*This post contains affiliate links. I receive small commissions for purchases made through these links at no extra cost to you. These commissions help me keep this site up and running, in order for me to keep providing helpful and inspiring art content. :)
Confused about the differences between watercolors and watercolor pencils? Are you curious if the skills you have acquired with either of these mediums translates into the other? Or, perhaps, you already bought a set of either and don't know how to use them for optimum results? This blog post will help clear up most of the doubts that revolve around these two water-soluble artistic mediums. I will be comparing the two in terms of preparation of supplies, painting process, and will finish up with a side-by-side comparison of the finished art studies. While I find it totally awesome that there are constantly new kinds of art supplies being produced and that an artist's options continue to grow, such a diversity in products may be overwhelming at times. All of these options can cause confusion, not to mention spending money on products that we may not end up using, which is always a bummer. I'm a huge proponent for encouraging artists to try every type of medium they can. Experiencing supplies first-handedly is definitely the best way an artist can come to conclusions about personal likes, dislikes and overall needs. Artists have to discover not only what artistic mediums suit their styles best, but also their preference in brands (what may be good for one of us may be terrible for the other). However, art supplies can be very expensive and I certainly don't recommend investing in a new medium out of whim (unless you have the money to do so). We don't want to waste our money on materials that we may not enjoy using, which can happen even if the medium at hand is often compared to another which we have experienced and liked. 
So, in order to save you some of the hassle, I will share my process as I create a simple painting using both watercolor pencils and watercolor paints. Then, I will compare the final outcomes and explain my conclusions. This way, you can decide for yourself if either of these is worth looking into. I'll also share some tips and tricks that may help you enjoy these mediums more and achieve more effective results. To find a list of my favorite art supplies so far, read my blog post titled My Favorite Art Supplies (So Far). To find a list of my favorite free online photo resources go to my post titled My Favorite Free Image Sites & Two Examples of References with Finished Illustrations.
Painting Process Using Both Art Mediums
If you enjoyed this video and found it helpful, make sure to subscribe to my YouTube channel. I share a brand new video every week with art tips, drawing and painting tutorials and mindset/productivity tips for artists. *Subscribe HERE*
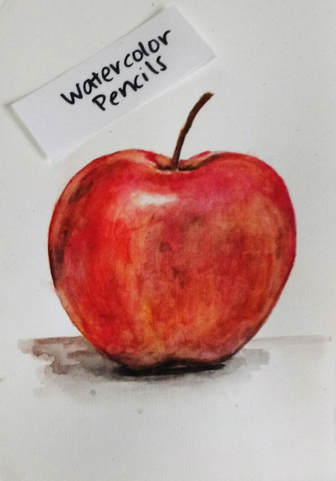
Check out this watercolor pencil rose painting video I shared over on YouTube, too! Watercolor Pencil StudySupplies -Pencil -Eraser -Watercolor paper -Brush (stiffer bristles) -Watercolor pencils -Sharpener -Water -Rag (for lifting)
Process a) Create your pencil sketch lightly and select the colors you'll be using (this will depend on the reference photo you're working with). Lay down your colors as needed, leaving the whitest areas free of color. Imagine you're using regular colored pencils and start creating color mixtures as you see fit, being careful not to "burnish" or press on your paper too hard. Start off with a good amount of color right off the bat. You really don't have to think about it too much because the color will be moved around. b) Once your initial layer of color has been added, use a paintbrush with a small amount of water to move the pigment around your paper. I like using a combination of straight/curved paintbrush strokes as well as scrubbing in small, circular motions. Try to pay attention to where the colors/values are in your reference picture so that you don't drag a color too far from where it should be. Look at your reference continuously. c) Allow initial paint layer to dry COMPLETELY and place more pigment on areas you'd like to make darker. However many layers of detail you decide to add is up to you, just make sure to allow them enough drying time in-between. Focus on creating needed values, as well as creating washes of color wherever needed. *When placing your deeper values, it's useful to wet your brush and take the pigment straight off the pencil tip! You can also use a watercolor pencil directly on your wet paper wherever you need a very dark value to be, but make sure that you are careful when doing this because you don't want to damage your paper. d) Finally, it's up to you if you'd like to use your watercolor pencils to create any final details, outlines or expressive line work that you feel could compliment your painting! 
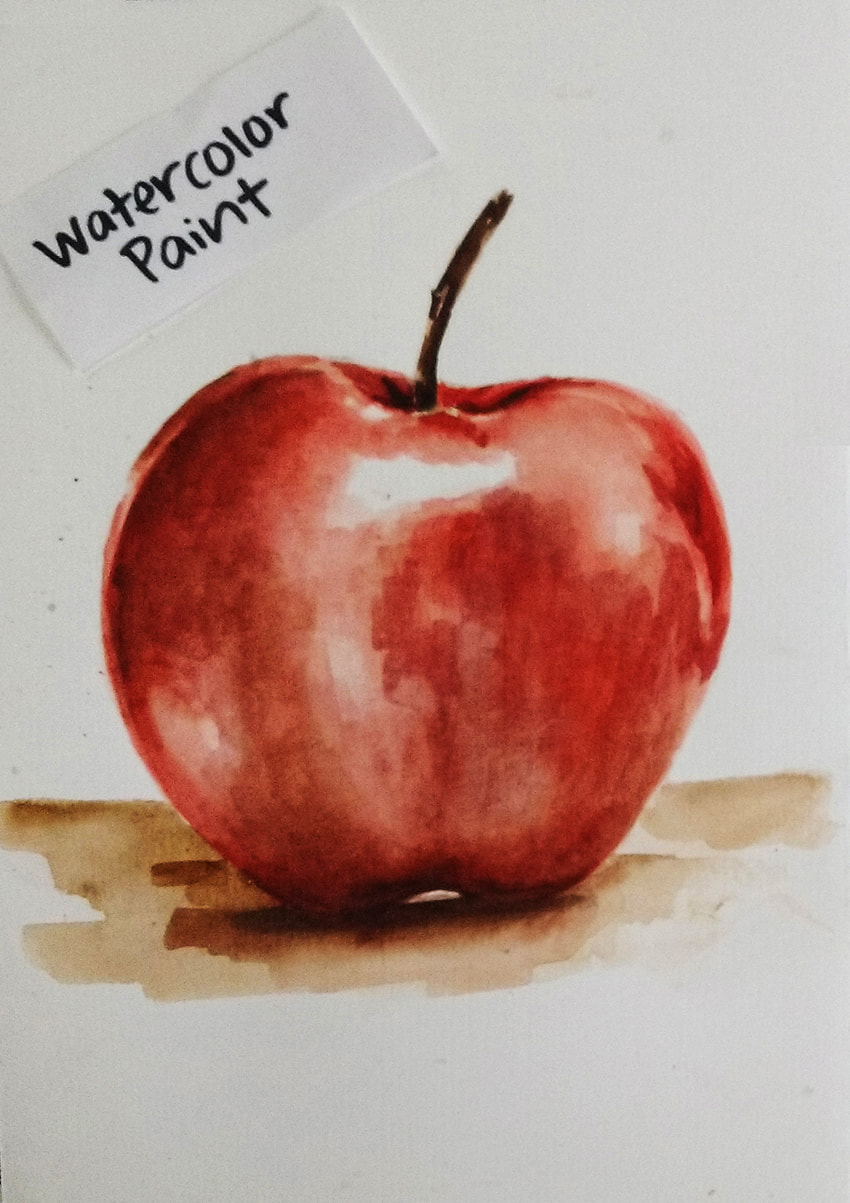
Watercolor Paint StudySupplies -Pencil -Eraser -Watercolor paper -Watercolor paints -Brushes -Paint mixing palette -Water -Rag (for lifting)
Process a) Create your pencil sketch lightly and prepare the colors you will be using (this will depend on the reference photo you have selected). Prepare your color palette by either taking some amount of pigment from your paint set and mixing it with water to create a few different values, or by creating color mixtures yourself. b) Start laying down your first layer of paint, making sure to leave the lightest areas free of color. Start with your lightest and most transparent layers of paint. c) Allow each layer to dry before moving on to the next. Remember, the point is not to cover your previous layer of paint, but to go on adding deeper values only where you can actually see them in your reference picture. The amount of layers you create is up to you (depending on how detailed you want your painting to be). Remember to look at your reference image continuously. Comparing Finished Studies
Differences The main difference between these two art mediums is that watercolor pencils are a drawing and a painting medium in one, when watercolor paint is only a painting medium. Furthermore, supplies needed are a bit different in that watercolor pencils require paintbrushes with stiffer bristles so that pigment can be effectively moved around the paper. No color mixing palette is needed with watercolor pencils, as the mixing happens right on the paper. However, we do need a sharpener. In terms of process, the main difference noted is that the beginning stages of a watercolor pencil piece don't require as much thought and care as a watercolor painting piece does. Though I really recommend pre-selecting and preparing colors before starting with either medium, a watercolor painting involves creating sets of values and mixtures on a palette. Also, when laying down initial colors in a watercolor pencil project, the artist doesn't have to worry about being so precise because the color is going to move around a lot. By comparing my finished studies side-by-side, we can conclude that watercolor pencils allow for a more controlled and tighter outcome when compared to the watercolor painting piece. Most of the time, some amount of line work will remain visible at the end when using watercolor pencils (I did my best to soften most line work in mine because I wanted to go for a painted look). The watercolor painting has more of a luminosity to it, which may be related to the fact that I have more experience with this medium than with watercolor pencils. Also, brush strokes are a lot more visible, which create a more painterly effect. Watercolor pencils are generally less messy and offer a solution for artists who want to create watercolor effects without the hassle of clean up. They can also be more portable,and don't require setting up a painting station when creating artwork in plein air. 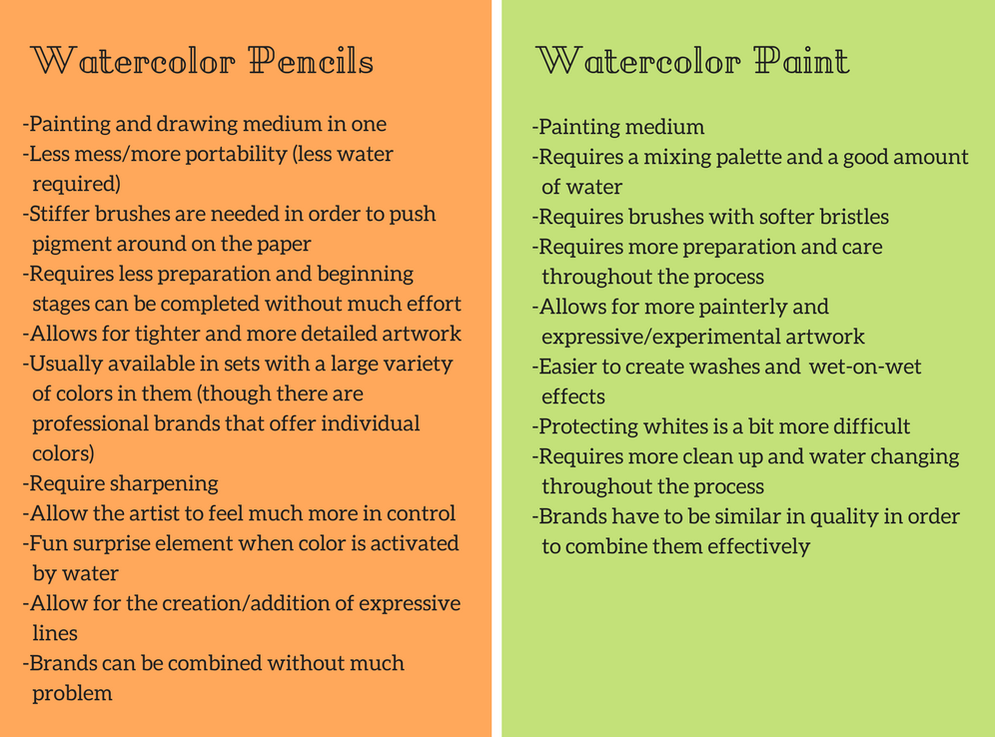
Differences between watercolor pencils and watercolor paint.
Similarities
Because these mediums are water-soluble, both require watercolor paper for optimum results, as well as drying time in-between layers. It is also necessary for the artist to plan and protect the lightest areas before starting, in order to achieve effective luminosity and form.
However, generally speaking, watercolor pencils require less water throughout the painting process which gives the artist more control and makes it somewhat easier to protect the whites. Both mediums have their learning curves in regards to water control, but once the artist has enough practice with them, realism and more expressive "loose" effects can be achieved with both. Also, both mediums dry lighter than they look when they are wet, but color payoff will vary greatly depending on the quality of supplies used. Both allow lifting to a certain extent, which can be used to correct some mistakes. Finally, both mediums require a certain amount of research in order to find quality products at affordable prices. Using lower quality products can lead to frustration and disappointment. 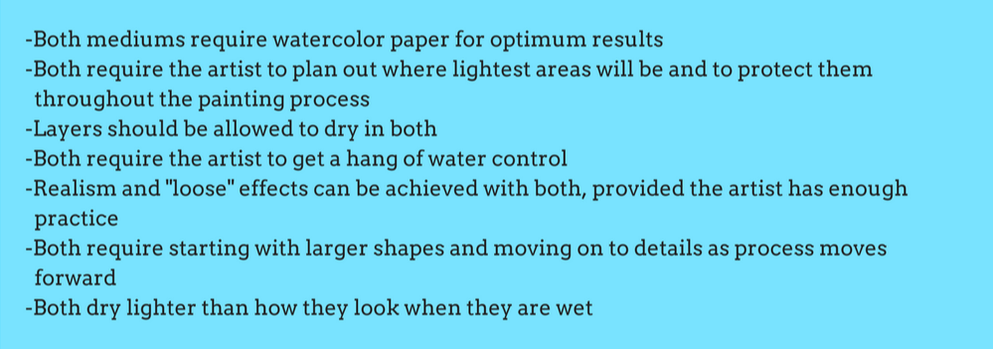
Similarities between watercolor pencils and watercolor paints.
Final ThoughtsThough watercolors and watercolor pencils are often compared due to their water-soluble properties, they are different in terms of how they are used and may lead to artworks with very different characteristics. Depending on the artist's individual style and preferences, he/she may find one medium much more enjoyable than the other. I personally wouldn't recommend watercolor pencils to artists that are specifically interested in painting techniques. However, watercolor pencils present a versatility that may be very appealing to artists that enjoy sketching/drawing and line work, as well as those looking to combine different techniques into one same project.
15 Comments
Are you constantly using photographs you find online as references for your artwork? Do you feel you lack the ability and/or resources to produce quality photographs to use when drawing or painting? More importantly, are you aware that not scheduling in time to produce your own reference images could actually be hindering your artistic progress? It is vital for an artist to work on forming an original collection of reference images to have at hand for both studies, as well as more finalized pieces. By taking time to produce our own original photographs we not only ensure that our artwork is truly unique, but we also start pinpointing subjects, colors, and general moods we are drawn to. This will all help us move toward finding our artistic voice and style. In last week's blog post (click here to read) I mentioned the specific situations in which using other people's photographs as references is acceptable. I also explain ways in which an artist can make sure he/she is progressing when using photos found online and ensuring that the finished piece is as true to the artist as possible. However, most of the time, we should be striving to work from our own photographic references. Today, I will give you ideas and the essential information you need in order to produce effective original photographs quickly and easily. It can actually be quite fun to do! This post includes a YouTube video in which you can see me create a still life arrangement in my studio and I also share a time-lapse of a watercolor painting created with the selected picture as reference. So make sure to check that out. This blog post is the second in a four-part series about the use of different types of references when creating artwork: 1. Using Other People's Photographs to Create Art (when it's okay to use other people's photos and how to do it in a way that will ensure your artistic progress) 2. Creating Artwork Based on Your Own Photography (click here to learn fast and easy ways to produce your own reference pictures) 3. Why Drawing from Direct Observation is Essential and 10 Tips to Improve (click here to learn why this drawing/painting method is so important in order to progress artistically) 4. Using Collage as an Effective Method to Create Unique and Expressive Art (click here to find out why collage is so powerful and how you can use it to your advantage) Why Making Time for Your Own Photos is Important (and Not That Hard to Do) Making time to take your own photos may sound tedious, especially when you want to get to the drawing/painting phase! However, it's important to remember that there is always at least a certain amount of planning and exploration behind an effective artwork. By producing your own reference photos, you have complete control of your artwork and are not limiting yourself to an image that already exists. Not to mention, most often than not, we end up loosing a lot of time looking for an image that inspires us to draw or paint, just to arrive at a photo that doesn't satisfy us completely. Producing your own reference photos will ensure that your artwork is 100% unique and personal to you. Creating your own library of reference images doesn't have to be complicated, time-consuming and you certainly don't need any fancy equipment. You just have to be creative with what you have and remember to take advantage of situations that you may be in on a day-to-day basis. Most cell phones these days have great cameras and you just have to remind yourself to take photos when you're out and about of subjects that call your attention. So no excuses!
If you enjoyed this video and found it helpful, make sure to subscribe to my YouTube channel. I share a brand new video every week with art tips, drawing and painting tutorials and mindset/productivity tips for artists. *Subscribe HERE*
Tips to Produce Photos to Use as Art References 1. Planning There is always some amount of planning and preparation behind an effective artwork. Aside from deciding on a subject, you should think about what you want your final piece to transmit. Have this idea/emotion in mind when selecting a color scheme and creating the general mood of your photograph so that it can later be translated into a drawing or painting. Do you like to draw/paint portraits? Animals? Landscapes? Indoor scenery? Still lifes? The way you prepare for your photoshoots will obviously vary depending on your subject of preference, but I will give you a few ideas that will help you produce photos quickly and easily. 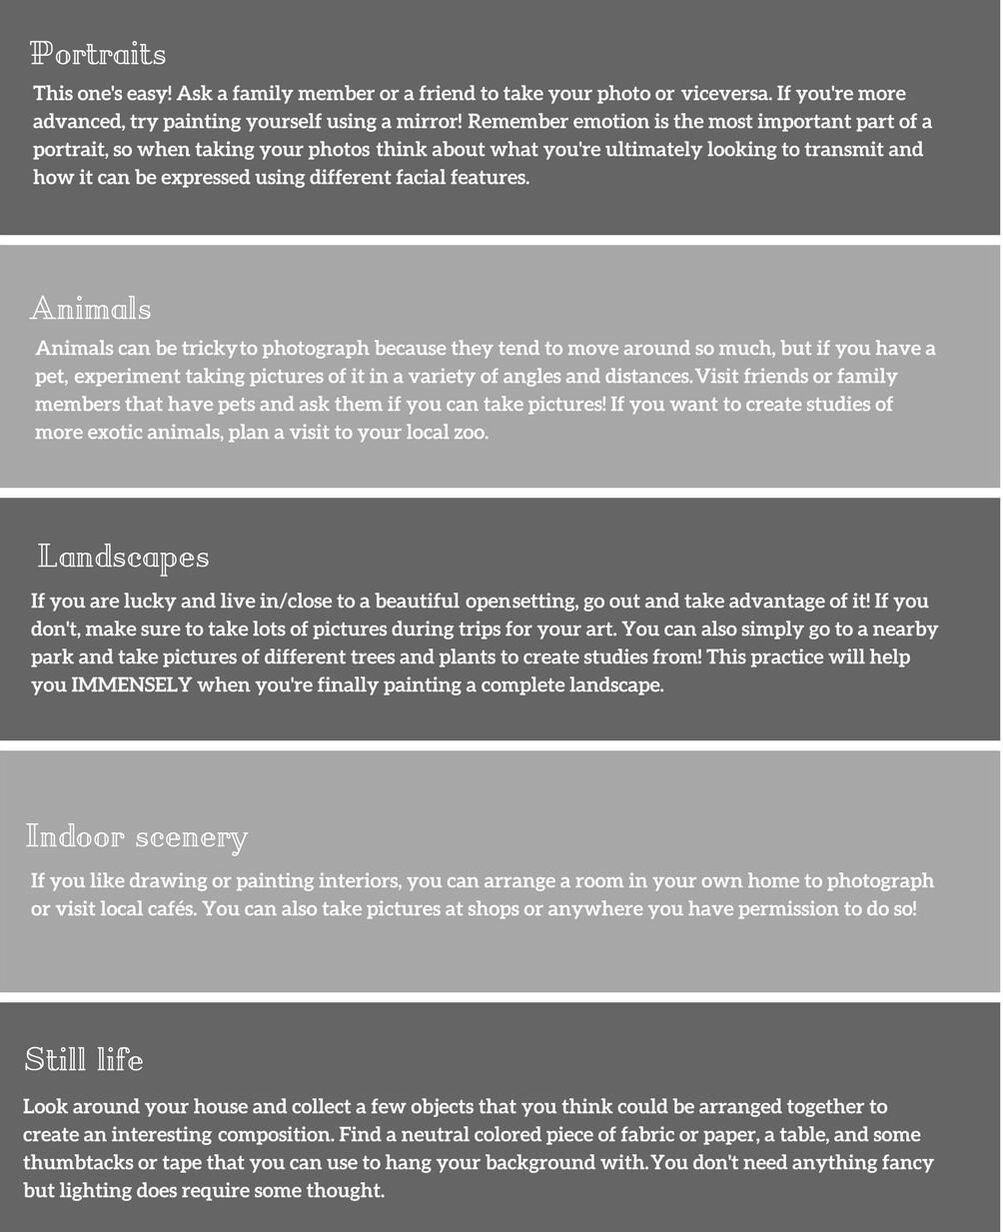
Tips to produce art reference photos quickly and easily.
2. Producing There are a few key things that you have to keep in mind when producing photos that you are intending to use as references when drawing or painting. There is nothing worse than thinking you have a great photo just to find out that it's not going to work when opening the file in your computer or printing it out. A good reference photo should facilitate your drawing/painting process, not make it more difficult. 
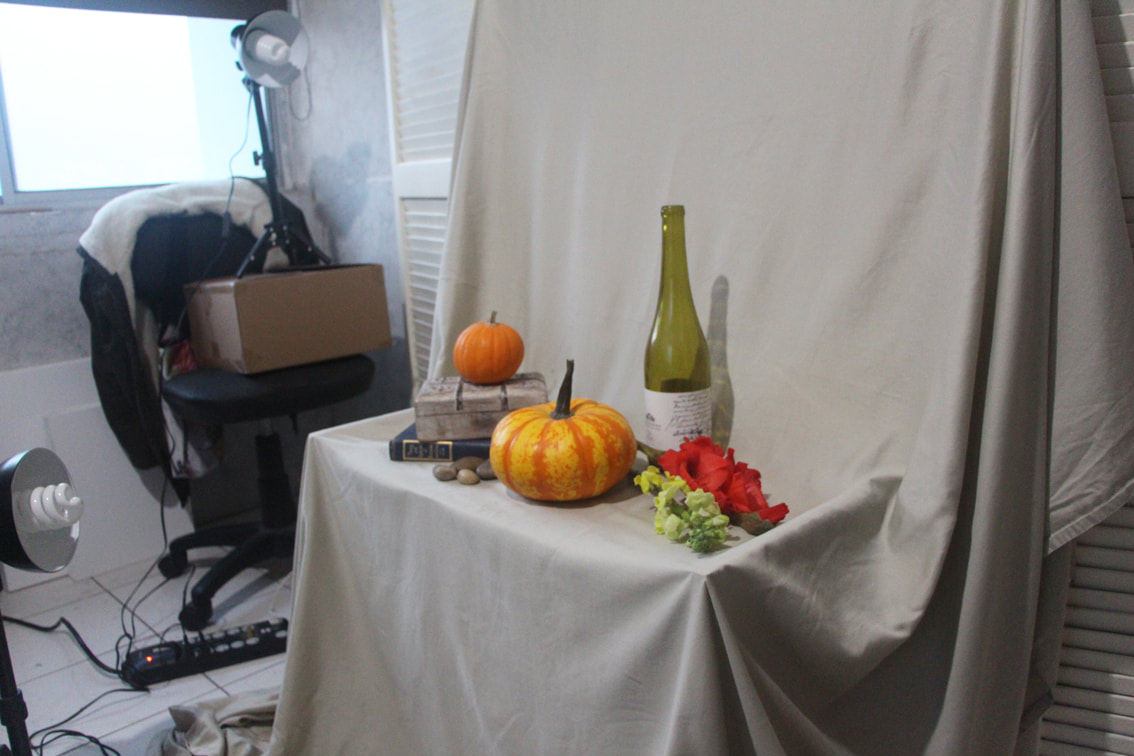
Setting up for still life photoshoot in my studio.
Resolution/Image Quality Make sure that you are taking high resolution pictures from the get-go. Blurry, grainy or pixelated pictures simply will not work. If you're using your cel phone, make sure the resolution is set at the highest possible and that you are focusing appropriately when taking your pictures. Lighting A good photograph should have a good play between lights and darks/shadows. Decide what your light source is going to be (natural or artificial) and whether it is going to be to the left or to the right of your subject(s). Use only one light source. You can experiment with different heights and angles, but avoid placing the light source directly in front of your subject(s). Also avoid using flash because it flattens out and washes out subjects. When using natural light, experiment with taking photos during different times of the day and see how shadows change. Composition Chances are you have already started developing a good eye for what makes a composition interesting and visually pleasing. If you feel you still need practice in this area, I recommend studying paintings created by your favorite artists and pinpointing how Elements and Principles of Art were used throughout the piece. Make no mistake, experienced artists know what they are doing when using Elements and Principles of Art and this is what makes their art so effective. Learn from them and take notes so you can apply these things in your own art. When taking a picture that you will be basing a composition off of, consider the separate objects as part of a whole. The famous Rule of Thirds is something that you should research if you don't know about it already. You can read about it in an old blog post of mine. Essentially, you should think about creating balance, harmony and interest within a piece. Ideally, there should be only one focal point in an image and you should consider how you will draw the viewer's eye to that specific place (you can use color, size, etc.). The rest of the subjects within the picture should be secondary, but should still work to lead the viewer's eyes towards different parts of the picture. Play around with angles, distances and arrangements throughout your photoshoots until you come up with a composition that you like. Lastly, don't rush! Try to enjoy this part of the process. Take a lot of photos and make sure that you keep them organized in the best way you see fit. Once I have selected the photograph I will be working from, I like opening it in Photoshop and adding a bit of contrast to it. At this point I also do any cropping or cleaning if the photograph requires it, but I keep it to a minimum because I can also change things throughout the painting process. 
3. Using Your Photograph as Reference for a Drawing or Painting 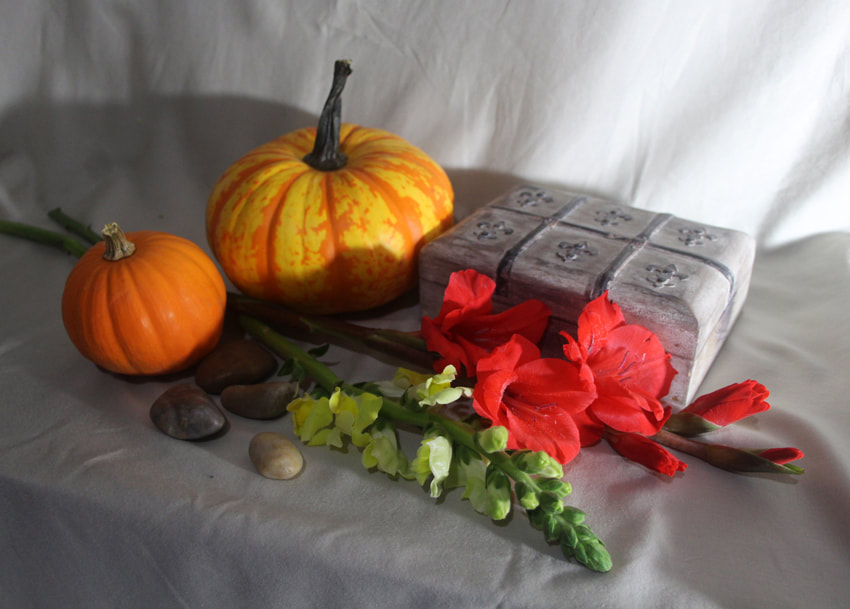
Selected still life photo to work from.
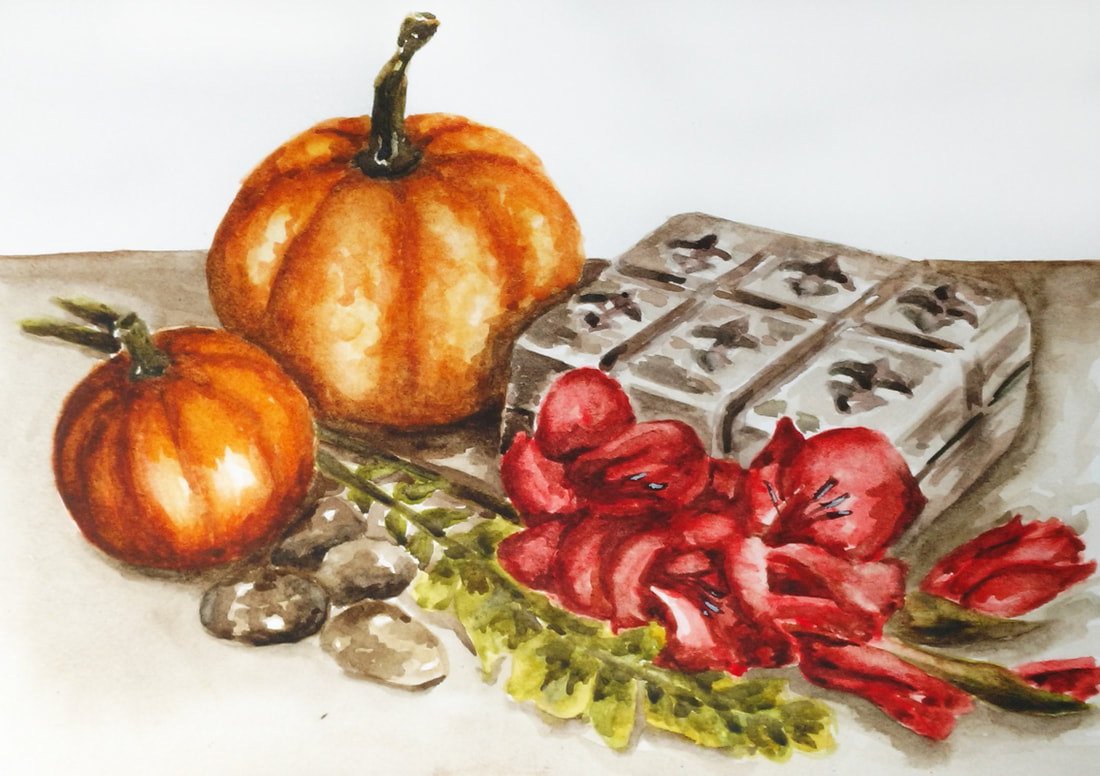
Finished still life watercolor painting.
A lot of artists like to print their photographs and place them beside the substrate they will be working on prior to starting an artwork. I personally rarely do this because I find it time consuming and expensive to go and have my prints made every time I want to create a painting. I like displaying the image for myself on my computer screen as large as possible and zoom in/out/around as needed. I do make sure to create my initial pencil sketch using my easel (either desk or standing), so that my laptop screen and my paper are in as similar angles as possible (this will ensure that perspective isn't distorted). If I am standing and working on canvas, I arrange my laptop at a height that is comfortable for me to work from. Finally, always remember that you have artistic license to modify things. How often do you use other people's photographs as art references? How often do you take your own? I'd LOVE to hear from you! Let's discuss in the comments section below. Hello, friends! Here is a gift from me to you. :) These are already prepared for you in excellent resolution and letter-sized so you can print at home (or anywhere you'd like)! Simply grab the PDF at the end of this post. Every Christmas I create gift tags for the presents I will be giving out to my loved ones and this time I decided to create little watercolor paintings. I hope they are useful for you as well. Thanks for visiting and enjoy your holidays! 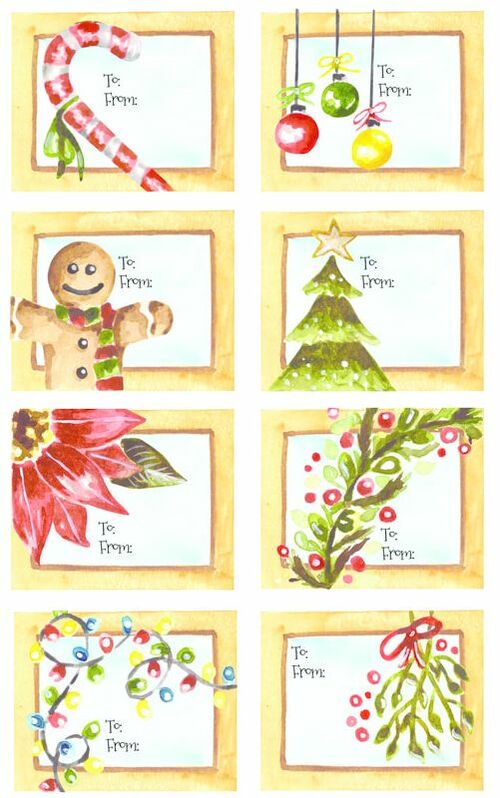
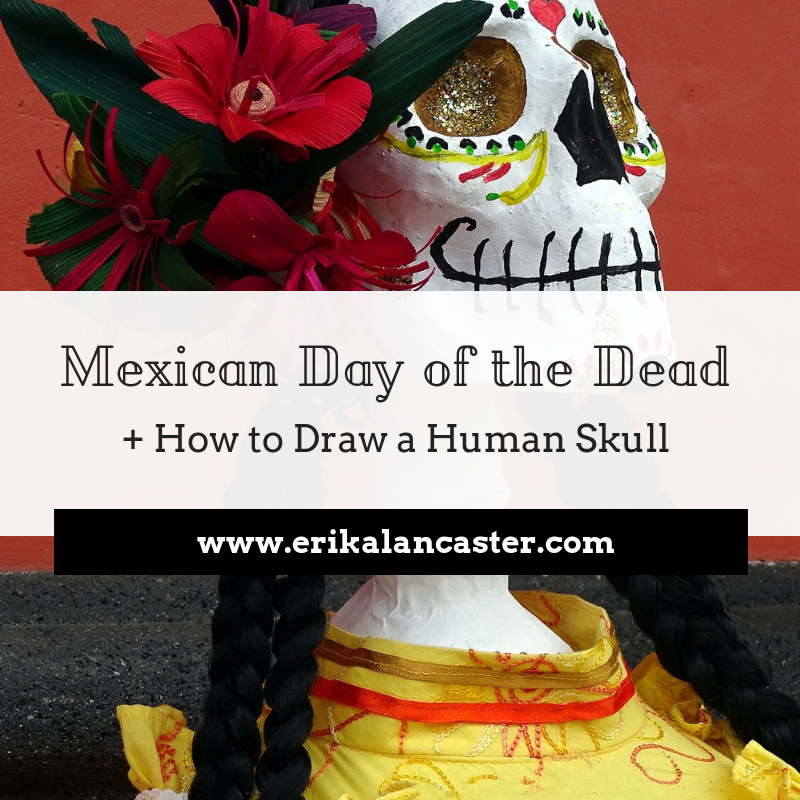
In what ways do you think your society's traditions and beliefs have impacted your work as an artist? How different do you think your artwork would be if you had grown up in a different place in the world? Is there any celebration or tradition that you find particularly inspiring? As human beings, we will always carry with us a certain degree of influence from the countries we have lived in and the people we have lived with, especially during our formative years. I consider myself extremely lucky to have lived most of my life in a country that, not only has produced amazing artists of all kinds, but has a rich and unique culture full of color, symbolism and joy. Mexican Día de los Muertos or Day of the Dead has always been one of my favorite yearly celebrations and, this year, I decided to use it as inspiration for a few watercolor illustrations. In this post, I will explain a bit about this wonderful celebration and the story behind the well-known Catrina character. Also, I will show you step by step how I go about drawing a human skull and why it is so important to have, at least, a general understanding of the underlying bone structure when drawing a face. I've included a free downloadable PDF at the end for you to print if you wish to practice with it! : ) A Day to Honor the Dead and Celebrate Life The Day of the Dead is celebrated each year on the second of November, coinciding with Christianity's All Soul's Day. This important celebration is a mixture of both indigenous rituals and Christian beliefs. Way before the Spanish conquistadores arrived in Mexico, the native indigenous people living in the area already had ceremonies that revolved around death and the natural cycle of living things. Since prehistoric times, the Aztecs and other indigenous groups used human skulls in rituals to symbolize death and rebirth. When the Spanish arrived during the XV century, they were horrified by the pagan rituals they witnessed and later on sought to spread Catholicism amongst these people. Eventually, customs of the Spanish started mixing together with those of the different indigenous groups. On and around the second of November each year, Mexicans remember their deceased family members in a variety of ways. Graves are visited and decorated with flowers. Elaborate altares (shrines) are created in homes to invite the souls of the dead back into the world of the living. Also, beautiful parades are organized in which entire communities are invited to celebrate together. On this day, death, which is usually something that is feared and associated with negative emotions, turns into something joyful. Mexicans pay homage to death with both respect and humor, celebrating both the past and the present simultaneously. Even though the whole idea of inviting the dead to visit us, and celebrating death in general may seem like a pretty morbid idea, the point of this day is to understand that death is an eventual part of life and to use this as a reason to enjoy ourselves while we are still here. El Día de Muertos reminds us to not only be more appreciative of life moments but to take advantage of the time we have. The Day of the Dead and Halloween are often compared, but there is a fundamental difference between the two celebrations. Halloween or All Hallows’ Eve was a festival created to mark the end of harvest season and the beginning of the “dark half" of the year. It was thought that, on this day, the walls between our world and the spirit world became thin enough to allow ghosts to pass through and damage crops. Halloween focuses more on our fear of mortality and the spookiness of the unknown. On the other hand, the Day of the Dead is more about remembering loved ones who have passed away, celebrating their memories instead of mourning their loss. Instead of treating death as something dark and frightening, it is about seeing the positive aspects of the living cycle and laughing in the face of death. 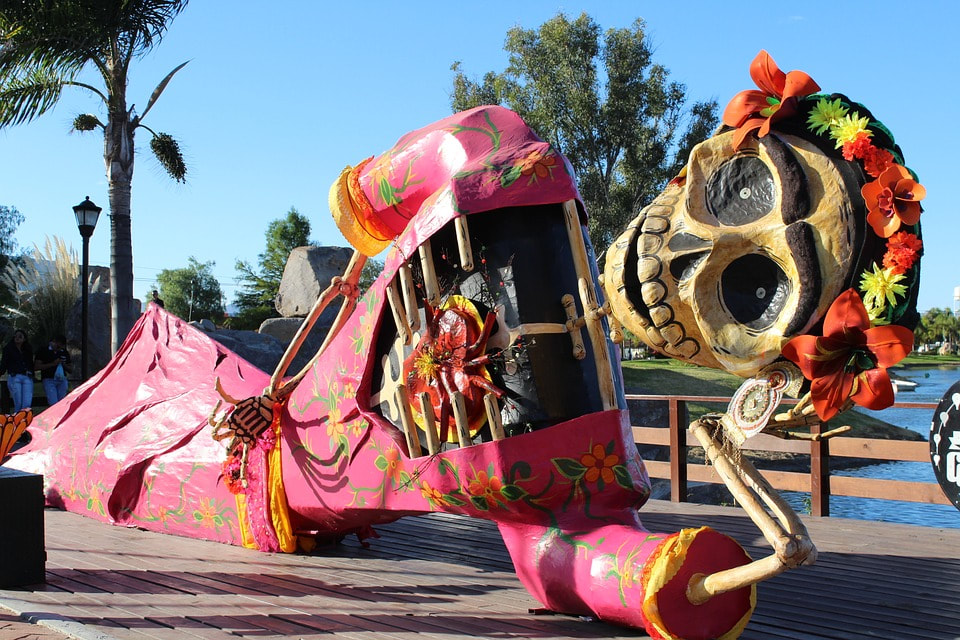
To go to original Pixabay source click on the picture.
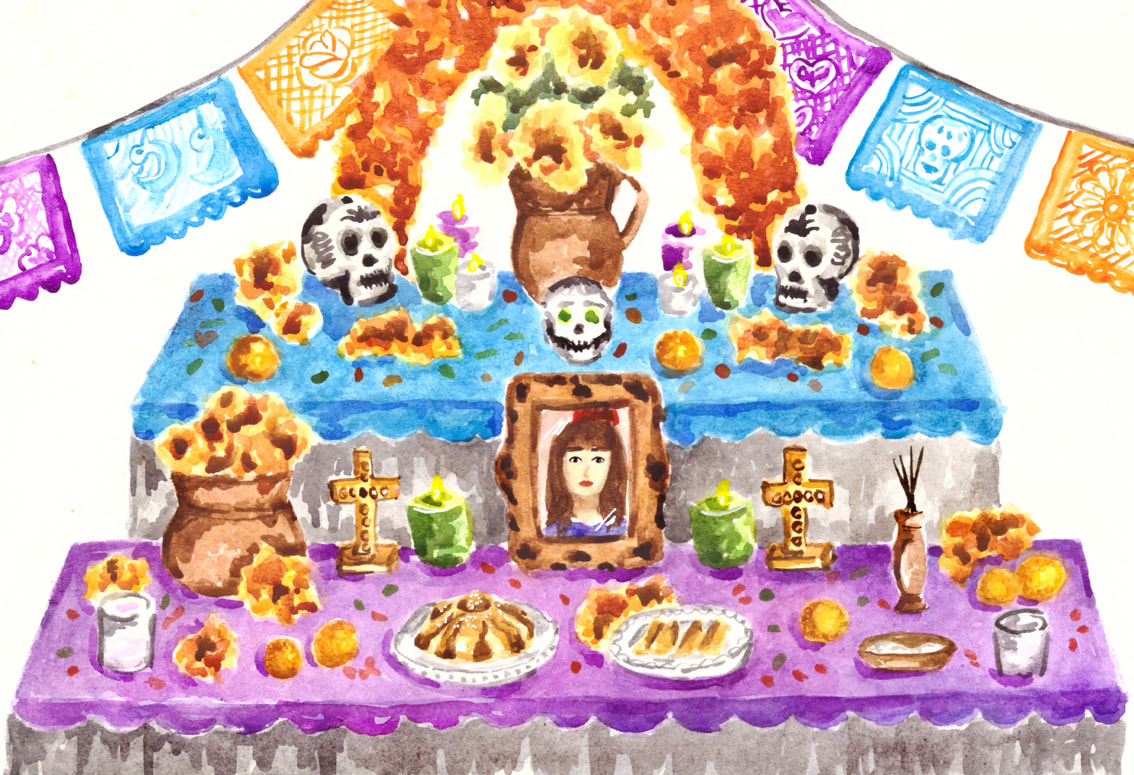
Watercolor Altar de Muertos illustration. Sakura Koi watercolors on Canson watercolor paper. Erika Lancaster.
Shrine for the Dead and Symbolism of Objects When a family sets up an Altar de Muerto for a deceased loved one, there are certain things that have to be taken into account. Each object included symbolizes a particular element and the location of the objects within the shrine also has a meaning. Usually, an altar is made up of objects that call to the senses (sight, smell, taste, touch, and hearing). Because the objective of an altar de muerto is to lure the deceased back home, it usually includes objects specific to that person, so that he/she feels the desire to make the long and hard travel back from the underworld. Here is a general list of the things that are usually included in an Altar de Muerto: 1. Levels (steps): Altars usually are made up of two to seven levels. The lowest levels represent the underworld and the Earth, while the higher levels represent celestial dimensions. 2. Arch: An arch symbolizes the entry to the underworld and is adorned with flowers and fruits. 3. Symbols for natural elements: Papel picado, which consists of cutting intricate designs out of delicate and colorful paper, represents wind. A glass of water is placed to represent this element and also to calm the spirit's thirst after the long travel back home. Candles are placed throughout to represent fire and to help light the way back home. Finally, seeds and fruit are included to represent earth. 4. Variety of aromas: Prehispanic cultures used to burn a type of incense created from the resin of Copal trees in their rituals. The smoke and aroma produced from burning Copal was thought to purify environments and keep away evil spirits. People now-a-days use either Copal or other kinds of incense in their shrines. Other aromas are produced by herbal infusions and flowers like the Cempasúchil (Marigold). The Cempasúchil is a bright yellow flower commonly used to help guide the spirits back home through both sight and smell. 5. Food: It is common practice for the family of the deceased to prepare his/her favorite dishes to place on the altar. Typically, it is a Mexican dish like mole or tamales. Candies are also placed throughout the altar, which can vary from sugar skulls, chocolate and/or amaranth. Pan de Muerto , which is a special seasonal bread, is also included. This bread is made differently depending on what area of Mexico you are in, but the shapes created within it usually represent skulls and bones. 6. Salt: Salt is thought to purify the body and to strengthen the spirit when traveling to and from the underworld. 7. Personal belongings: Photographs and personal belongings of the deceased are usually placed somewhere within the central levels of the altar. Usually, family members choose to include specific favorite objects that will lure the deceased back home. 8. Religious symbols: Crosses and/or other religious symbols are usually placed on the higher levels of the shrine. It is common practice to include saint figures, virgins, and angels. 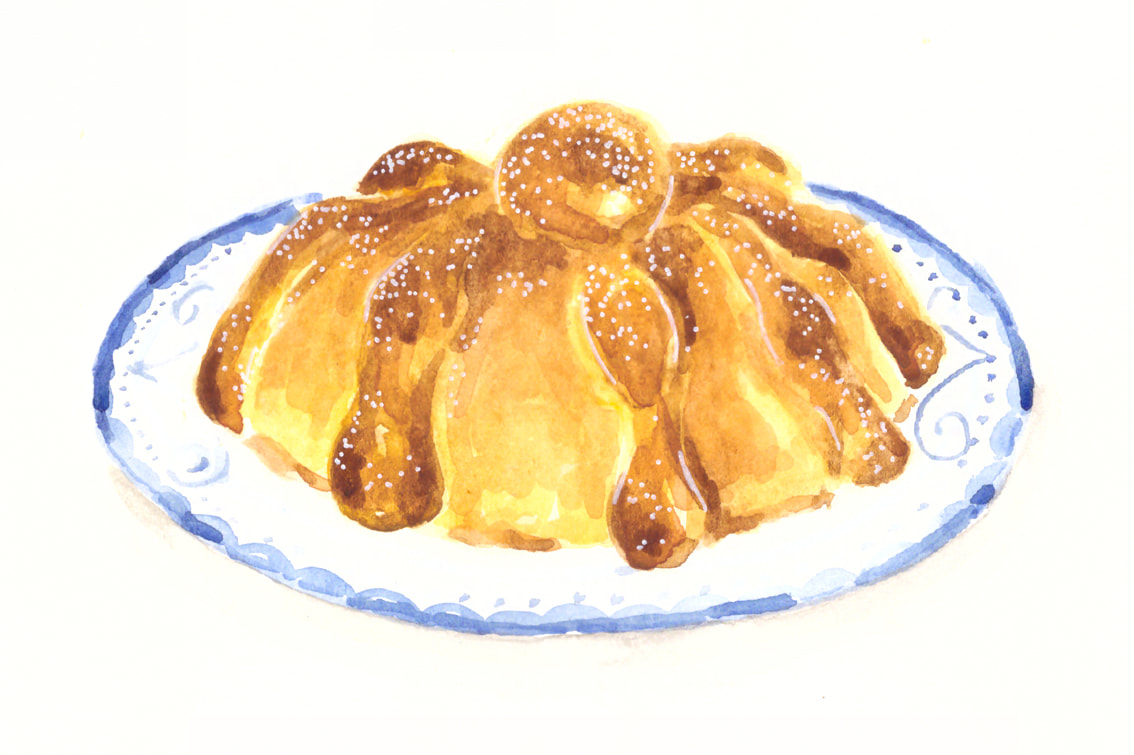
Watercolor Pan de Muerto illustration. Sakura Koi watercolors on Canson watercolor paper. Erika Lancaster.
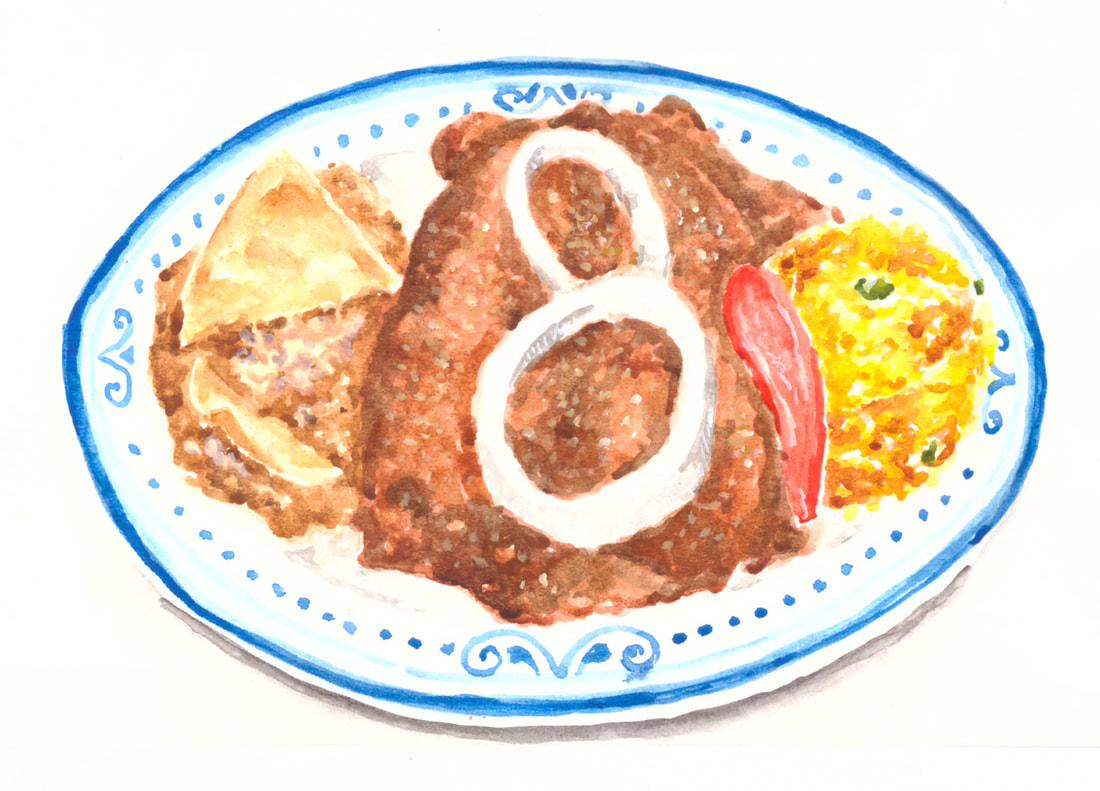
Watercolor Mole (Mexican food) illustration. Sakura Koi watercolors on Canson watercolor paper. Erika Lancaster.
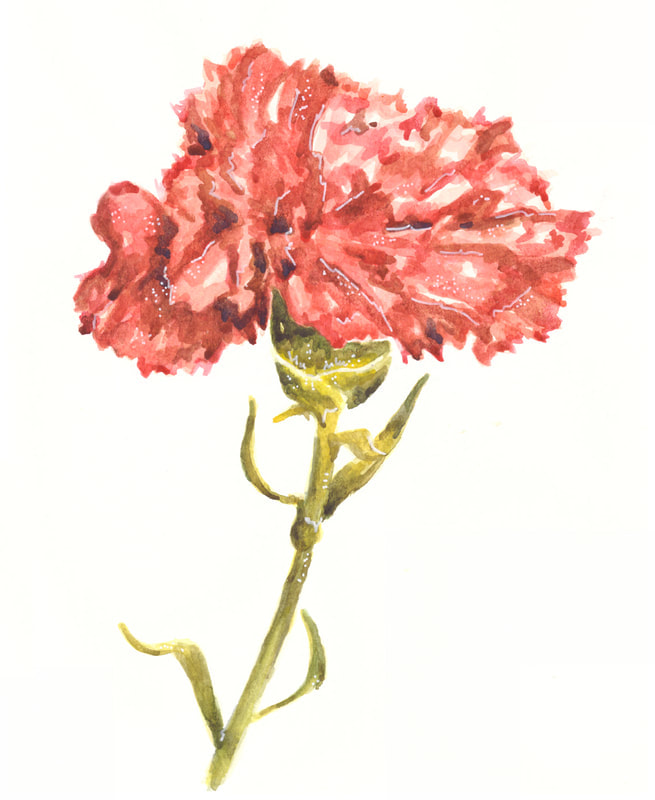
Watercolor Clavel/Carnation flower illustration. Sakura Koi watercolors on Canson watercolor paper. Erika Lancaster.
Who is Catrina?
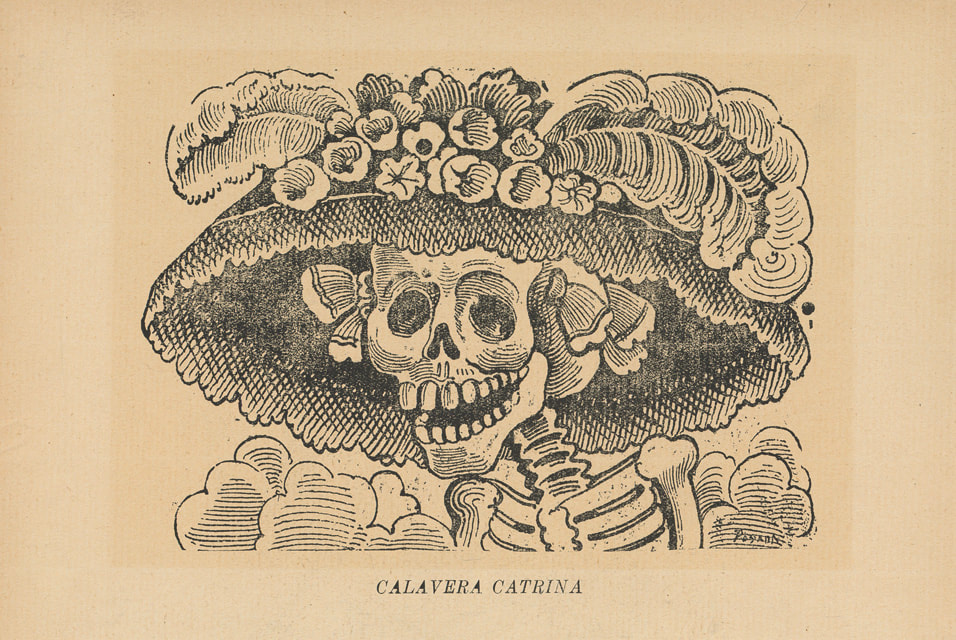
José Guadalupe Posada. La Calavera Catrina. Zinc etching. 1910-1913.
The original Catrina character was created by José Guadalupe Posada, a Mexican illustrator, printmaker and engraver, and was called “La Calavera Catrina" or “Elegant Skull". However, it was made popular later on by artist Diego Rivera in his mural Sueño de una Tarde Dominical en la Alameda Central (Dream of a Sunday Afternoon Along Central Alameda), completed in the historic center of Mexico City in 1947. 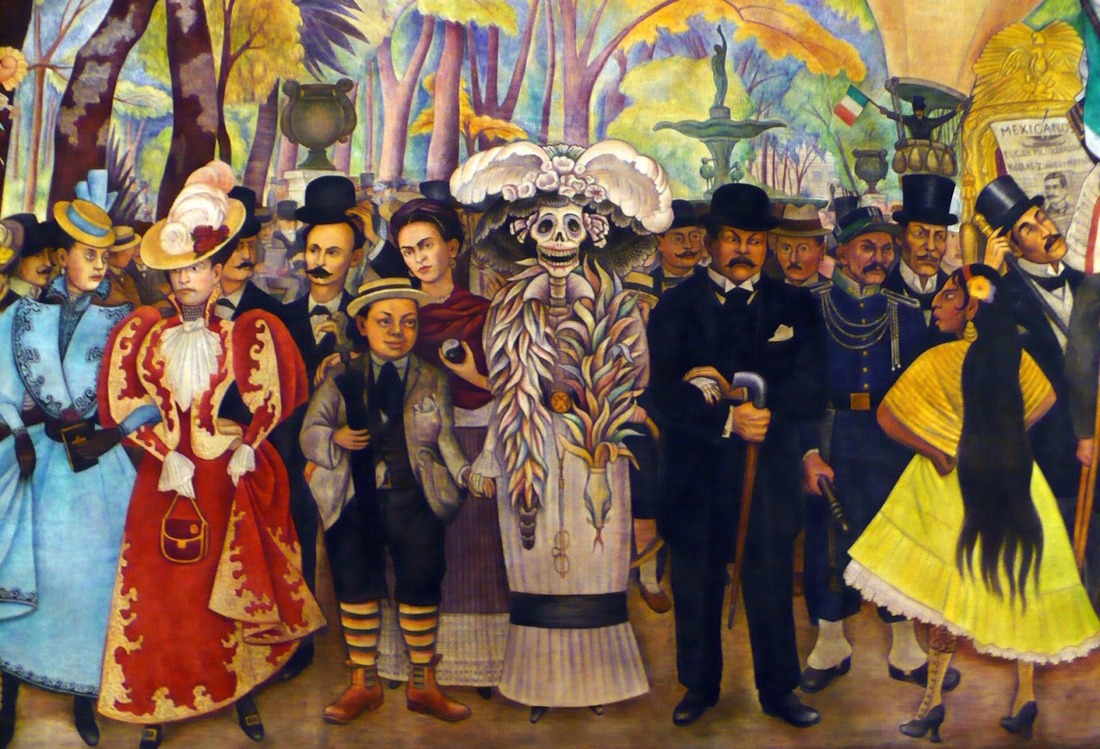
Diego Rivera. Sueño de una Tarde Dominical en la Alameda Central (Dream of a Sunday afternoon along Central Alameda). 1946-1947.
Even though Posada and Rivera created these artworks at different moments in history, they both used this character as a symbol to transmit social and political messages to the public during times of transition in the country. In Posada's time, it was common to see skeleton characters in newspaper illustrations humorously critizising both the actions of politicians as well as the hypocrisy found within Mexican people as the blood and social ranks of the Europeans and indigenous mixed. Posada stated once: “La muerte es democrática, ya que a fin de cuentas, güera, morena, rica o pobre, toda la gente acaba siendo calavera.” / "Death shows a sense of democracy because, at the end, blonde, dark-skinned, rich or poor, everyone ends up being a skull.” Over time, Catrina stopped being as political and became an important Mexican symbol representing death. Today, she is known all over the world and is widely used during Day of the Dead celebrations at parades. All sorts of artworks are created by Mexican artisans that specialize in this subject year-long. Many tie Catrina to the the Aztec's Goddess of Death Mictecacihuatl, who was considered the keeper of the bones in the underworld. This goddess was a vital part of the Aztec's month-long festivals honoring the dead. However, Catrina differs greatly from the serious Mictecacihuatl and the bloody rituals of the prehistoric peoples. This character is always smiling, dressed in colorful clothes and is unmistakably humorous. 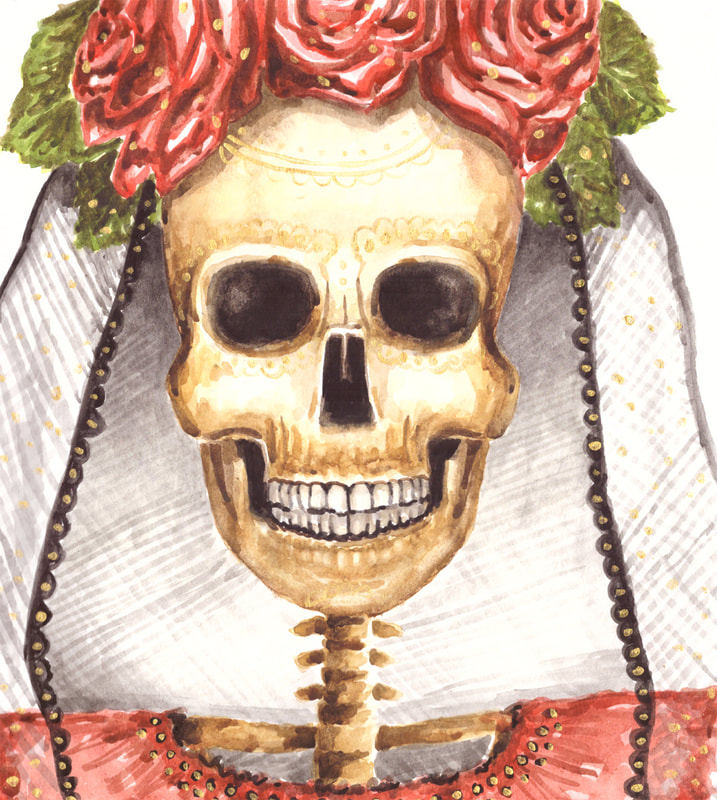
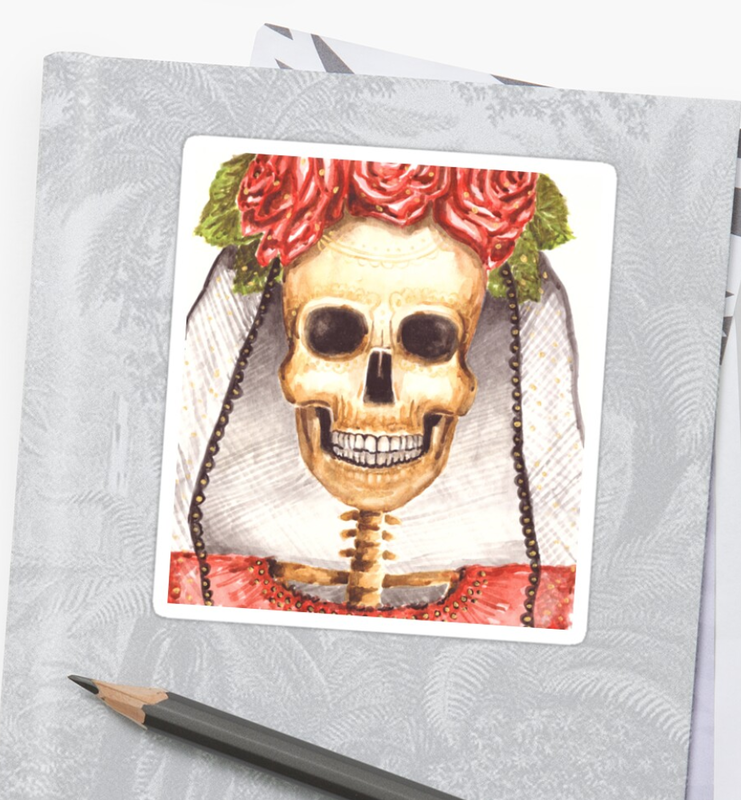
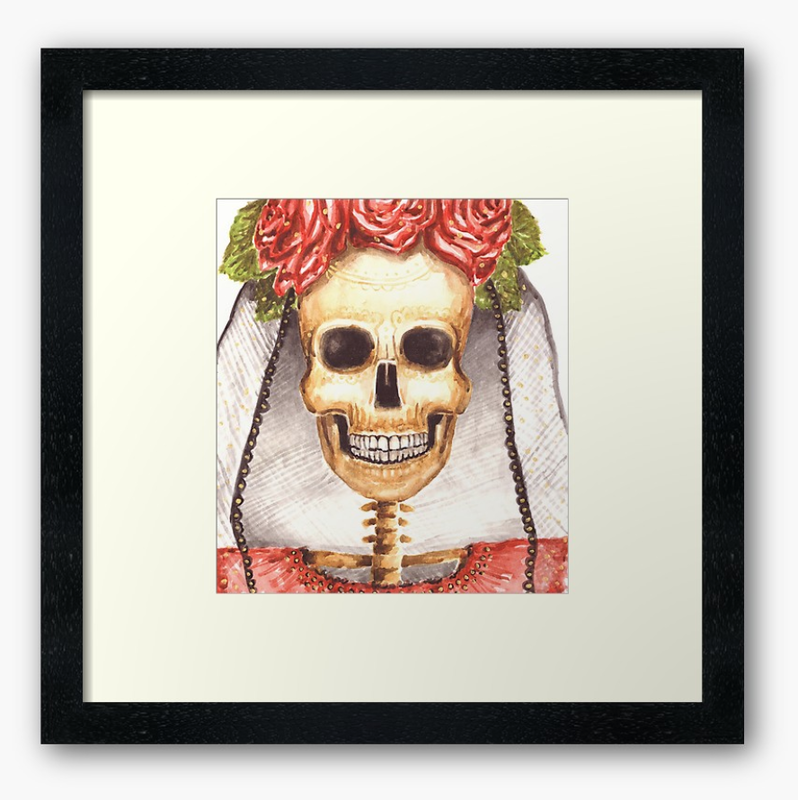
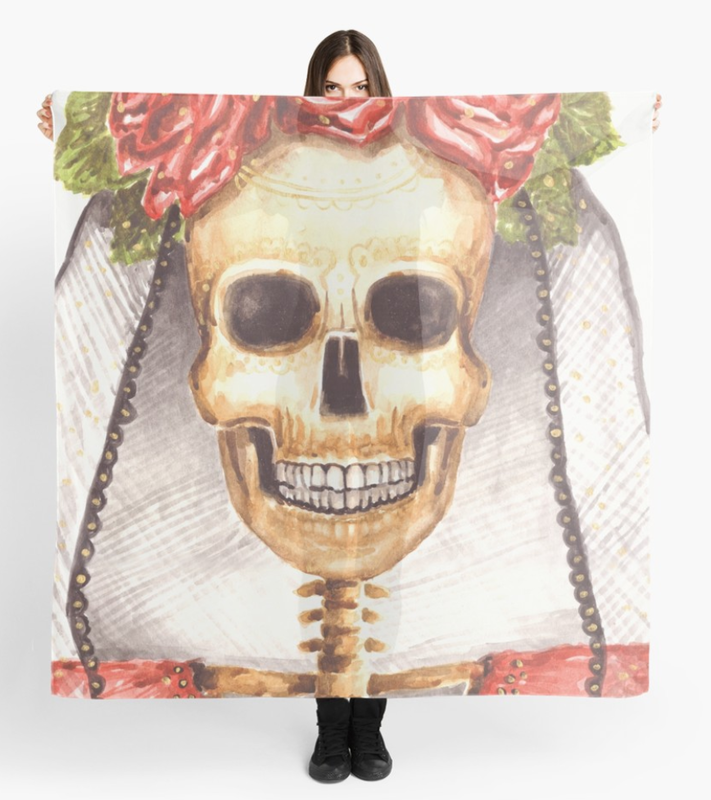
Watercolor Catrina illustration. Sakura Koi watercolors on Canson watercolor paper. Erika Lancaster.
Shop Catrina posters, framed prints, stickers and more at my Redbubble shop!
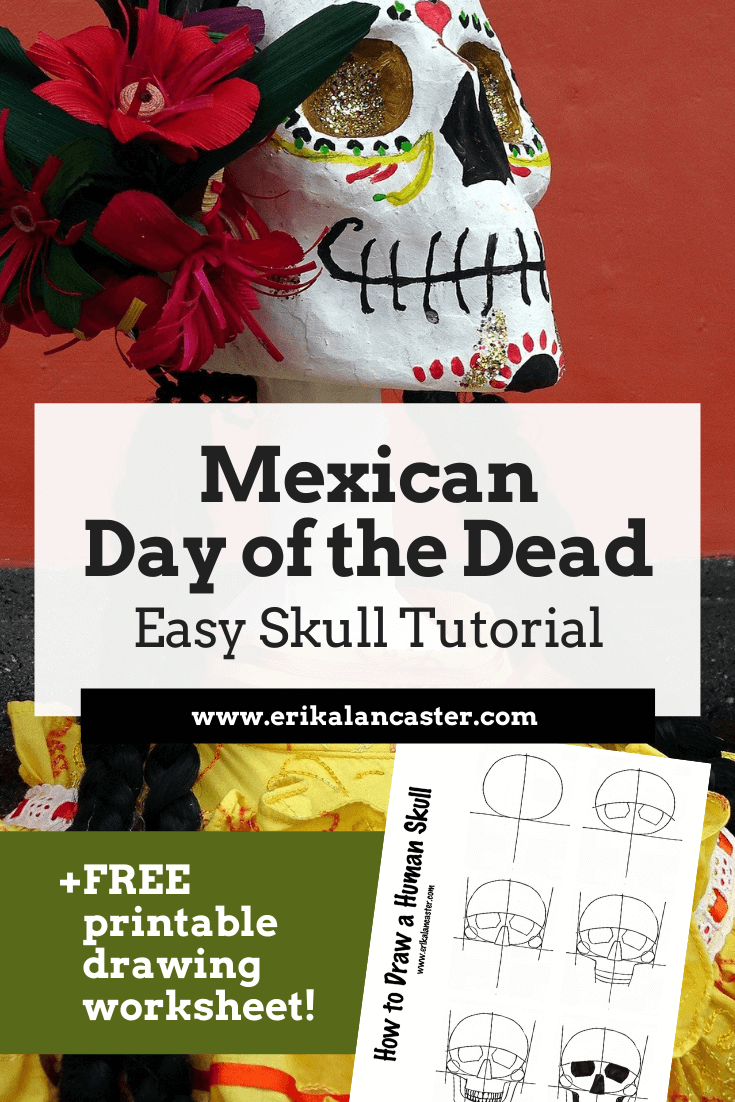
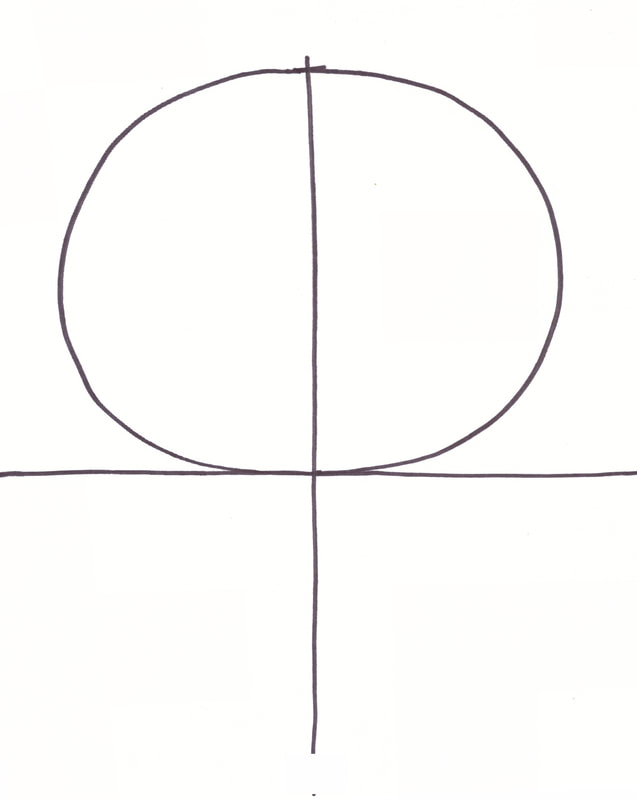
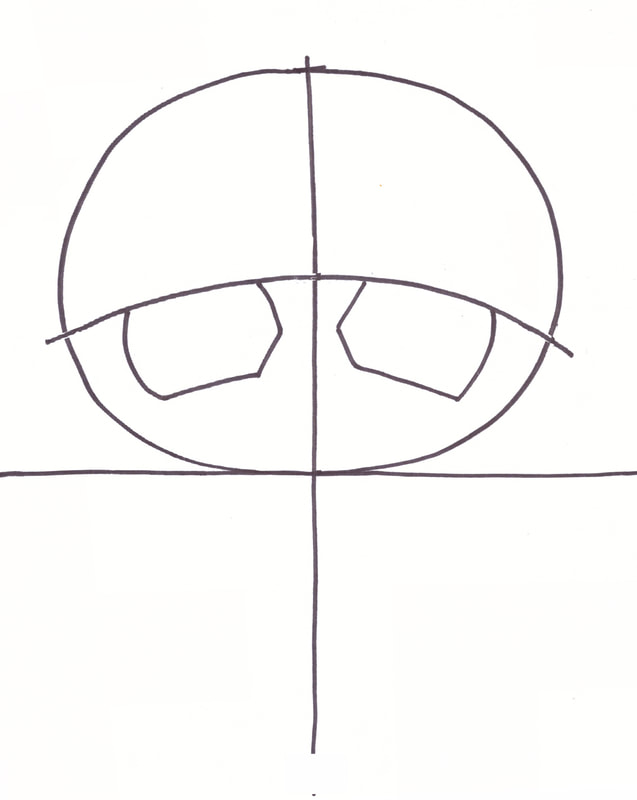
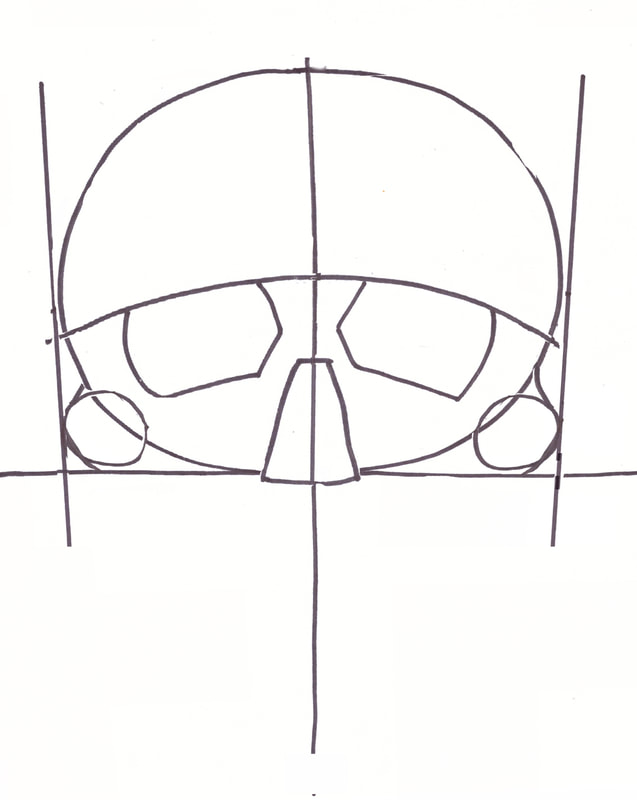
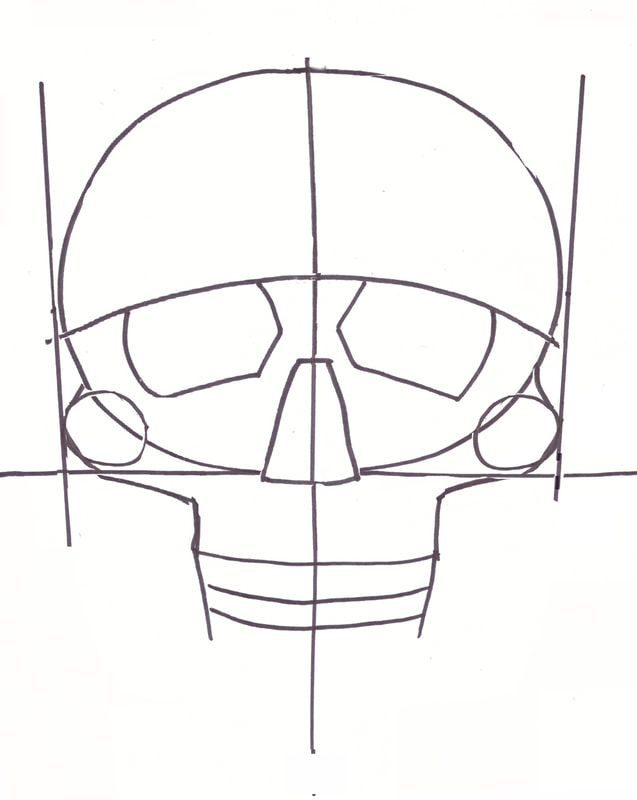
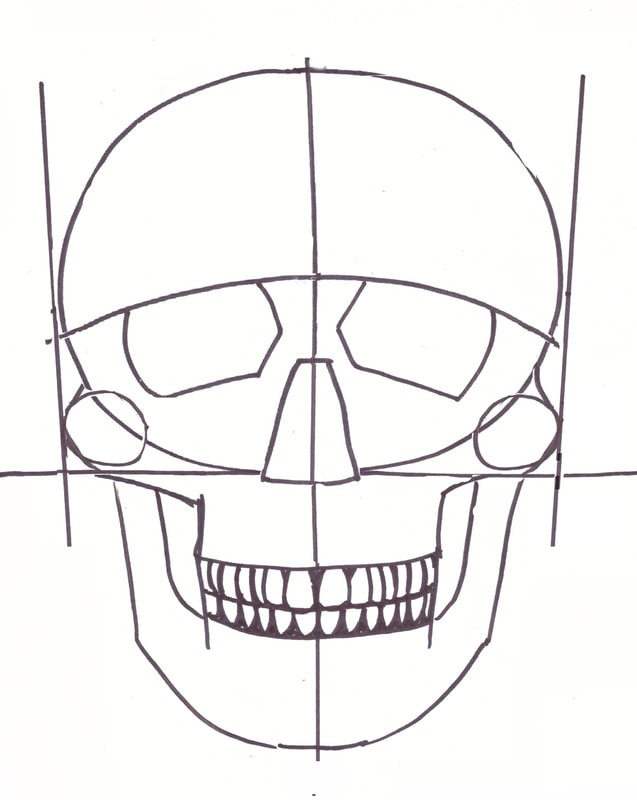
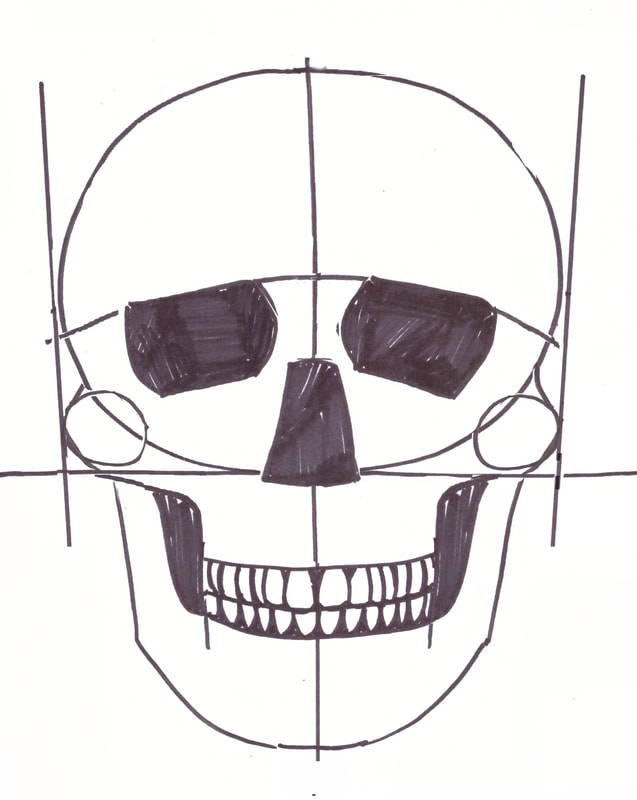
How to Draw a Human Skull
Practicing drawing the human skull is very useful for beginner artists that are starting to draw faces. By understanding the underlying bone structure of a face, we are able to better understand proportions and locations for facial elements within the head, as well as forms and planes that will give a drawing a sense of three-dimensionality. I really recommend finding a good picture of a skull and studying its form. This will help you discern where shadow and light naturally falls within the face and your drawings will be much more effective and realistic. Use the steps below to create an outline drawing of a skull. Once you have this down, step up the challenge by searching for a good picture of a real skull online and try placing shadows, lights and midtones in the areas you see fit. Remember I have the downloadable PDF at the bottom for you to print out and use!
Are there any particular celebrations or traditions in your culture that you feel you draw a lot of inspiration from for your art? How do you feel your culture impacts your artwork and what you want to transmit with it to others? Let's have a discussion in the comments section below! 
Are you obsessed with those cool sketches made by artists that go outside and are able to capture cityscapes or landscapes so realistically AND so fast? Would you like to try plein air drawing or painting but feel like you'll never be able to capture your surroundings realistically? Does the word perspective scare you away or bore you to the point that you abstain entirely from creating artwork that involves different viewpoints from those you are used to? Perspective is considered to be one of the fundamental components of drawing. A beginner artist may think that it only has to be mastered by landscape or cityscape artists, but this is not the case at all. Understanding perspective and how to create the illusion of depth is essential in order to render believable scenes in all kinds of art, whether it's still-life, interiors, and even animal and portraiture-based artwork. In this post I will explain a few key terms and ideas to grasp before moving on to the One and Two Point Perspective drawing techniques. I will also suggest specific exercises and provide you with downloadable grids that you can use to improve your drawing and visualization skills. With a bit of practice you'll gain the confidence to get out there and start sketching in plein air, which is so important and gratifying as an artist! I remember first learning very basic perspective in Art class at some point in Elementary school. Our teacher taught us about simple One Point Perspective and we were asked to create a landscape drawing including a path going off into the distance. I remember how my mind was blown back then as I started realizing that creating realistic artwork is quite simply knowing how to apply a series of optical illusions in order to make the viewer believe that a picture has real-life qualities (be it texture, volume, depth, etc.). Later on in life, I learned about more complex perspective in one of my first semesters at university, where I took an incredibly difficult course that architecture students took. I was super scared because this class involved numbers, Geometry and being extremely clean/precise. As a child, I had always been terrible at Math and, to the day, I have a tendency to tune out when calculations and numbers come up in conversations! The professor was incredibly strict and took off points for any little extra pencil or eraser mark on our assignments, but I passed the course and I honestly learned a ton. That class fast-forwarded my ability to visualize objects in space and gave me the abilities I needed later in order to begin creating realistic art. I promise it is not too hard! If I can do it, you can do it! Understanding Perspective in Real Life and in Art Perspective is what gives a picture a sense of three-dimensionality and depth. Take a moment to look out your closest window. Observe how the trees/buildings/houses closest to you appear larger, while the trees/buildings/houses farther from you appear much smaller. Even though the tree closest to you may, in reality, be the same size as a tree farther away from you, they appear to be different sizes to you due to the fact that you are standing at the specific point you are in. Artists must master the ability to create this effect on a flat, two-dimensional surface, be it paper, canvas, or whatever substrate is used. The more complex a picture is, the more important it is for the artist to approach the piece in a methodical and careful fashion. Take a minute to analyze the following famous masterpiece by the great artist Raphael. 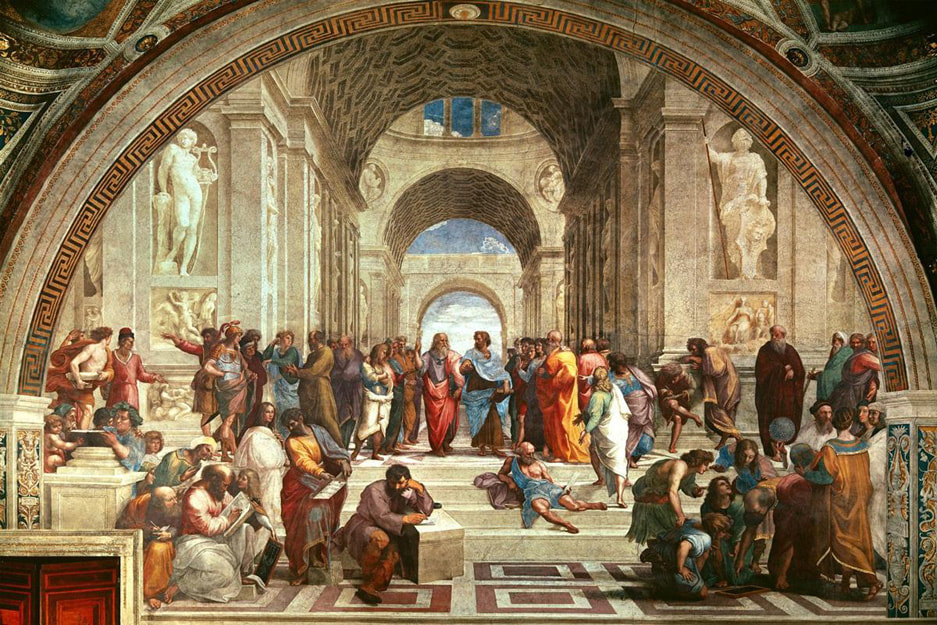
Fresco painting by Raphael created for one of the Vatican walls. The School of Athens (1510 - 1511).
In this fresco we are able to see how the arches in the ceilings get smaller and smaller as they get farther away from us in the distance. Likewise, the human figures that are closest to us in the foreground appear larger that the people located in the middleground (more about these terms later). The combination of all of these things creates a very effective sensation of three-dimensionality, perspective and depth. Isn't it just astounding? This famous masterpiece is an excellent example of One Point Perspective, which we will get into in a bit. If we place the One Point Perspective grid on top of the artwork, we are able to see how the artist was able to visualize where to effectively place the elements within the painting. Starting our work with a grid made up of straight lines, allows us to better visualize the three-dimensional space which we will place our shapes upon. 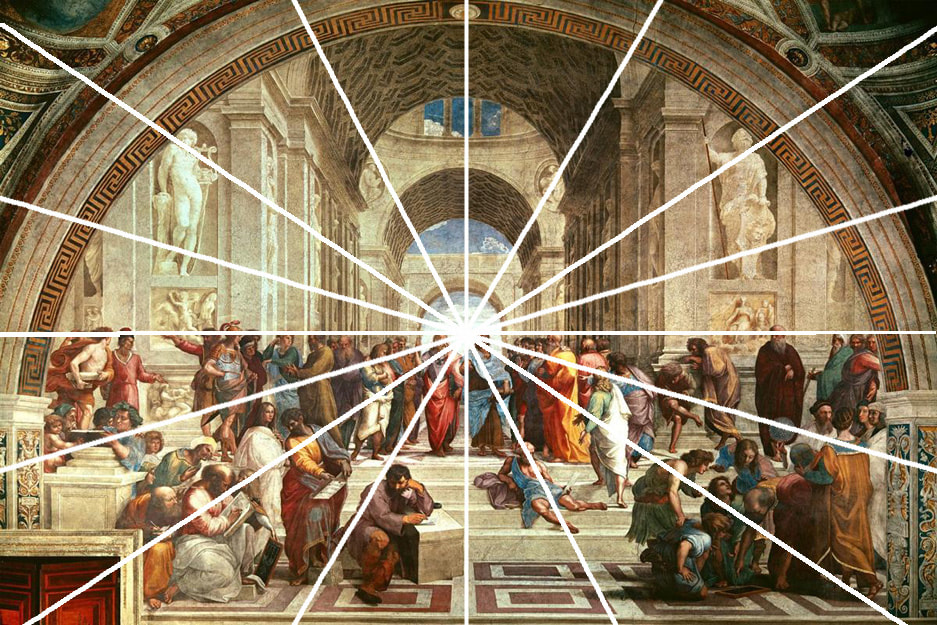
The School of Athens with a One-Point Perspective grid.
Before moving on, here's how the grid applies in a modern picture. Notice how the point at which the lines meet is off center in this image. 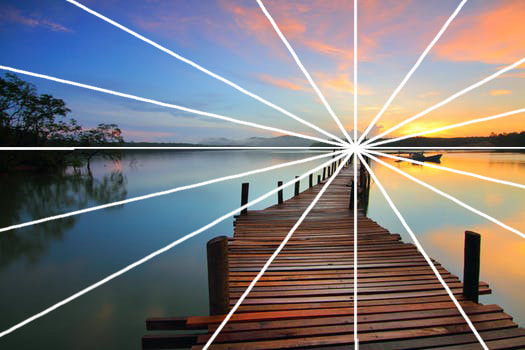
Picture of a dock going off into the distance over a large lake with One Point Perspective grid. Click on the picture to go find the original at the Pexels website!
Important Art Terms Related to Perspective Before explaining how to use the One and Two Point Perspective drawing techniques, I would like to just mention a few key art terms we need to be able to understand. 1. Horizon Line This is the line that separates sky from land (in landscapes) or sky from water (in seascapes). It is also referred to as the "eye-level" of the viewer. The Horizon Line doesn't necessarily have to be right in the middle of your picture. In fact, it is a lot better, compositionally speaking, if it is somewhere below or even above the halfway point of your drawing area. 2. Vanishing Point The Vanishing Point is placed somewhere on the Horizon Line and it represents the farthest point in your picture. There can be a number Vanishing Points (One Point Perspective has one, Two Point Perspective has two and Three Point Perspective has three). When creating a grid, this point is were the Orthogonal Lines all meet. 3. Orthogonal Lines Orthogonal Lines (also known as Convergence or Vanishing Lines) are key when drawing perspective. They are diagonal and recede back into the vanishing point(s). A perspective grid can have many Orthogonal Lines or very few of them, depending on the complexity of the picture. The more elements in the picture, the more lines you will probably have to include in your grid. 4. Transversal Lines These are completely horizontal or vertical lines that are either parallel or perpendicular to the horizon line. They form rectangles or right angles along the grid and are especially useful when drawing interiors (I will provide you with an example in a bit). 5. Vantage Point The Vantage Point refers to the specific place from which a scene is viewed. This point can actually be very high (referred to as bird's-eye) or very low (referred to as worm's-eye). It is crucial to decide where the Vantage Point is going to be in the very beginning because this will affect the placement and size of all elements within the composition. 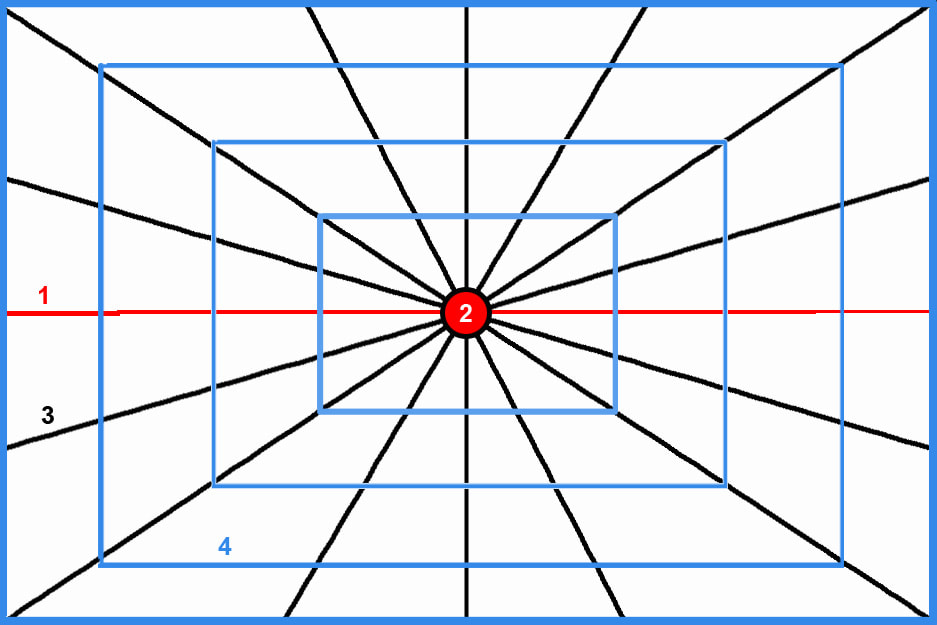
Foreground, Middleground and Background are also helpful terms to understand because including a variety of layers within a drawing or painting really helps transmit a sensation of depth. The layer closest to the viewer is referred to as the Foreground, behind it is the Middleground and the layer furthest from the viewer (which in many cases is simply the sky) is the Background. It varies from image to image, but the important thing is that you are able to discern which layers are closest to the viewer and which layers are farther away. This will affect the color placement within the artwork, as well as the sharpness of the elements included in each layer. The image below is an excellent example that illustrates how the elements in the foreground are much more sharp and saturated than the layers behind it. As you can see, elements in the middle ground and background, also get cooler and cooler in temperature as they recede. This is related to another perspective technique called Aerial Perspective which artists can employ along with linear perspective (or by itself) in order to create a sensation of depth and space. 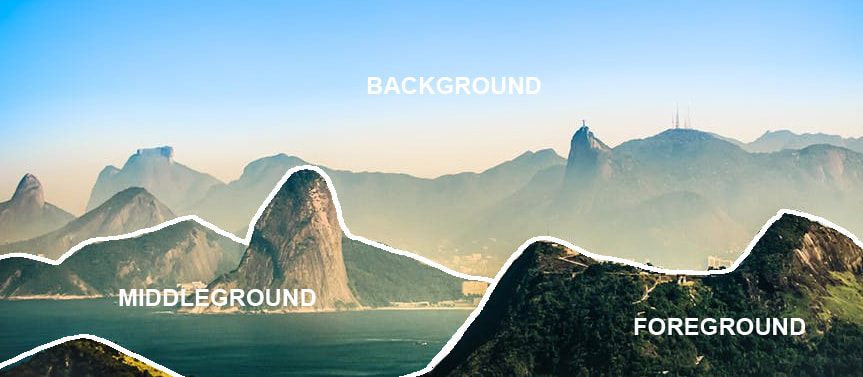
Click on the picture to go find the original at the Pexels website!
Finally, foreshortening is a drawing technique that helps us create the illusion of an object/person/animal receding into the distance. The object, person or animal is drawn shorter, in a way that makes it seem as if one part of it is closest to the viewer and the other end is far from the viewer. It is a great way to transmit a sense of depth, even when the only subject included in an artwork is an object or a person. When used in extremes, it creates very interesting artwork. Andrea Mantegna's famous Lamentation of Christ (1480) is an excellent example of foreshortening. 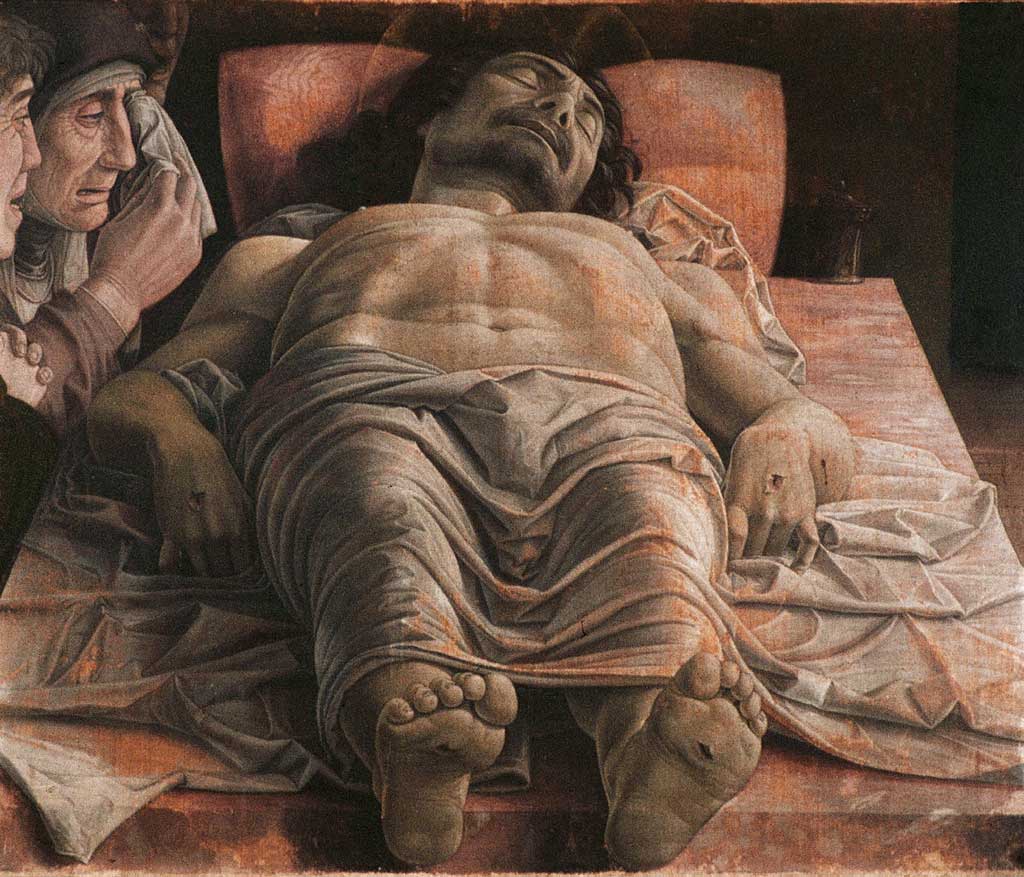
Tempera painting on canvas by Andrea Mantegna. Lamentation of Christ (1480).
The picture below also shows foreshortening. If you notice, the man's forearm appears wider than the width of his open hand. This is because his forearm is so much closer to us than his hand! 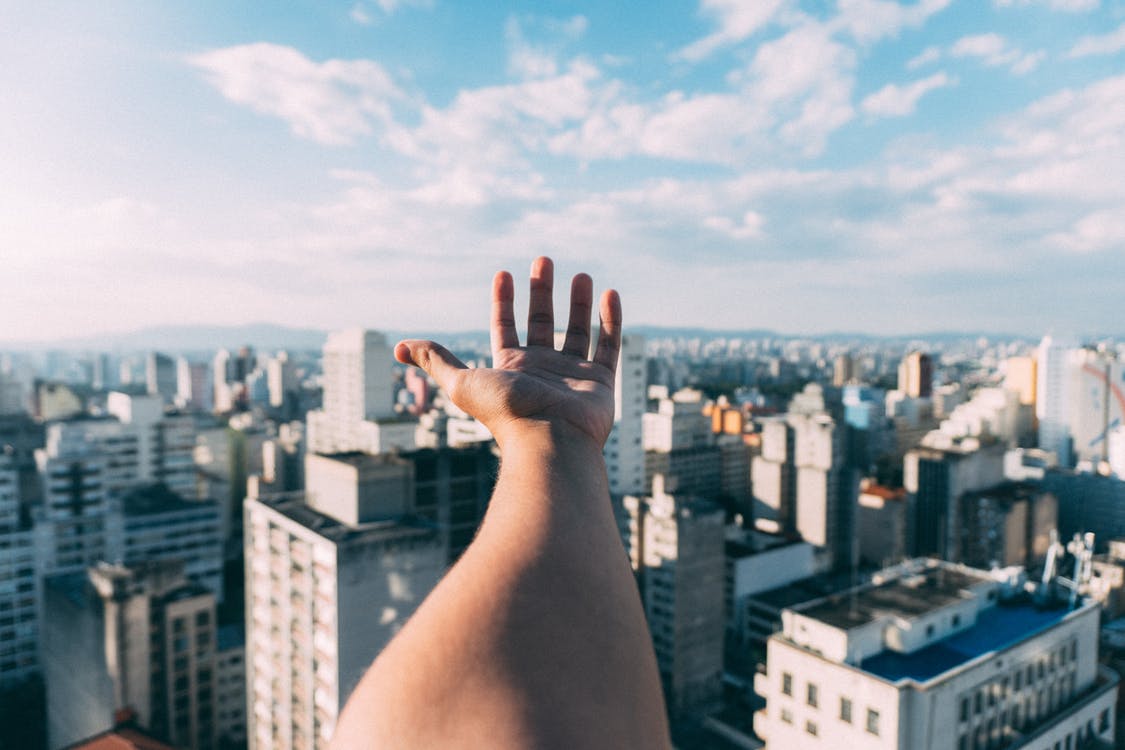
Click on the picture to download the original for free at the Pexels website!
Drawing 3-Dimensional Geometric Shapes Knowing how to draw three-dimensional geometric shapes is absolutely necessary before moving on to using the One or Two Point Perspective drawing techniques. Why? Because, here in reality, everything around us has volume (length, width and height). First, practice drawing simple three- dimensional shapes (use the PDFs at the end of the post titled Geometric_Shapes1 and Geometric_Shapes2 for step-by-step instructions). Once you feel more confident, try placing them within the One and Two Point Perspective grids (I have also included both grids at the end for you to use). If you are already great at this, ignore this step. When attempting to draw any geometric shape, straight lines are important. This is even more important when creating three-dimensional shapes because they involve parallel lines and angles. Due to this, I recommend using a ruler in the beginning. If you want to get even more technical, bring out your protractor! Keep in mind that, once you have enough practice, you will be able to create 3D shapes without using any straight-edged tools. Unless you are going for a super clean and precise drawing, slight imperfections will not affect the picture if the perspective is successful overall. 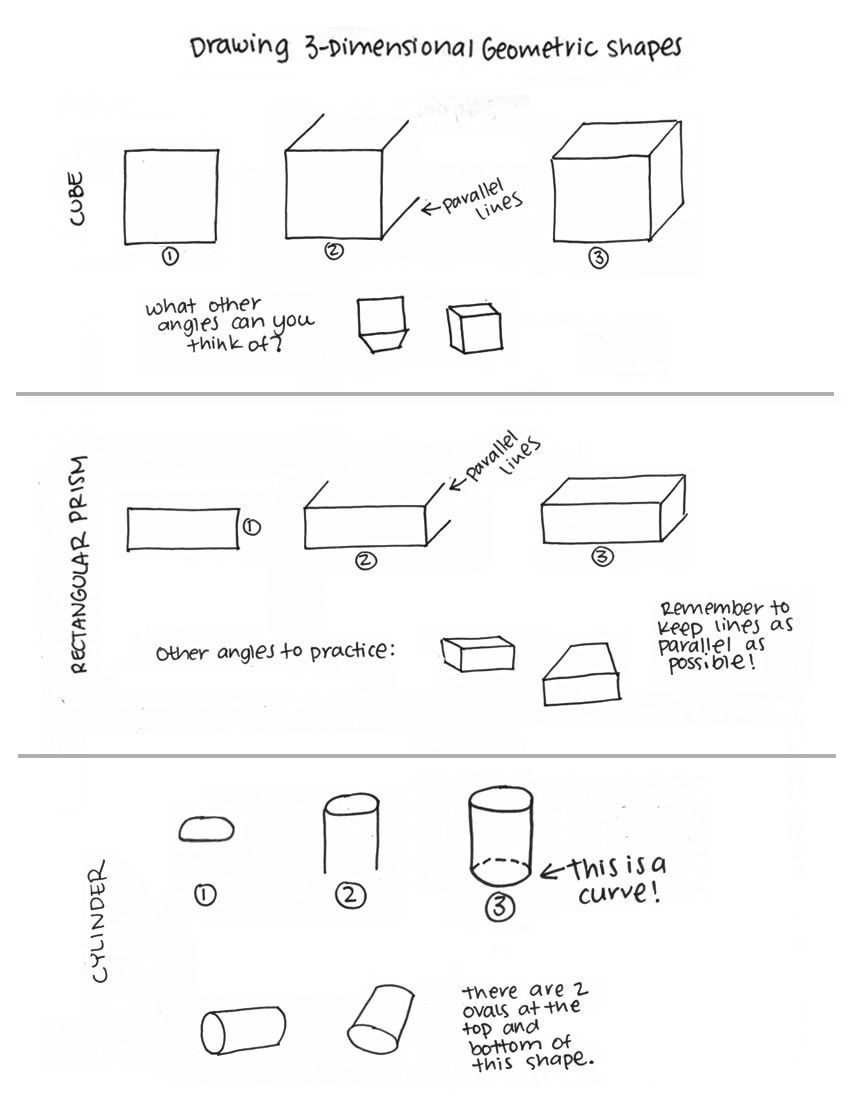
How to draw 3D Geometric shapes. Download this worksheet at the end of the post.
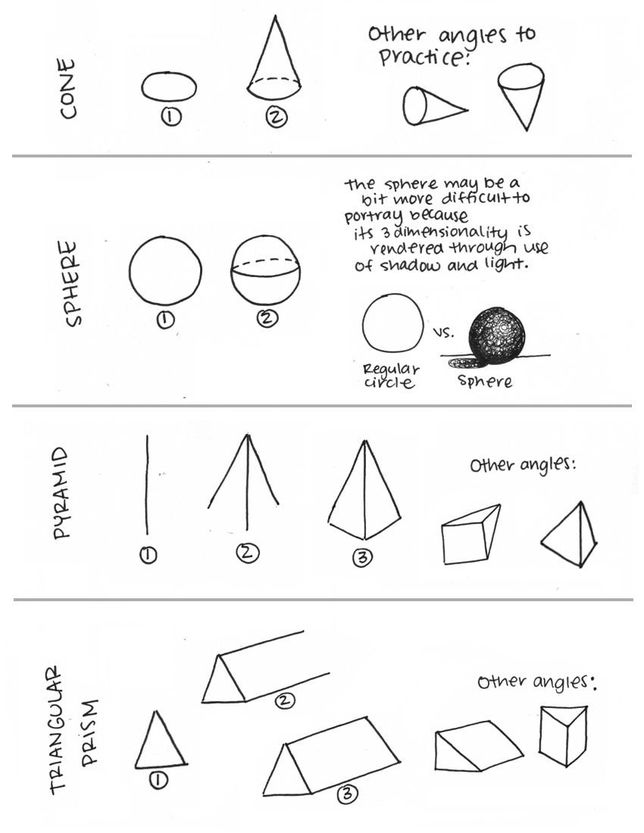
How to draw 3D Geometric shapes. Download this worksheet at the end of the post.
How to Apply the One and Two Point Perspective Techniques One, Two and Three Point Perspectives are referred to as ¨Linear Perspectives¨, which means that they rely on the use of straight lines to depict a three-dimensional space and the forms within it. In other words, to apply these techniques we will need to prepare for our drawings by creating grids using a ruler. It is important to note that this grid should be created lightly. Though it will be heavily used throughout the drawing phase, they will be erased later on.
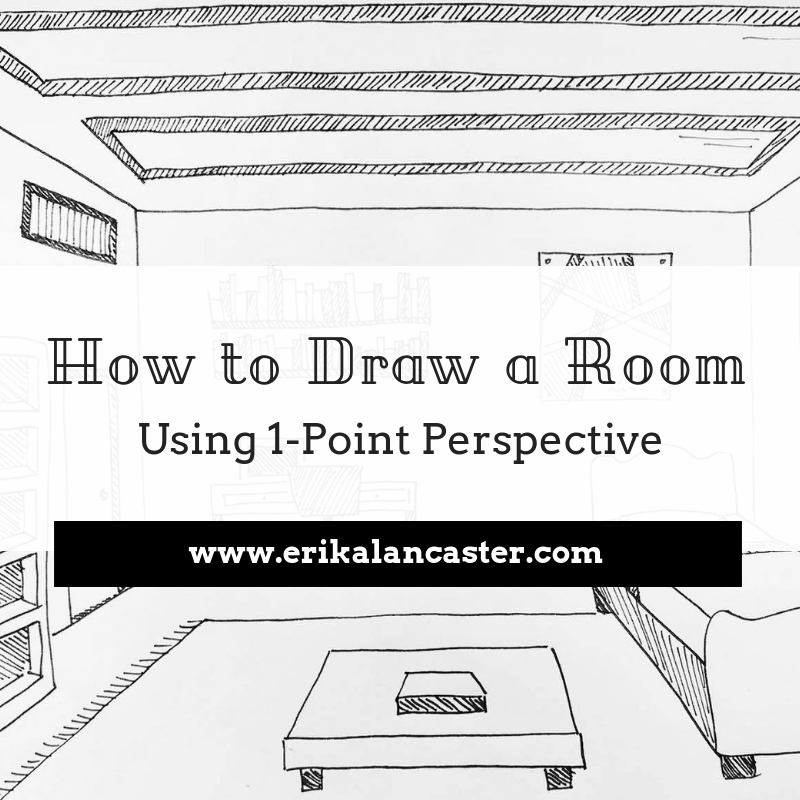
One-Point Perspective
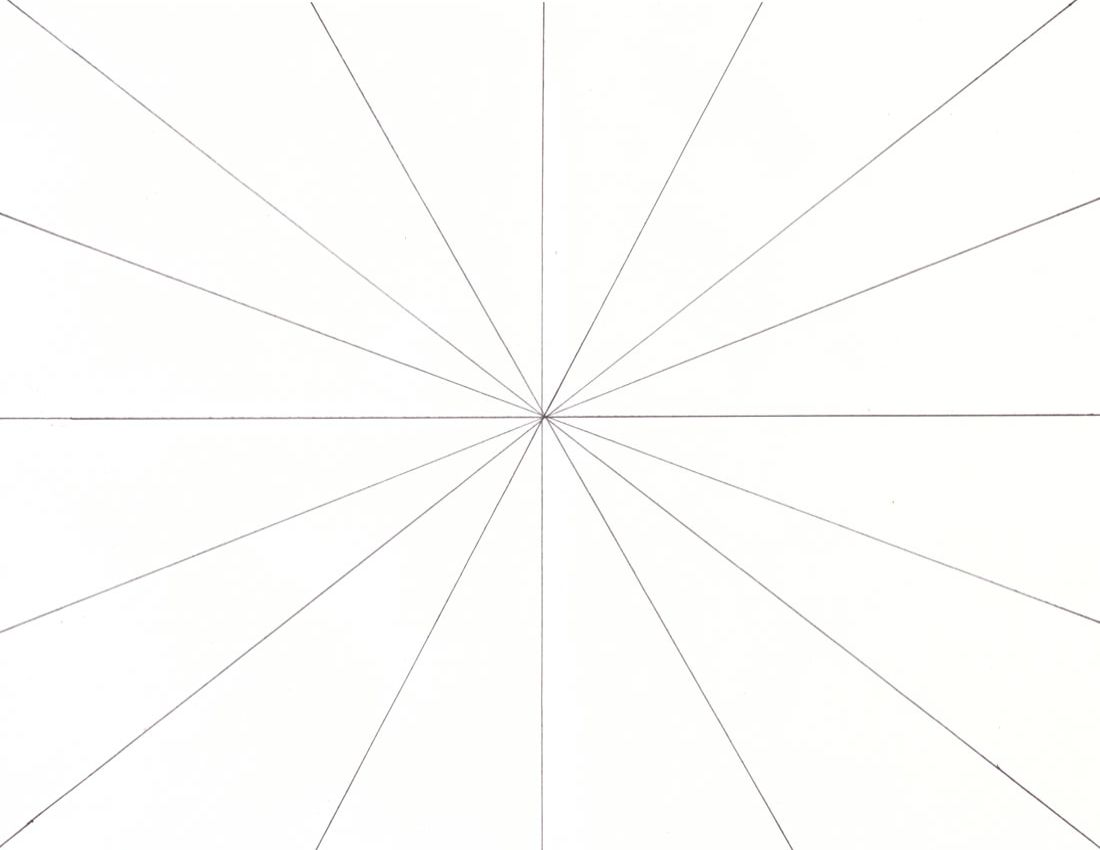
One-Point Perspective Grid
The One-Point Perspective grid is made up of straight lines that converge at the Vanishing Point. Firstly, decide where your Horizon Line will be placed within your drawing area. Secondly, place your Vanishing Point somewhere on your Horizon Line (remember it does not have to be placed right in the center). Then, carefully draw straight lines from one edge of your paper to the other using a ruler, making sure that they all cross at your Vanishing Point. This kind of perspective is excellent to draw simple cityscapes, landscapes and interiors. My suggestion would be to begin using this technique to draw simple landscapes and focus on adding in different organic elements with believable proportions. Then, master placing three-dimensional geometric shapes within the One-Point Perspective grid to effectively transmit a sensation of depth (see picture below). Afterwards, one can move on to buildings and interiors. 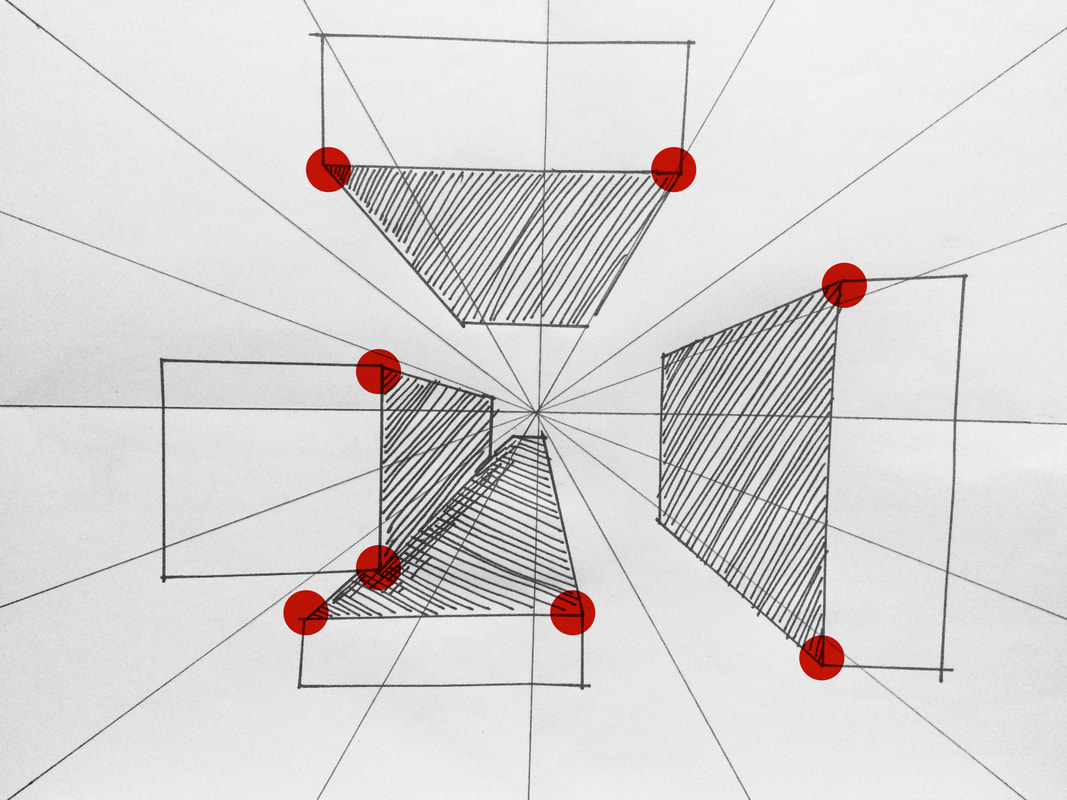
3D Geometric Shapes in One-Point Perspective Grid.
How to do this exercise: 1. Prepare your One-Point Perspective grid (you can download the PDF at the end or draw it for yourself). 2. Draw a few flat (two dimensional) rectangles or squares anywhere on your grid. 3. Pinpoint the corners/angles of your shapes that are closest to the Vanishing Point (see red highlights in the image). 4. Using your ruler, draw straight lines from the corners of your shapes down to the Vanishing Point. Take into account here that there may be two to three lines, depending on where you placed your shape. 5. Finally, close your shapes with vertical or horizontal lines. Remember to make these lines parallel to the lines you used in your initial two dimensional shape. You're done! 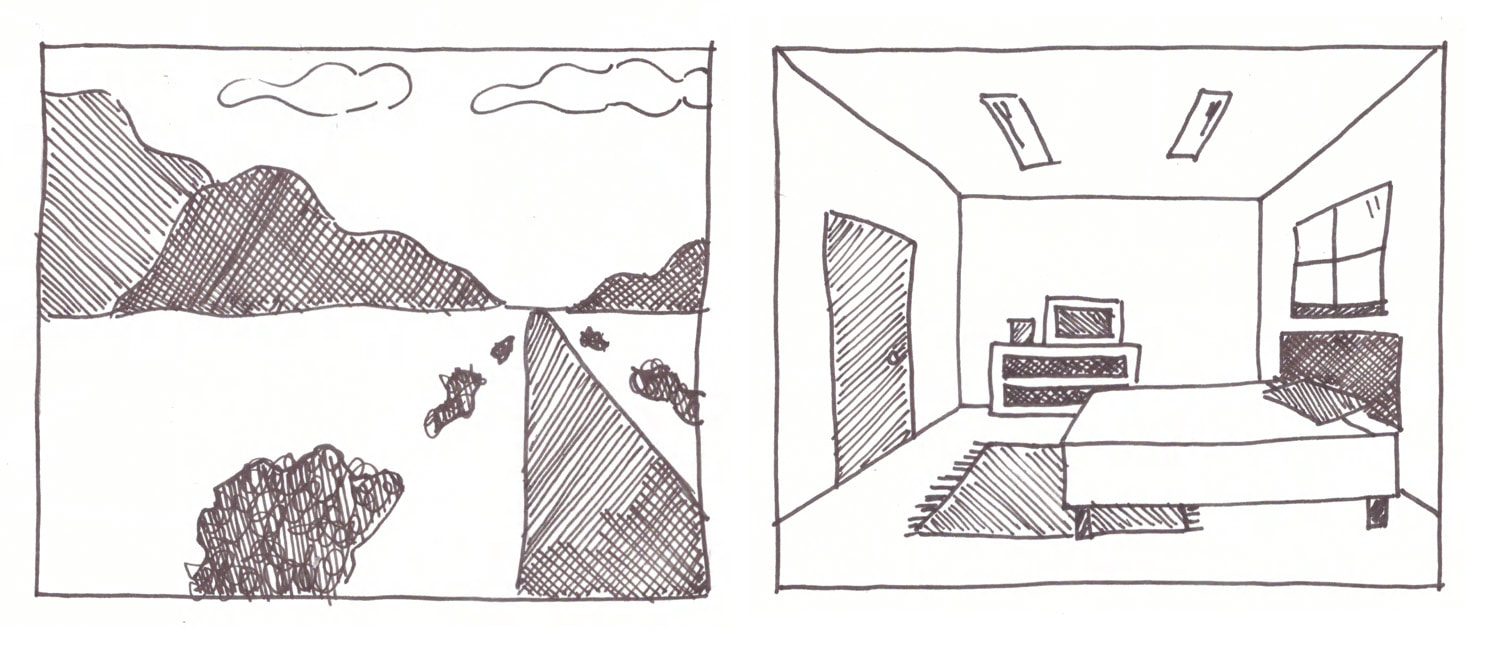
Thumbnails showing use of 1 Point Perspective in a simple landscape and in the interior of a room.
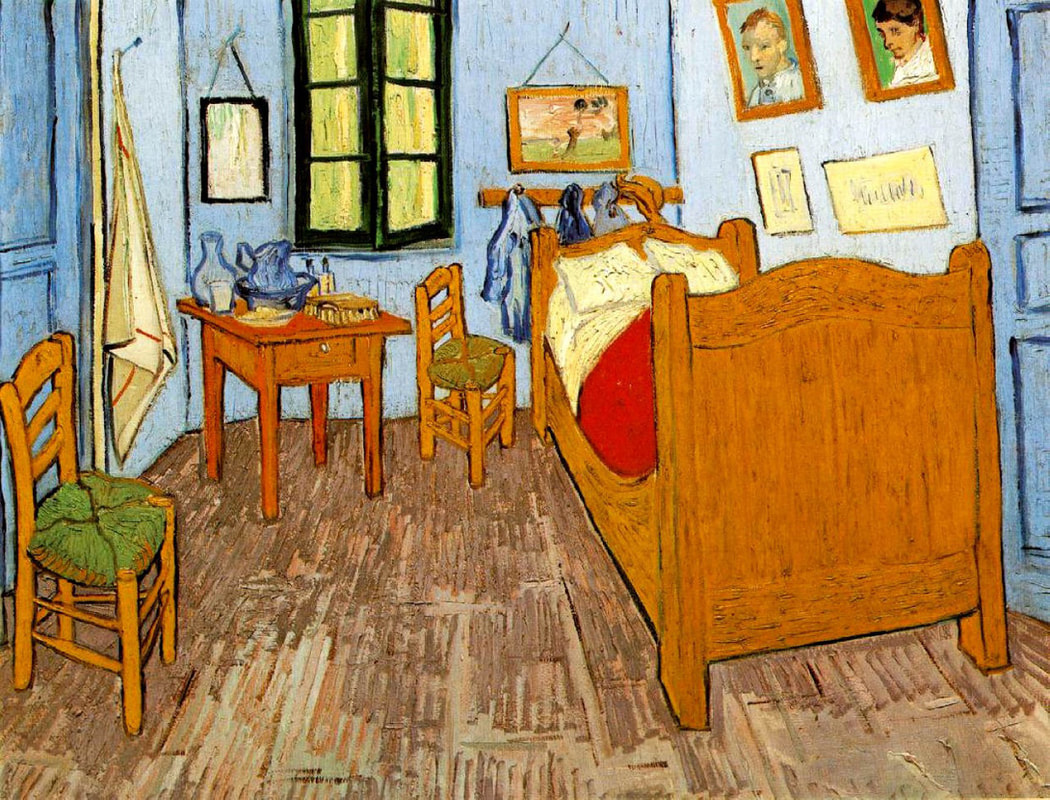
Oil painting on canvas by Vincent Van Gogh. The Bedroom (1888).
Take a moment to analyze this important artwork by Van Gogh. Judging by the lines you can see in the image, where would you say the Vanishing Point is located? Two-Point Perspective
Two-Point Perspective Grid
The Two-Point Perspective grid is also made up of straight lines that converge at the Vanishing Point, only this time there are two! This grid is going to help us create the effect of viewing objects (think boxes or buildings) as if we are standing on a corner. It is slightly more complex and is often used when drawing buildings in a cityscape or objects at more extreme angles. Let's start practicing! You can decide if you'd like to use the Two-Point Perspective grid I have included at the end of the post, or if you'd like to create it for yourself. Here are the steps you need to follow to make it yourself! To prepare a Two-Point Perspective grid, I usually start by folding my paper in half both lengthwise and widthwise. The horizontal fold will be my Horizon Line in this case. 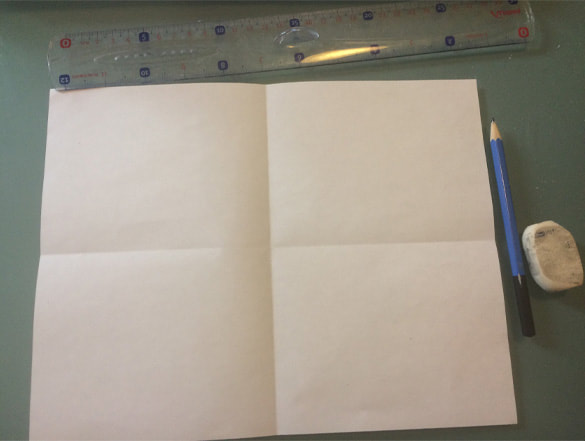
How to draw a 2-Point Perspective grid
Then, decide where your two Vanishing Points will be on this Horizon Line (I recommend placing them at a good distance from each other). You can see in the image below how I placed my two Vanishing Points close to the edges of my paper. I often like to place them at equal distances from the edges and use a ruler to help me do this. The vertical lines you can see here will be erased and are not really a necessary part of the grid. You can also see that I have folded my paper two more times. Sometimes I like to do this because the folds help me visualize straight lines as I am creating my grids, but they are not necessary either. 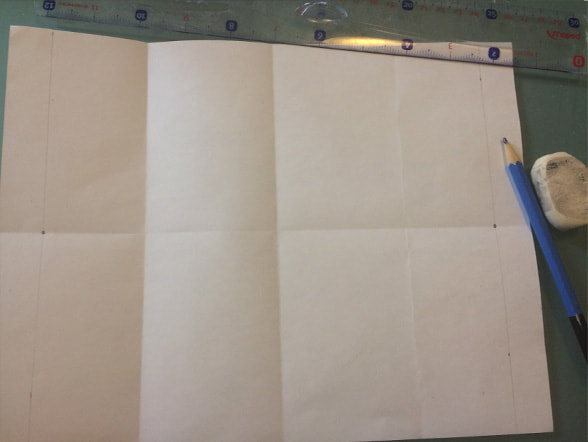
How to draw a 2-Point Perspective grid
Next, create small marks using a ruler right on the central vertical fold on your paper. You can decide how close or far apart you want these marks to be (I recommend somewhere between 1.5 to 2 centimeters to start out). 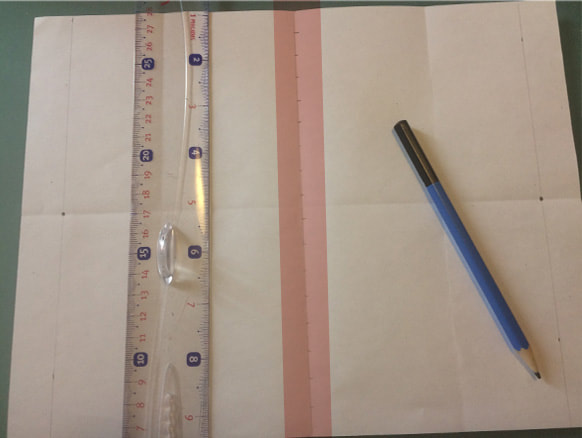
How to draw a 2-Point Perspective grid
To finish the grid, carefully draw lines starting at your Vanishing Points and ending at the marks you previously created on the central vertical line. The lines you draw coming from your left and right Vanishing Points should meet, creating a symmetrical/mirrored effect. 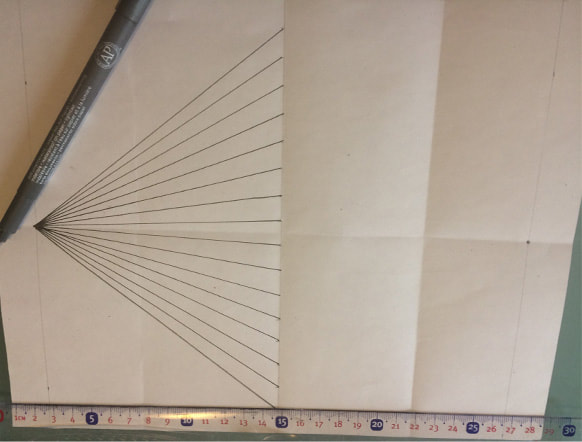
How to draw a 2-Point Perspective grid
By this point your Two-Point Perspective grid should be finished. If you have never used this technique before, I recommend starting out by drawing simple three-dimensional geometric shapes on it. This will help you understand how it works and will set you up for success in your later drawings. 
3D Geometric forms drawn in the 2-Point Perspective Grid.
Next, use the grid to create a cityscape! Remember, these buildings are nothing more than rectangular prisms with a few details added in. Nothing to be scared about! 
Cityscape created with a 2-Point Perspective grid.
After enough practice, you will be able to easily conclude what kind of drawing technique you need to apply in each project. The sketch below is something I created a while back. Where would you say that the Vanishing Point is located in this case? Remember that even though certain elements are not always visible within a final piece, the artist must always have them in mind when working so that the sense of perspective is achieved at the end. 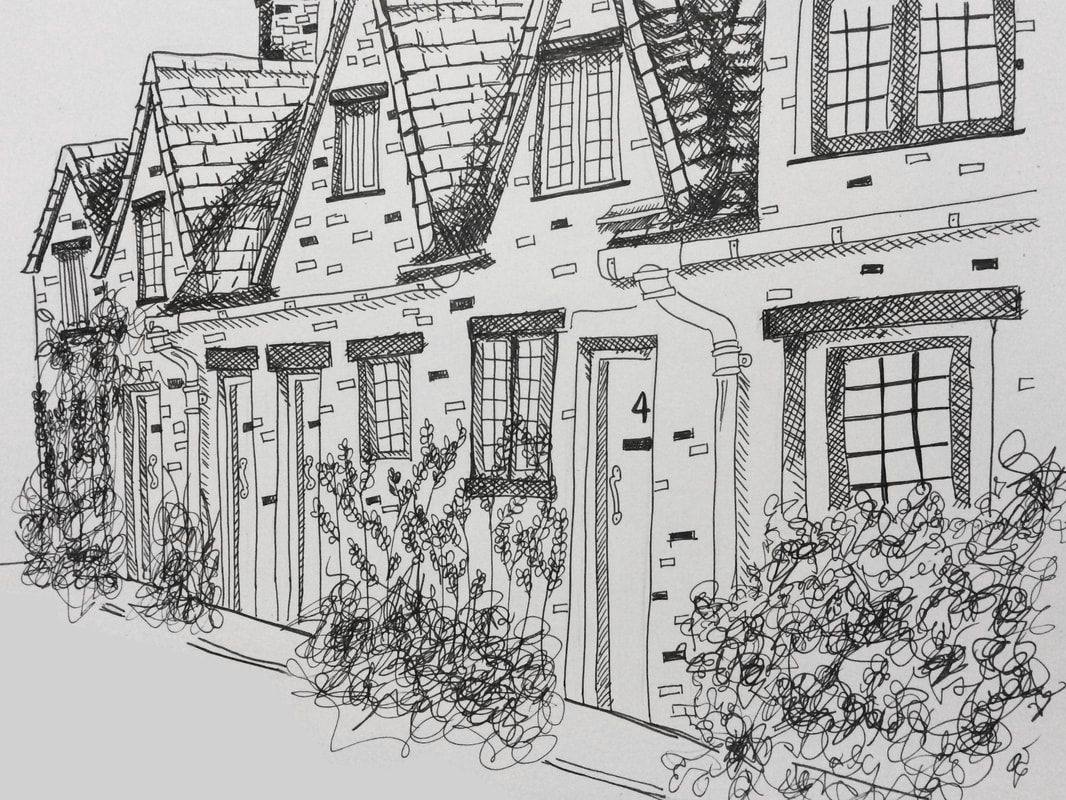
European house ink sketch by Erika Lancaster
If you still feel a bit unsure about taking it outside, I recommend searching for pictures of buildings or houses online and apply what you have learned. Draw one single house or building three-dimensionally and move on to groups of houses, then street views, etc. I assure you, you WILL get more and more comfortable. To conclude this post, I leave you with this great da Vinci quote about Perspective: Perspective is to painting what the bridle is to the horse, the rudder to a ship… There are three aspects to perspective. The first has to do with how the size of objects seems to diminish according to distance: the second, the manner in which colors change the farther away they are from the eye; the third defines how objects ought to be finished less carefully the farther away they are.
-Leonardo da Vinci
Do you find it difficult to create depth and perspective in your artwork? If so what is it specifically that frustrates you? Let me know in the comments below!
|


 www.erikalancaster.com
is a participant in the Amazon Services LLC Associates Program, an affiliate advertising program designed to provide a means for sites to earn advertising fees by advertising and linking to amazon.com. www.erikalancaster.com is a participant in the Shareasale.com Affiliate Program, an affiliate advertising program designed to provide a means for sites to earn advertising fees by advertising and linking to Shareasale.com partner companies. |
||||||||||||||||||||||||||||||


 RSS Feed
