*This post contains affiliate links. I receive small commissions for purchases made through these links at no extra cost to you. These commissions help me keep this site up and running, in order for me to keep providing helpful and inspiring art content. :)
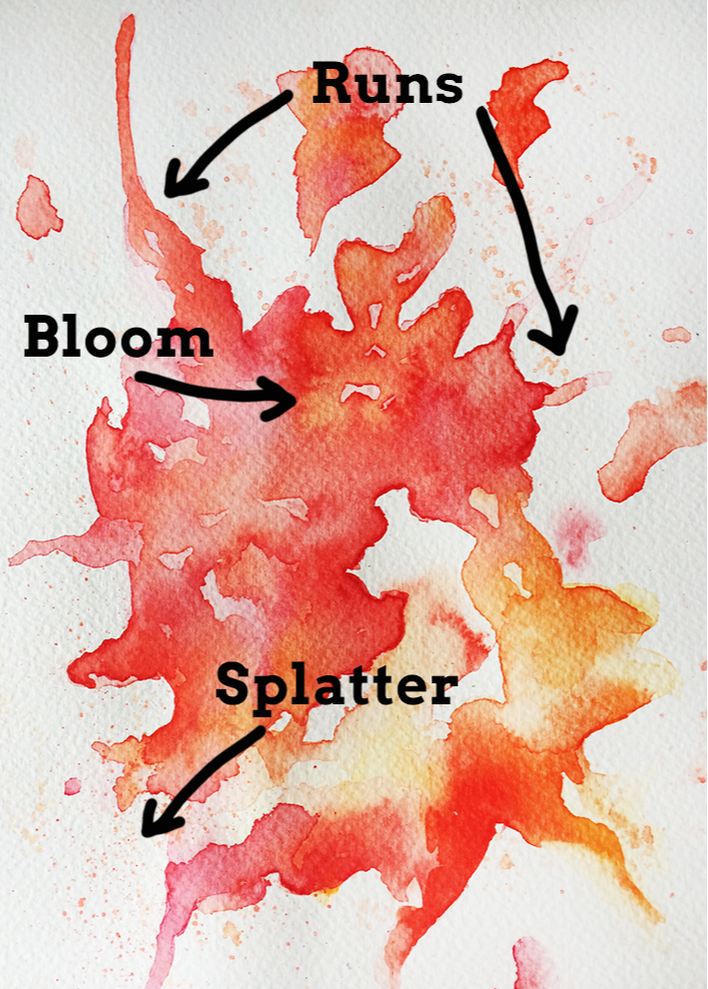
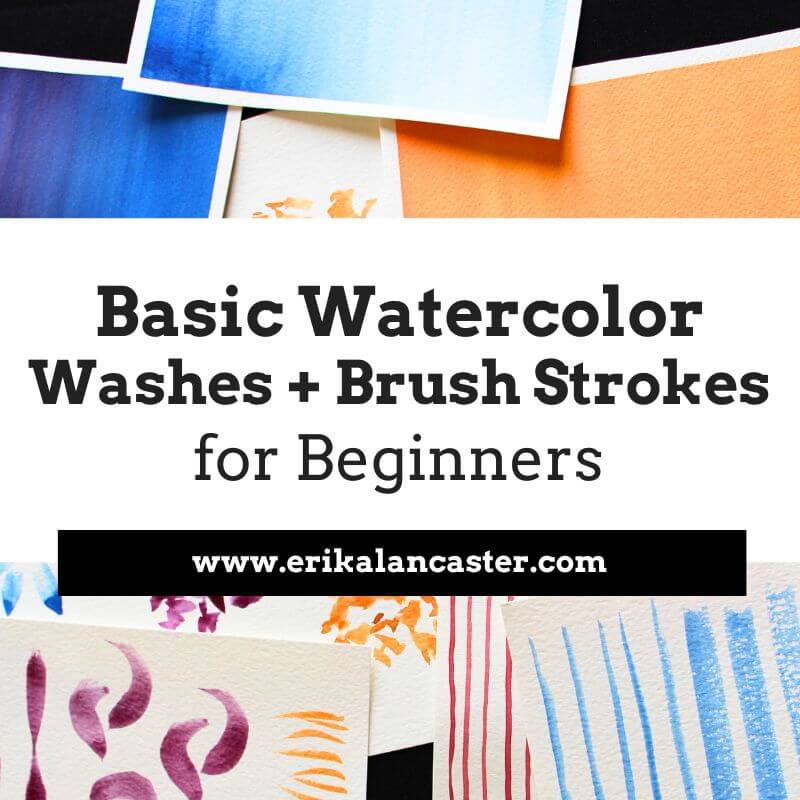
What, exactly, does the term wet-on-wet refer to and how can we use these techniques to create beautiful paintings with watercolor? Do you love watching artists create those awesome washy watercolor effects, but find that things don't end up as expected when you're trying them yourself? In today's blog post I'll explain what wet-on-wet effects are, how they can be combined with wet-on-dry effects to create awesome paintings, and a few essential tips to apply when using these techniques. I'll also explain how to do different effects like blooms, splatters and runs. Make sure to check out the video included in this post to see me in action! Wet-on-wet refers to the act of applying fresh paint onto a wet surface or on paint that is still wet rather than onto a dry surface or a layer of paint that has already dried. When using these kinds of techniques, we get colors that blend or intermix with each other. It's important to understand that this painting technique isn't exclusive to watercolors, but can be used with all traditional painting mediums (watercolor, gouache, acrylic, oils) and it can be used in a variety of ways. First and foremost, when working with watercolors, it's essential to understand that when a paint mixture is placed on paper that is wet (either because it has been pre-wetted with clean water or because a previous layer of paint hasn't dried), the paint mixture will expand, creating a blurred out/fuzzy effect. Opposite to this, when we place a paint mixture on paper that is dry (either because it's a fresh sheet of watercolor paper or because the previous layer has completely dried), the newly placed paint will not expand, leading to sharp looking lines and defined shapes. This principle is essential to grasp and it's important for beginners starting out with watercolors to know that wet-on-wet and wet-on-dry effects complement each other to create beautiful paintings. By combining them, we're able to create a visually pleasing contrast, bring attention to focal points by adding sharper detail to certain elements, add depth to a piece, and many other things. It's important for beginners to practice both kinds of techniques, and start giving thought to how they can be used in a particular piece before actually starting the painting process. 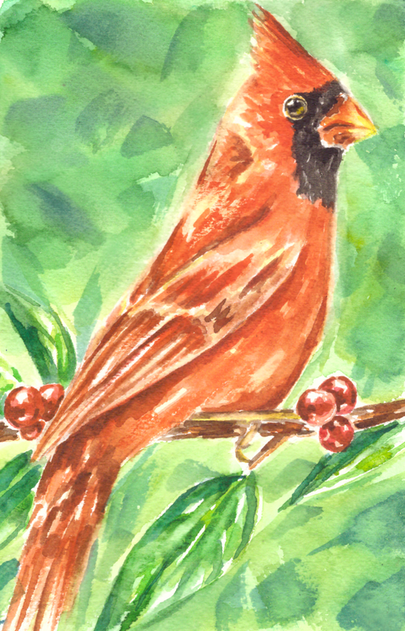
Watercolor Cardinal painting by Erika Lancaster. Wet-on-wet techniques in combination with wet-on-dry techniques.
How and when you use wet-on-wet and wet-on-dry techniques in your painting process will depend on what subject you're painting and what effects you're personally going for. Generally speaking though, the first layers of paint should be translucent and paint mixtures should contain more water than pigment. As the painting process moves forward and subsequent layers start being placed, paint mixtures contain less water and more pigment. 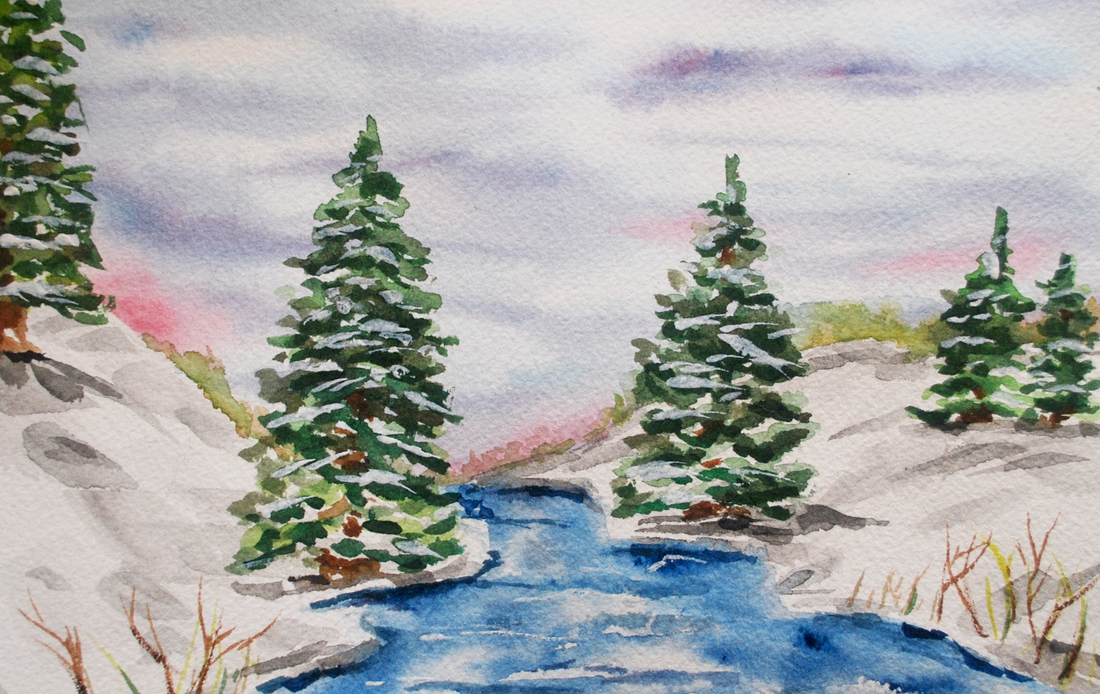
Watercolor Winter Landscape painting by Erika Lancaster. Wet-on-wet techniques in combination with wet-on-dry techniques.
If you enjoyed this video and found it helpful, make sure to subscribe to my YouTube channel. I share a brand new video every week with art tips, drawing and painting tutorials and mindset/productivity tips for artists. *Subscribe HERE*
5 Essential Tips to Have in Mind When Using Wet-on-Wet Techniques1. Use medium to heavier-weight paper with enough tooth/absorbency Paper makes a huge difference when painting with watercolor and can often be the reason why our wet-on-wet effects don't turn out as expected. No matter what kind of painting medium we're using, it's absolutely essential to give thought to what paper or support we'll be painting on before starting a piece as this will directly affect both our painting process, as well as its overall outcome. When painting with a water-soluble medium like watercolor, we should use a paper that is intended for this purpose. This said, when we're planning on using lots of wet-on-wet effects like the ones described in this post, it's best to use a medium (140 lb.) to heavier weight (300 lb.) watercolor paper, as anything thinner will warp and possibly even shred throughout the process. You also want it to have some degree of tooth or texture to it, as this will help ensure that water/paint mixtures will be absorbed when placed upon it. Watercolor paper can certainly be difficult to grasp, as there are so many different types and formats available. In my blog post/YouTube video Watercolor Supplies for Beginners and Things You Must Know, I go much more in depth into watercolor paper and explain a few other important aspects in regards to watercolor painting supplies. 2. Give thought to the colors you'll be using Because colors will be intermixing a ton when using wet-on-wet techniques, it's essential to do a bit of planning to ensure that we won't create unwanted hues accidentally. Though one of the beauties of watercolor is the fact that it has a mind of its own, skilled artists are able to have at least some level of control over the 'chaos'. They have practiced water control and have a good idea of what's going to happen when a certain paint mixture is placed in a specific area, using effects to their advantage. Skilled watercolor artists have not only become masters at managing the combination of paint and water, but they also know the importance of planning color. This Element of Art is an important aspect behind making a painting look harmonious and balanced. We're also able to create very striking visual effects when planning our color palettes and giving thought to how we'll actually be using it throughout the painting process. Color shouldn't be an afterthought or something that happens accidentally. In the video included in this post, you'll see how I create my warm and cool color studies separately. The reason I do this is because I know that when Complimentary Colors mix together, they create grayed out/dull tones. Complementary Colors mute each other out and, in these studies, I wanted my colors vibrant and saturated. 3. Keep your water clean Using murky water when painting with watercolor is a huge no-no, no matter what kinds of techniques you're using. Dirty water will affect your paint colors and may even make your piece appear dirty. When working wet-on-wet we're not only using a lot of water, but we're also usually working at a faster pace because we're using the freshness/dampness of an area to create beautiful effects. It's important to ensure that we're not accidentally dipping our paintbrush into dirty water and placing this water on our paper! I've known of artists that use two or even three cups of water as they are painting. One idea could be to use one glass of water to rinse color off your brush and a second one to dampen it with clean water. Whatever it is you decide to do, make sure you're constantly checking on your water throughout the painting process. 
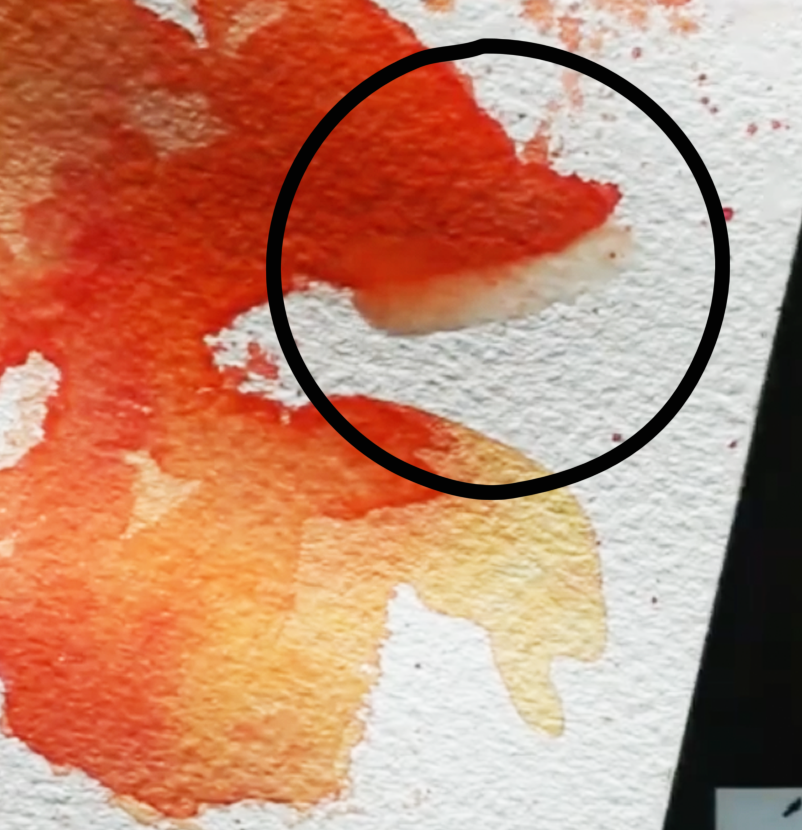
For a list of my favorite art supplies and books, go here. 4. Constantly give thought to how much water is already on your paper and how much water is in your brush The outcome of our wet-on-wet techniques will greatly depend on how wet/damp the specific area of paper is, as well as how thick or watery the paint mixture that we're placing upon it is. I would recommend beginners to practice creating a wide range of paint mixtures, from watery/translucent to thicker/heavily pigmented mixtures, and see what happens when they are placed on slightly dampened paper vs. puddles of water. In the video included in this blog post, you can see me play around with large puddles of water/paint mixtures. While puddles allow for a lot of exciting movement, they are certainly difficult to control and can lead to unwanted effects like backruns and splotchiness if we're not careful! Generally speaking, if your paper is already very wet, it would be best to stay away from laying down a very watery paint mixture on it. In principle, for backruns not to happen, you have to make sure that there is less water in your brush than there is on your paper. Another option to avoid backruns and undesired splotchiness would be to allow your paint layer to dry completely before going back in with another color. If you've wetted your paper too much accidentally, you can always absorb some excess water with a paper towel or with a clean (dry or slightly dampened) brush. 5. Know when to stop When I was first starting out with watercolor, I didn't understand that watercolor paper can only take a certain amount of 'beating' before it has to be left alone to regain its strength. Even if paper is specially intended for use with water, it's essential to understand that wet paper is fragile paper. With watercolors, we must stay mindful of when we should stop, as continuing to work over and over on one same area will definitely lead to overworking our paper (even when using the heavier weight variety). Beginners starting out with this medium tend to lay down paint mixture over paint mixture and try to fix mistakes or make changes in one same area, damaging the paper. When we've made a mistake, it's best to do a bit of gentle lifting when the paint is still wet and then allow it to dry completely. What I like doing, is ignoring my accident for a bit and working on other areas of my painting while that one dries. Other times, I work on two pieces at once and jump back and forth from one to the other, allowing paint layers to dry. Often, we can make mistakes less noticeable by doing a bit of work in the area once the initial layer has dried. We can add more washes of color, lift some more, or even to a bit of gentle scrubbing at this point. Check out my blog post titled 5 Common Watercolor Painting Mistakes and How to Fix them for ideas on fixing accidents and avoiding them altogether.
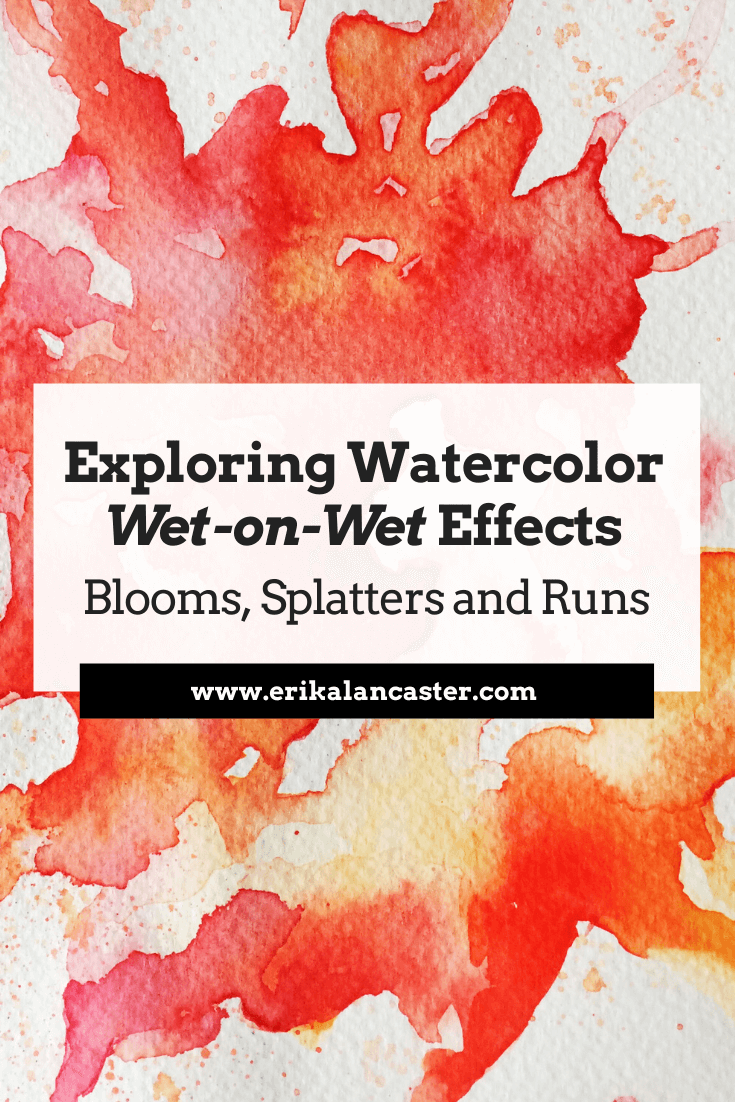
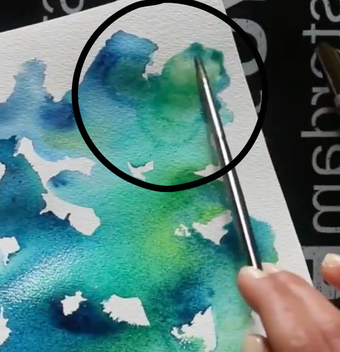
Watercolor Wet-on-Wet Techniques
|
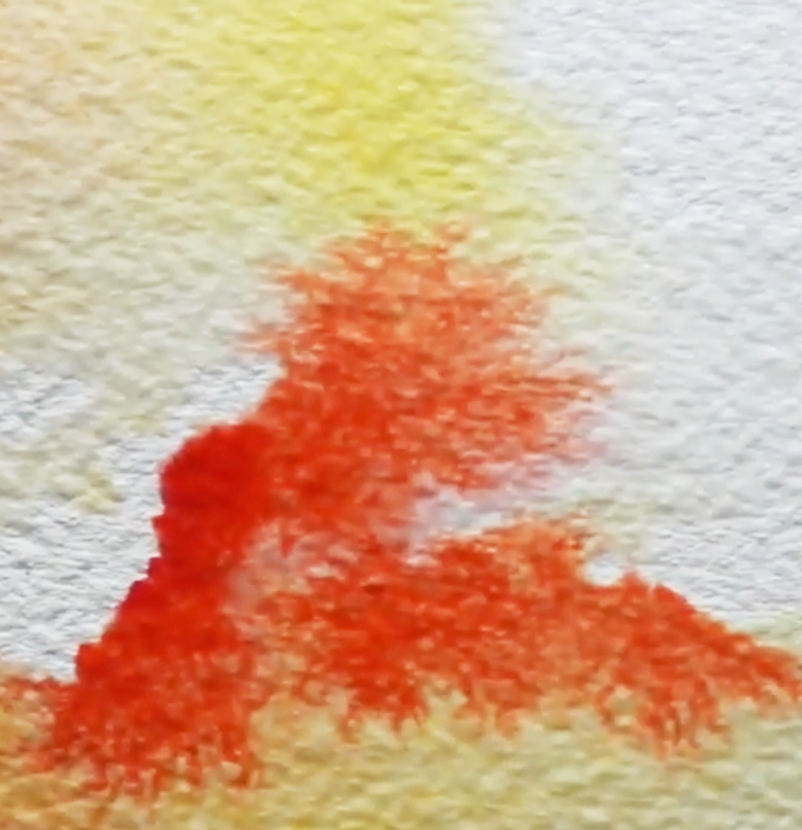
Watercolor orange and yellow bloom
|
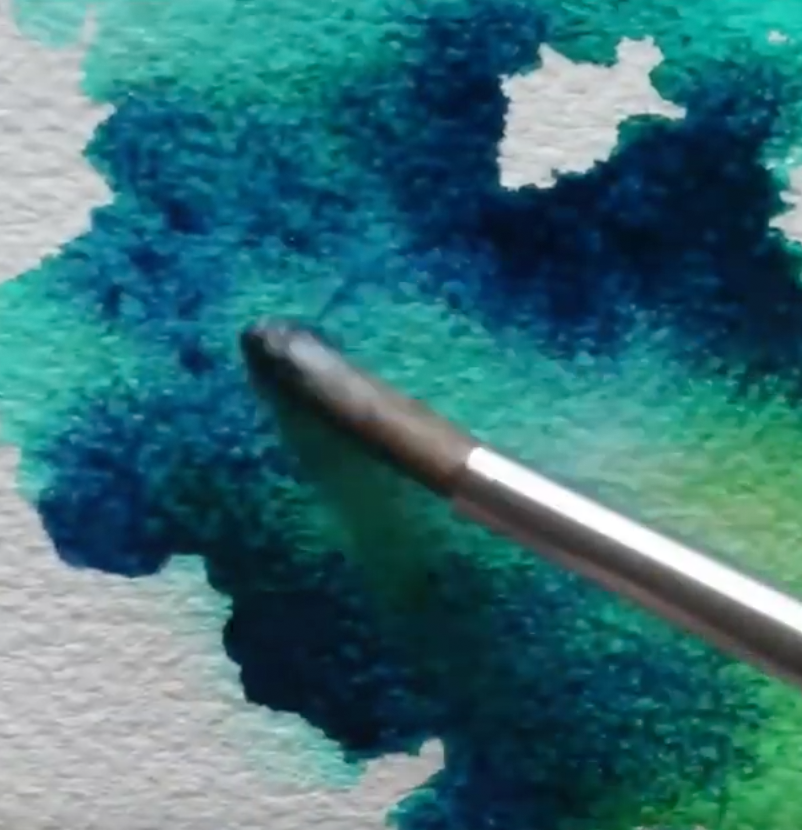
Watercolor blue and green bloom
|
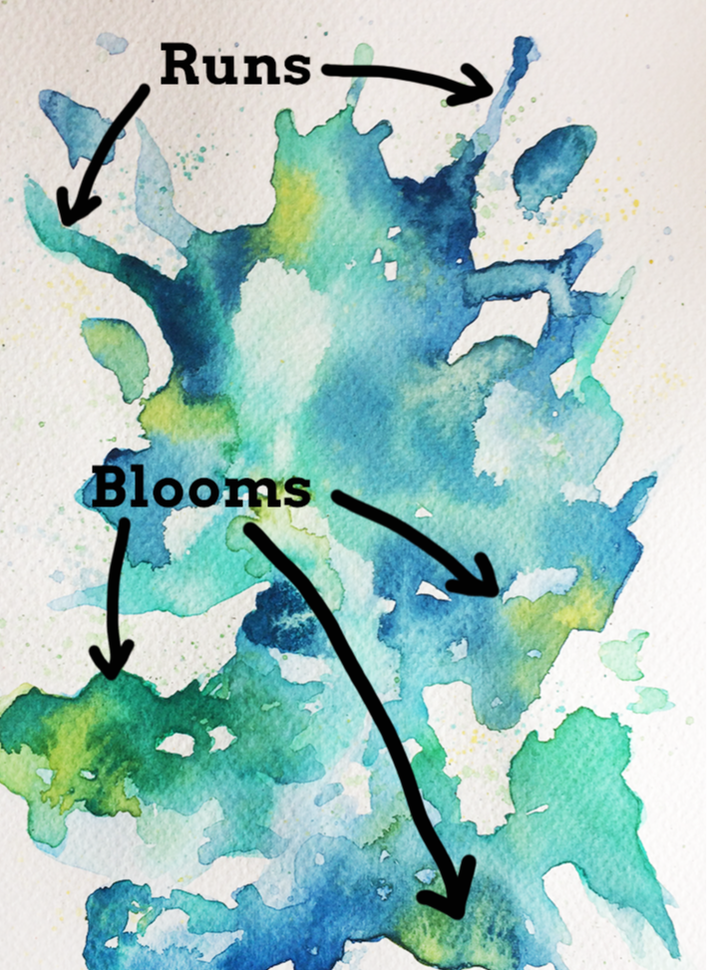
2. Runs (Controlled + Organic)
Runs are interesting effects that can be used when we're creating an abstract painting, or even when adding abstract elements to figurative painting. They are, quite simply, a stream of paint running off the main area or subject in our piece.
We can create runs completely organically by shifting our paper to a slanted or sideways position while it has a large amount of water on it. Sooner or later, gravity will make the water naturally travel down your paper.
If it doesn't happen, consider placing a bit more water in the puddle using your paintbrush, and/or gently tap the paper on your desk in this vertical position.
We can also create controlled runs quite easily by drawing a line of clean water in a specific shape/direction, placing a watery paint mixture at the start of it (the place where our main shape ends and our clean line of water starts), and shifting our paper sideways until the paint mixture starts moving down on its own.
Remember, when using watercolor paper, the paint mixture will naturally expand or move towards the wetness and stay away from dry areas. This is why the paint will naturally travel down the path we've created for it!
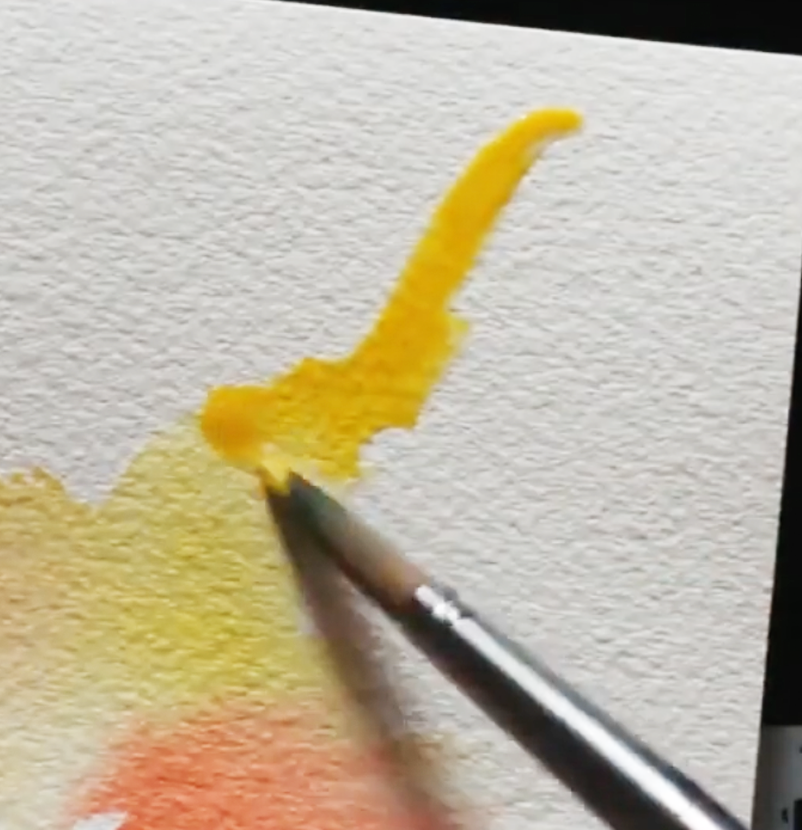
Watercolor run in yellow
|
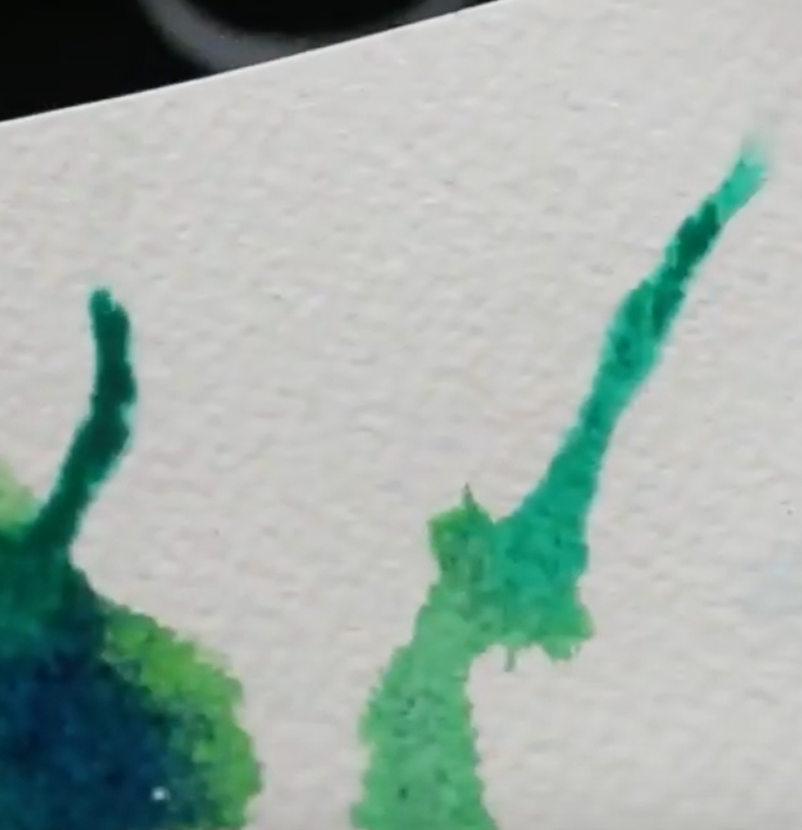
Watercolor run in blue/green
|
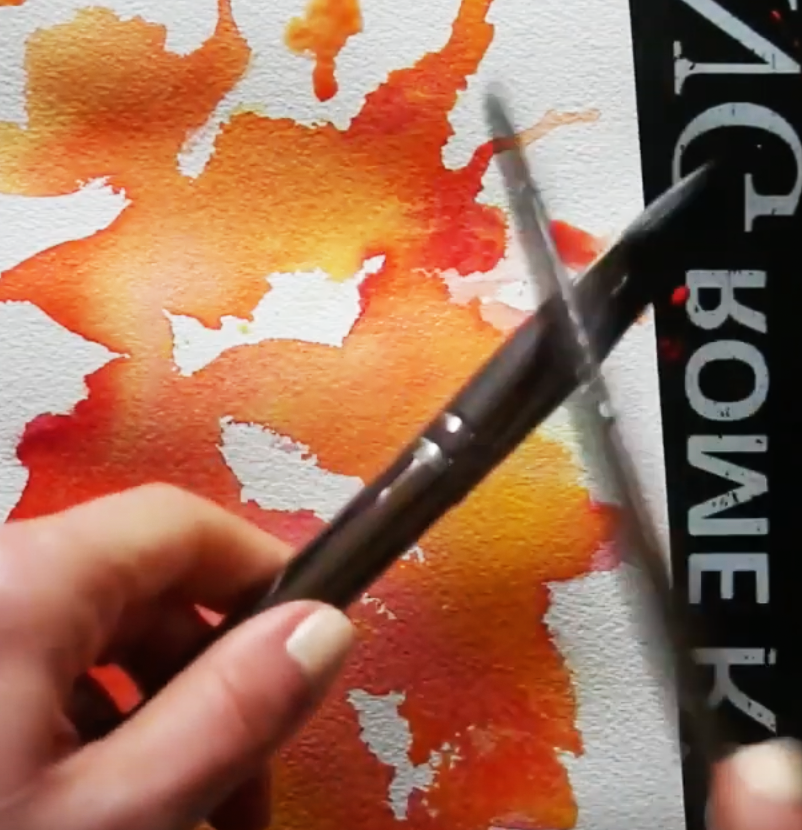
3. Splatters
Splatters can have very striking results and can be used in a variety of ways. If heavily-pigmented paint drops fall on areas of paper that are wet, you can create mini-blooms! On the other hand, if splatters fall on dry paper, these drops will retain their sharp, circular shape.
It's easy to go overboard with it, though, mostly because it's quite fun to do! So work incrementally and stay mindful throughout the process.
To do this technique, create a watery but pigmented paint mixture, wet your paintbrush (I use a round in size 8 in the video) and gently tap it on another paintbrush in a cross position.
Watercolor splattering technique in warm color exploration
|

Watercolor splattering technique in cool color exploration
|
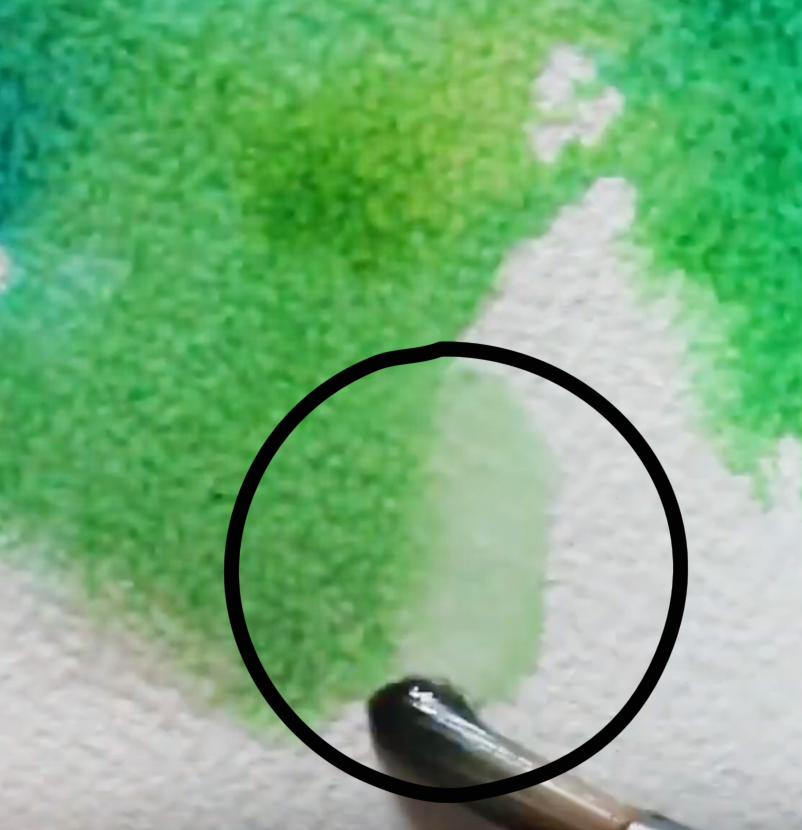
4. Bleeds
Many beginners starting out with watercolors aren't aware of this, but it's easy to soften out stark- looking lines and shapes both while our paint is still wet and after our paint has already dried.
One of the techniques we can use to soften lines or create feathering effects is bleeding, which can be easily done whilst our paint is still wet or is in the drying process.
To do bleeding, simply rinse your paintbrush thoroughly and draw a line of clean water right along the outer edge of the shape or line you want to soften out. Because paint will expand in wet areas, the color will feather out into the recently wetted line of clean water you've drawn, creating a softened effect.
This said, one of watercolors characteristics is the fact that they can be reactivated once they've dried! This means that we'll always have the option to go back into an area to soften it out by doing some gentle scrubbing using a clean, damp paintbrush.
Of course, certain pigments will be easier to lift and move around than others and it will be almost impossible to go back to the whiteness of our paper, but we'll be able to do at least some level of softening.
It's very useful to swatch out our colors when buying a new watercolor paint set, as this allows us to test out paint characteristics before actually using them in a painting.
In my blog post/YouTube video titled How to Swatch Watercolors and Why it's Important, I describe important characteristics and terminology related to this painting medium and take you through my own swatching process.
Watercolor bleeding/feathering effect in red
|
Watercolor bleeding/feathering in green
|
*Bonus Effect: The Backrun
In essence, backruns can be avoided by making sure the amount of water in our bristles is less that the amount of water that is already on our paper. They can also be avoided by allowing the previous layer to dry completely before going back in with another wash of color.
This said, backruns are one of those things that some artists consider to be absolutely wrong, while others actually create them intentionally to give the impression of specific things in their paintings like foliage in a landscape, etc.
What do you think?
Watercolor supplies used in the video:
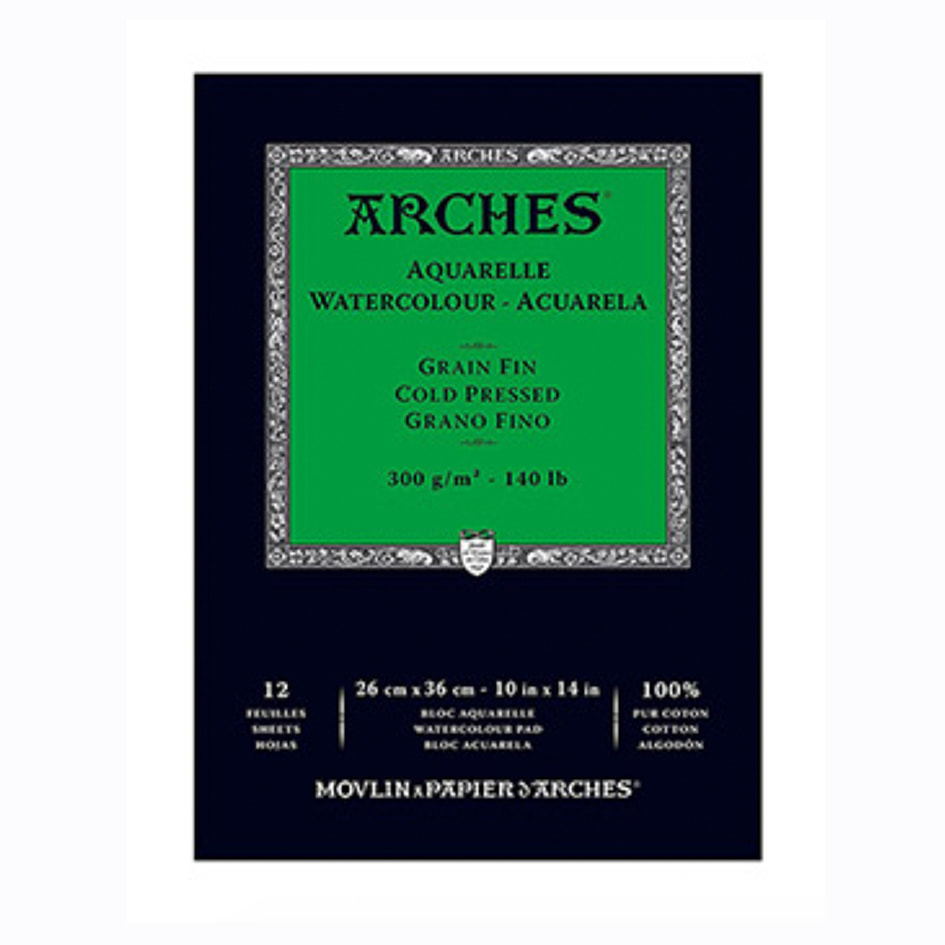 Arches Watercolor Paper Pad: 10 X 14 inches Arches Watercolor Paper Pad: 10 X 14 inches
|
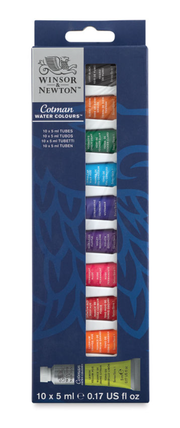
Winsor & Newton Cotman Watercolor Set of 10 Tubes
|
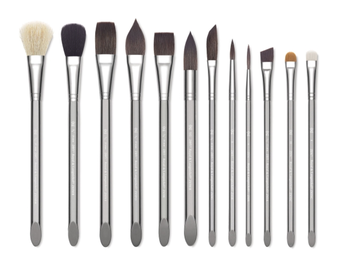
Royal & Langnickel Zen Line Watercolor Brushes
|
I hope you enjoyed this post and learned something new, or got inspired to go and create for yourself.
I wish you tons of progress and enjoyment in your artistic journey! :)

So much good stuff packed into this post Erika.... value, value, value! You are powering on in this, it’s so evident you are operating in your calling as its top shelf stuff you’re creating, all the way. Keep it up, you’re such an inspiration xx
Hey there, Chrissie!
I'm so happy to hear you liked this one. :)
Thanks so much for your positive comment. It means the absolute world to me and makes me want to continue.
I love creating helpful content for aspiring artists and encouraging others to pursue their passions.
Much love to you, my friend!
such wonderful advice - given in simple terms - I am so grateful!
Hi, Jo! :)
Thanks so much for reading and taking time to comment. It really means the world.
So happy you found this one helpful.
Wish you tons of progress and enjoyment in your journey!
Erika
Merci beaucoup, tres instructive votre conseilles!
Thanks for checking this one out, Paula! :)
Glad you found it helpful.
Wish you a lovely day.
Really enjoyed that. You have covered the basics on wet techniques so well. One clarification. What is the advantage of wetting the reverse of the paper while painting
Hi, Sanjeev!
I hope you're having a lovely day.
Glad you enjoyed this one.
Wetting the reverse of my paper while painting is not something I've ever done before. Not sure what the use of this could be.
The only time that I wet the reverse of my paper is when I'm stretching it PRIOR to starting with the painting process, not during.
Stretching watercolor paper is helpful in order to prevent warping and buckling as your painting, and to have a flat paper at the end.
You basically soak the entire sheet in water for a few minutes and then staple it onto foamboard or gatorboard and allow it to try before starting to paint.
There are many different ways of stretching watercolor paper and tons of tutorials on YouTube and in blogs. Each artist has their own way of doing it and one must really experiment to see what works best for us.
You can probably find a bunch by searching for "Stretching watercolor paper tutorial" or something along those lines. :)
Hope this helps in some way and thanks again for checking out this post.
Take care!
Thanks. I needed this info and I will read and reread until I feel ready. I do not want to do abstract. I will have a drawing. Thanks again.
Hi, Michele!
Thanks for checking out this post and taking time to leave a comment.
Glad you found this one helpful. Wish you tons of progress and enjoyment in your art journey.
Have a lovely day and take good care!
Thanks for the reminder that the kind of pigment I'm using can also be a factor when using a wet-on-wet technique when painting I'd like to look for a learn to watercolor paint course soon because I've been having a lot more free time during the weekends lately. Maybe it would be best to use that time to learn new things.
Hi, Alice!
I have line and wash courses myself that you can check out here: https://www.erikalancaster.com/courses.html
Hope you find what you're looking for and wish you tons of enjoyment moving forward in your journey!
Thanks for reading.
Leave a Reply.


is a participant in the Amazon Services LLC Associates Program, an affiliate advertising program designed to provide a means for sites
to earn advertising fees by advertising and linking to amazon.com.
www.erikalancaster.com
is a participant in the Shareasale.com Affiliate Program, an affiliate advertising program designed to provide a means for sites to earn advertising fees by advertising and linking to Shareasale.com partner companies.
 RSS Feed
