*This post contains affiliate links. I receive small commissions for purchases made through these links at no extra cost to you. These commissions help me keep this site up and running, in order for me to keep providing helpful and inspiring art content. :)
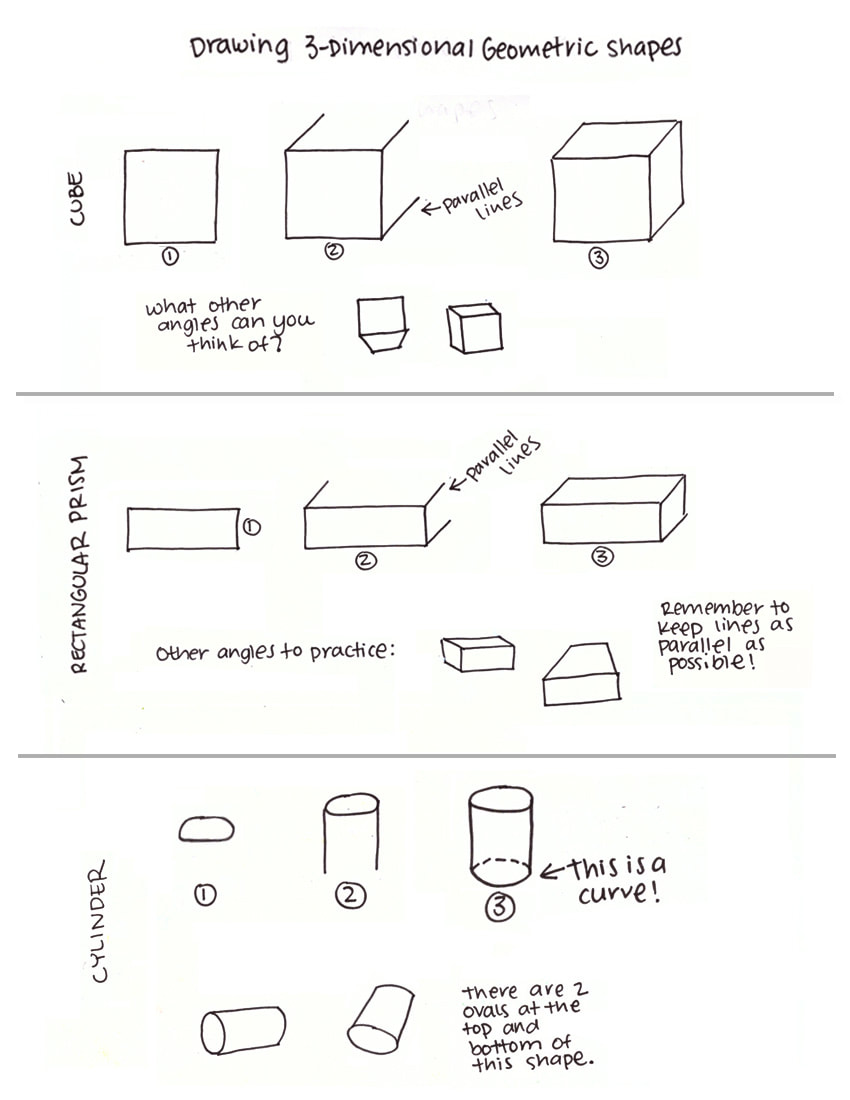
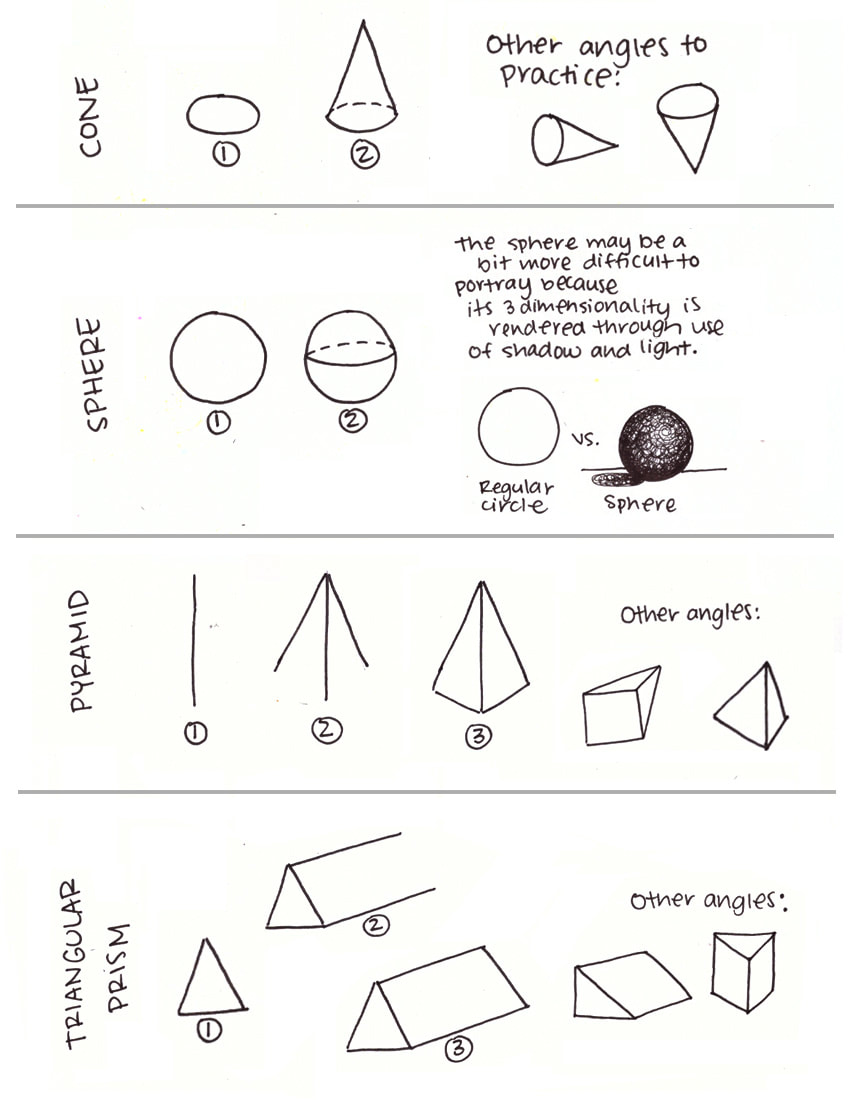
Does the word 'perspective' intimidate you? Do you feel like being too precise and using grids takes away from the fun of creating art? Would you love to be able to create drawings or paintings that effectively transmit a sense of depth and space, but don't know where to start? The term 'perspective' basically refers to our point of view when we're in a specific, fixed location. Depending on where you're sitting or standing right now, you're going to have a different perspective of your surroundings when compared to a person sitting on the opposite side of the room, or even from someone sitting/standing next to you at a different height or slightly different angle! To create believable three-dimensionality and depth on flat surfaces like paper or canvas, artists make use of grids and/or lines that assist them in creating optical illusions. Though perspective may be more evident in artworks featuring indoor or outdoor scenery, it's actually present in all types of art, whether it's a portrait, a still-life, or anything in between. Make no mistake, perspective is a fundamental topic to understand in order to achieve believable and compositionally-sound drawings or paintings. In today's post (and YouTube video!), we're focusing on 1-Point Perspective, which is the perfect place to start for the beginner artist. I'll be walking you through an initial exercise using simple three-dimensional geometric shapes that will allow you a proper warm-up, and then we'll be applying our knowledge to draw the inside of a room! *A quick caveat before moving on: If you feel you don't have enough practice drawing simple, three-dimensional geometric shapes, you may want to practice drawing these a few times before continuing with the first drawing exercise. Feel free to grab and print these two PDF's with steps for drawing cubes, rectangular prisms, etc.
A while back I wrote a very thorough guide to both One-Point and Two-Point Perspectives, which includes several more free downloadable worksheets/templates. In that post, I explain a lot of key terms related to perspective that you should definitely know about and also provide numerous examples of perspective in both famous artworks and modern photography. Check it out here: Perspective for Beginners: How to Use 1 and 2 Point Perspectives to Create Great Artwork The 1-Point Perspective Grid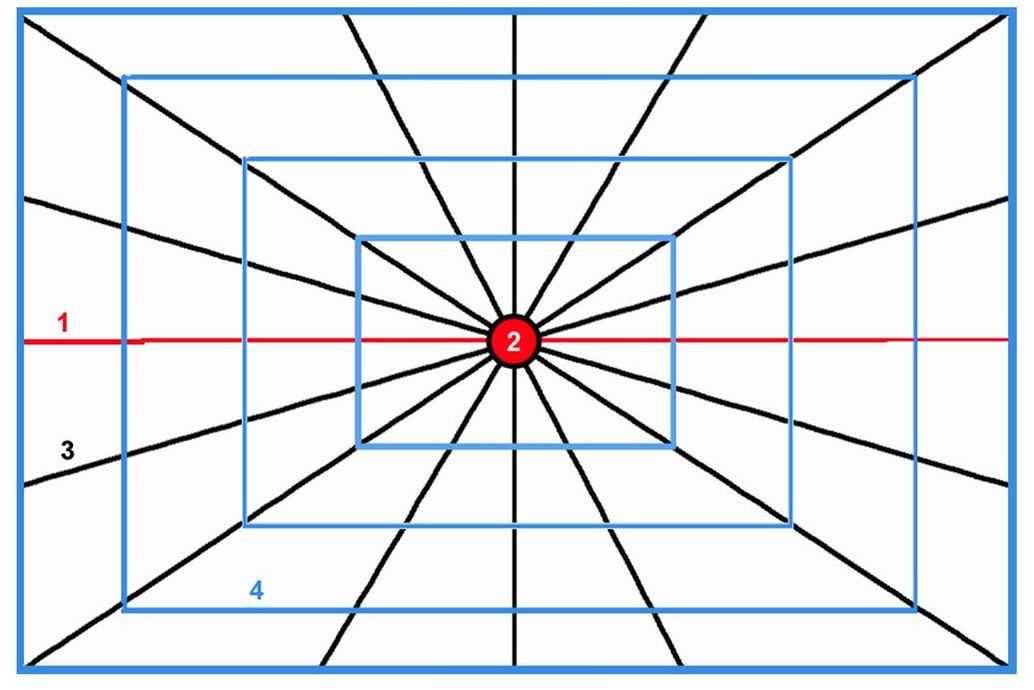
The 1-Point Perspective grid
One, Two and Three-Point Perspectives are all categorized as ¨Linear Perspectives¨. This means that they rely on the use of straight lines to depict three-dimensional space and the forms within it. In other words, to apply these techniques we will need to prepare for our drawings by creating grids which will be erased later on. What these grids do, is allow us to create the illusion that objects get smaller and smaller as they get further away from us, while objects closer to us will appear larger. These grids also allow us to establish our vanishing point(s), which represents the furthest point from us in the distance. The 1-Point Perspective grid contains one vanishing point, while the 2-Point Perspective grid contains two, and so on. The 1-Point Perspective grid, is very useful when we're trying to draw a subject front-on. Surfaces of objects facing the viewer are drawn in their flat, undistorted shapes. However, sides of shapes that are not facing the viewer are created by diagonal lines that converge at our single vanishing point in the distance. The following are included in a One-Point Perspective grid: 1. Horizon Line This is the line that separates sky from land (in landscapes) or sky from water (in seascapes). It is also referred to as the "eye-level" of the viewer. The Horizon Line doesn't necessarily have to be right in the middle of your picture. In fact, it is a lot better, compositionally speaking, if it is somewhere below or even above the halfway point of your drawing area. Objects above the horizon line are drawn as if you're looking up at them, while objects below it are drawn as if you're looking down at them. 2. Vanishing Point The Vanishing Point is placed somewhere on the Horizon Line and it represents the farthest point in your picture. When creating a grid, this point is were the Orthogonal Lines all meet. 3. Orthogonal Lines Orthogonal Lines (also known as Convergence or Vanishing Lines) are key when drawing perspective. They are diagonal and recede back into the vanishing point. A perspective grid can have many Orthogonal Lines or very few of them, depending on the complexity of the picture. The more elements in the picture, the more lines you will probably have to include in your grid. 4. Transversal Lines These are completely horizontal or vertical lines that are either parallel or perpendicular to the horizon line. They form rectangles or right angles along the grid and are especially useful when drawing interiors (which we'll be doing today!). 5. Vantage Point The Vantage Point refers to the specific place from which a scene is viewed. This point can actually be very high (referred to as bird's-eye) or very low (referred to as worm's-eye). It is crucial to decide where the Vantage Point is going to be in the very beginning because this will affect the placement and size of all elements within the composition.
If you enjoyed this video and found it helpful, make sure to subscribe to my YouTube channel. I share a brand new video every week with art tips, drawing and painting tutorials and mindset/productivity tips for artists. *Subscribe HERE*

Let's get started!
Supplies You'll Need:
-1 pencil with harder graphite (H or HB) -1 pencil with softer graphite (B or 2B) -Ruler -Sharpener -Soft eraser -A few sheets of printing paper *Optional: Black drawing pen
Drawing Exercise #1: 3D Shapes Using the 1-Point Perspective Grid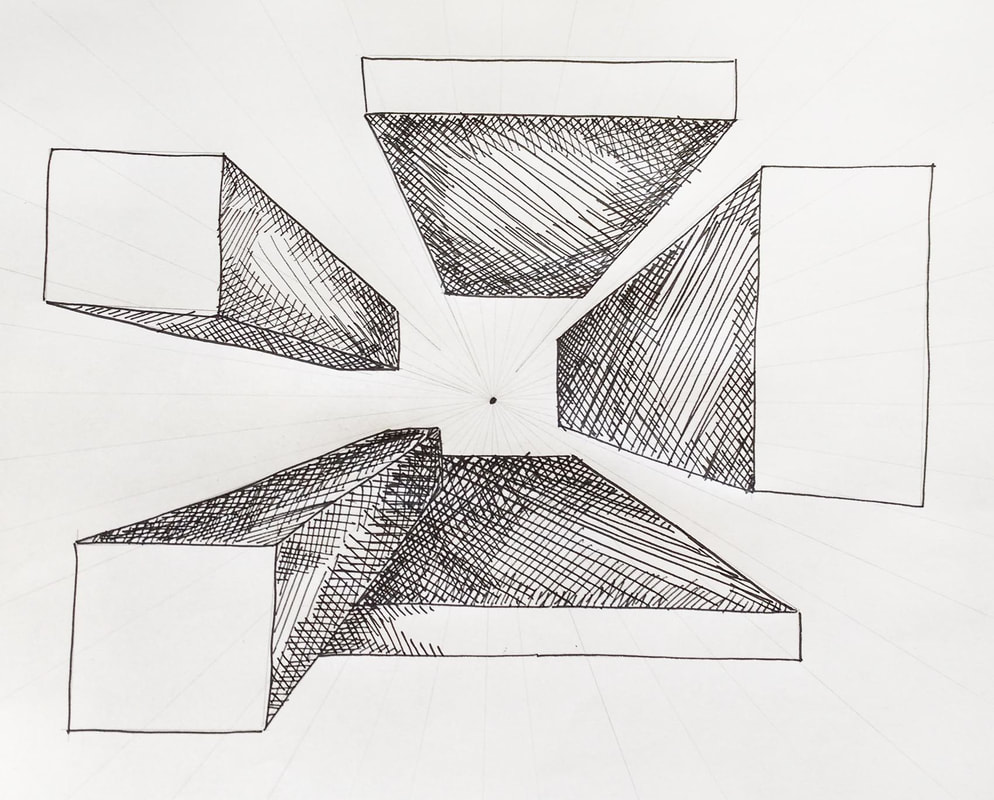
3-Dimensional shapes drawn on a 1-Point Perspective grid.

Steps: 1. Using a ruler and your hard-lead pencil, draw a simple 1-Point Perspective grid. Pick a point within your drawing space (it doesn't necessarily have to be right smack in the center of it). With your ruler, draw lines intersecting at this point. Draw enough lines to fill the majority of your drawing space, but keep them as light as possible! 2. Using a softer-lead pencil, start drawing flat, two dimensional squares or rectangles anywhere within your grid. Do your best to keep your lines as straight as possible and help yourself with your ruler if needed. These flat shapes will be the 'planes' or sides of objects facing you. 3. Pin-point the innermost corners of your shapes (the ones closest to the vanishing point) and, using a ruler, draw lines from these corners to your vanishing point. Make sure your ruler is perfectly aligned with the corners of your shapes and your vanishing point. *Notice that some shapes are going to have two planes (or sides) showing and others will have three, depending on their location within your grid. 4. Close these shapes anywhere you'd like using horizontal or vertical lines. Make sure to protect those right angles and keep your lines as parallel as possible! 5. Extra step: Shade some of your shape's sides, just make sure to keep it consistent throughout (if you start shading the innermost planes of your shapes, keep the front planes unshaded). Read my blog post titled Guide to Shading Techniques: Hatching, Cross-Hatching, Scribbling and Others to learn some fast shading methods! Drawing Exercise #2: Drawing a Room Using the 1-Point Perspective Grid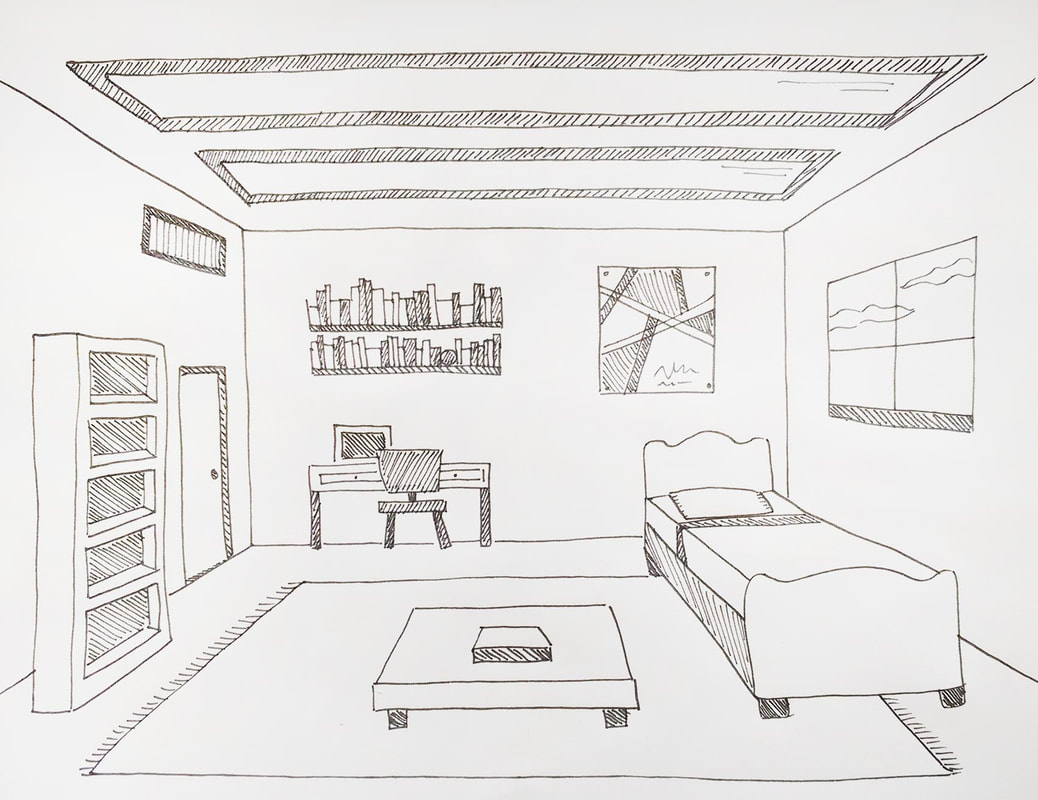
Room interior drawing showing One-Point Perspective.
Process: 1. Using a ruler and your hard-lead pencil, draw a flat rectangle in good size somewhere near the center of your drawing space (this will represent the back wall of your room). This rectangle doesn't necessarily have to be perfectly centered by any means, but make sure that you're leaving enough space around it so you have enough area to add things into your room! *Don't make this rectangle to small or narrow, as it will make your room look more like a long hallway. And don't make your rectangle to big, as this will make it seem like your standing too close to your back wall! 2. Create a very light cross in the center of your rectangle/back wall by aligning your ruler to opposite corners of your rectangle (top-left to bottom-right and top-right to bottom-left). Make a dot right where these diagonal lines intersect. This will represent your vanishing point. 3. Next, you're drawing the four corners of your room! To do this, align your ruler with your vanishing point and each of the corners of your back wall to draw four lines outward. Fill up the rest of the area on your floor, ceiling and walls with light lines like we did in the first exercise. Avoid filling in your back wall with lines, as you won't be needing them there. 4. Switch to your softer-lead pencil and re-trace the corners of your room to make them a bit darker. This will allow you to better visualize your floor, walls and ceiling. 5. Start adding in windows, doors, rugs or whatever you'd like to include in your room using your diagonal grid lines. Start by adding in flat decorative items (posters, doors, windows) and once you've got that down, begin experimenting with using 3-dimensional shapes as foundations for more complex pieces of furniture! Remember, rectangular prisms and cubes can basically be used to start off drawings of tables, shelves, beds and even sofas! *Check out the embedded video and pause as many times as you need to to see how I do it, step-by-step. Vincent Van Gogh's famous Bedroom in Arles is an excellent example of a famous artwork showing the interior of a room. Where would you say the Vanishing Point in this work is located? 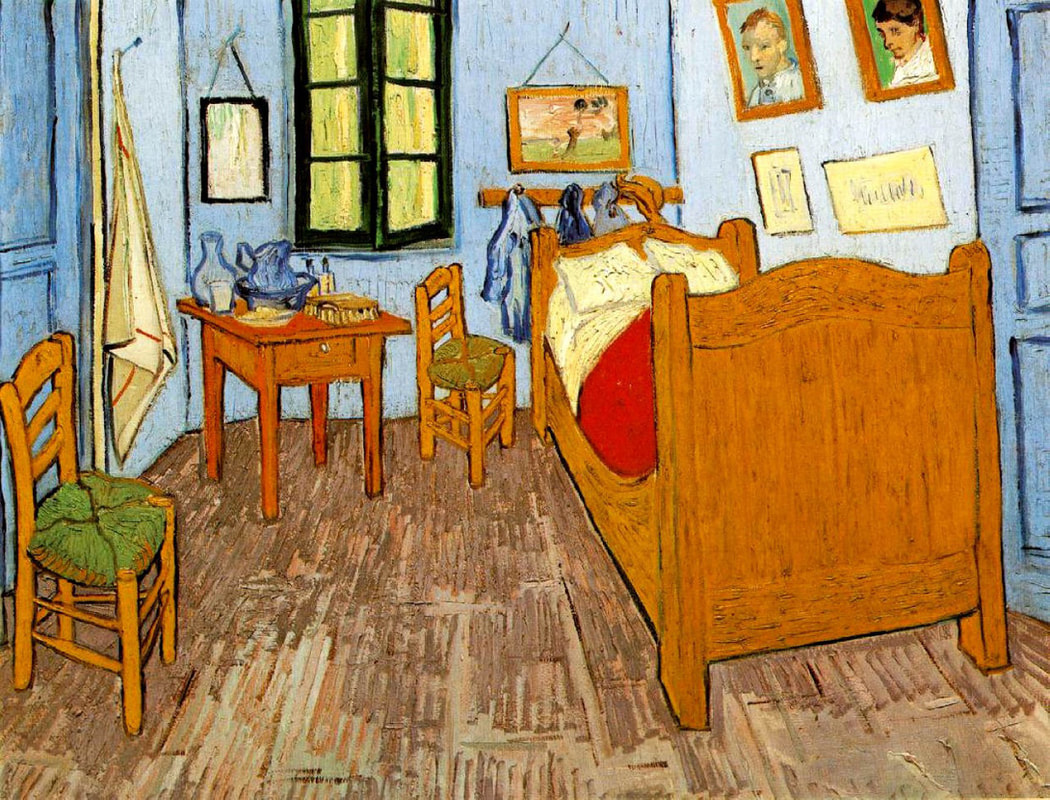
Bedroom in Arles painting by Vincent Van Gogh (1888) showing 1-Point Perspective.
Notice how the Vanishing Point in this room is off-center! In many cases, placing this point off-center actually makes a work more interesting!
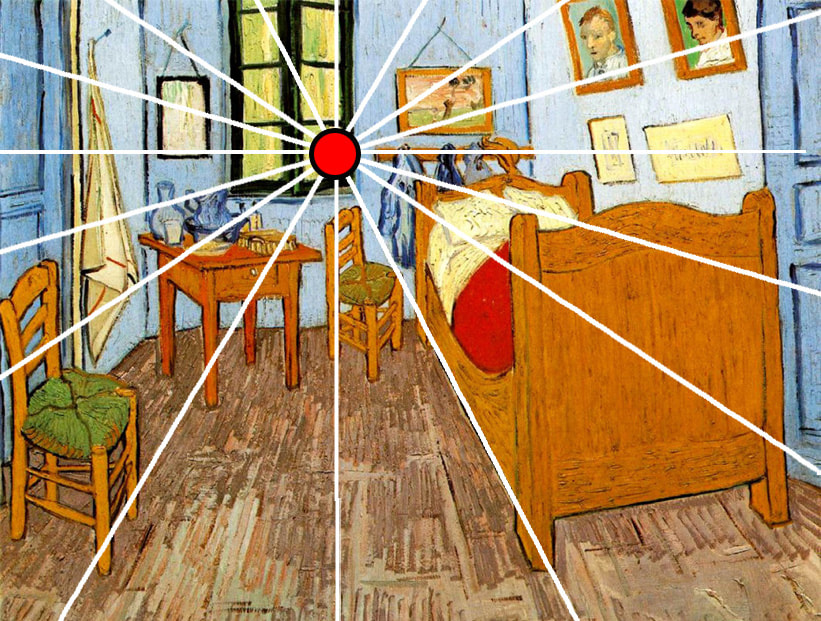
Bedroom in Arles painting by Vincent Van Gogh (1888) with 1-Point Perspective grid.
Even though creating perspective may sound complicated and like an intricate process when we're just starting out, I promise you that it's not as hard as it seems and it will come naturally to you after some practice! Not to mention, these types of drawings usually lead to very satisfying results and provide us with much needed visualization practice that will improve our artistic skills tremendously! Take your time with this, have fun, and move on to creating 2-Point Perspective drawings once you've grasped the concept! :) What's your favorite masterpiece or famous artwork that demonstrates 1-Point Perspective? I'd LOVE to know in the comments section below!
10 Comments
Erika Lancaster
5/14/2018 08:04:11 am
Hi Jenna,
Morgan
4/10/2020 08:37:27 am
i really liked it 4/13/2020 09:03:16 am
Hi, Morgan!
Amanda
7/13/2020 10:12:39 am
Thank you Erica, this was really helpful. I have never used these gridlines before. I enjoy every moment of the 30 day challenge! Greetings from South Africa, Amanda 7/15/2020 03:51:12 pm
Hi, Amanda!
ART
10/6/2020 05:49:24 pm
Hi Erika, 10/12/2020 06:49:41 pm
Thanks for checking this one out, Art!
phyllis
7/24/2024 09:23:36 pm
I have started drawing a one point perspective room, but I cannot figure out how to continue. None of the walls in the room I am drawing are parallel; there is the wall at the back, a wall coming off the right of the back wall at a right angle, and a wall coming off the left of the back wall at an obtuse angle. I need to draw another wall coming off the leftmost wall at a right angle, but I'm not sure where to place the vanishing point for the wall to make it appear to be at the right angle. Leave a Reply. |


 www.erikalancaster.com
is a participant in the Amazon Services LLC Associates Program, an affiliate advertising program designed to provide a means for sites to earn advertising fees by advertising and linking to amazon.com. www.erikalancaster.com is a participant in the Shareasale.com Affiliate Program, an affiliate advertising program designed to provide a means for sites to earn advertising fees by advertising and linking to Shareasale.com partner companies. |
|||||||||||

 RSS Feed
