*This post contains affiliate links. I receive small commissions for purchases made through these links at no extra cost to you. These commissions help me keep this site up and running, in order for me to keep providing helpful and inspiring art content. :)
Unsure of how to create lights, midtones and darks in pen and ink drawings? How do you recreate value/tonal relationships present in a reference photo via pen and ink techniques? What are the best exercises for beginners? In today's post I will be explaining a few techniques that are very useful to know when you are ready to start giving drawings a sense of realistic volume and depth. Once you can create basic outline drawings, the next step is to start practicing further observational skills which will allow you to pinpoint light and shadow areas as well as other details in subjects. This is an essential skill to develop as you work your way towards creating more realistic artwork. I will be including seven different shading techniques commonly used by pen and ink artists. However, I use many of these myself when drawing with pencil and they can be used when drawing with charcoal, chalk, and many other kinds of drawing media. I will not be going into the graphite blending technique that is commonly used to create hyperrealistic drawings because what I want to get across with this lesson is the importance of value placement, more than creating realistic texture.
Value or tone is an incredibly important Art Fundamental to understand if we're looking to start developing any sense of realistic three-dimensionality and depth in our drawings.
It is a wide range of values, starting from lightest lights, to a wide range of midtones, to darkest darks, that give a subject a sense of three-dimensional form. Many artists argue that value is even more important than color. It's common for artists to create sketches prior to starting paintings and, in these sketches one of the most important things to decipher (besides proportion and placement of elements within the composition) is where the darkest and lightest areas will be. Let's begin with the topic! Hatching, crosshatching, stippling, etc. are traditional drawing techniques that have been used by artists for centuries. All of these are nothing but patterns and groups of lines (or dots) placed in well thought-out ways in order to transmit a sense of volume, three dimensionality, depth and texture. Some artists style is more controlled and precise, which lead to cleaner and more organized lines, while others have a more free and expressive style. I greatly recommend looking for drawings by Van Gogh, Durer and Da Vinci to be able to see different results. First off, I want you to take a moment to observe the following etchings created by Giorgio Morandi. 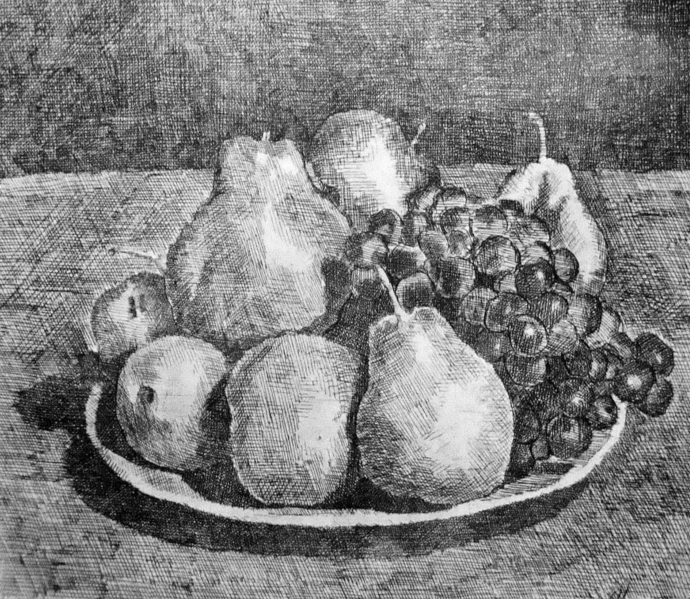
Giorgio Morandi etching. Still Life with Pears and Grapes, 1927.
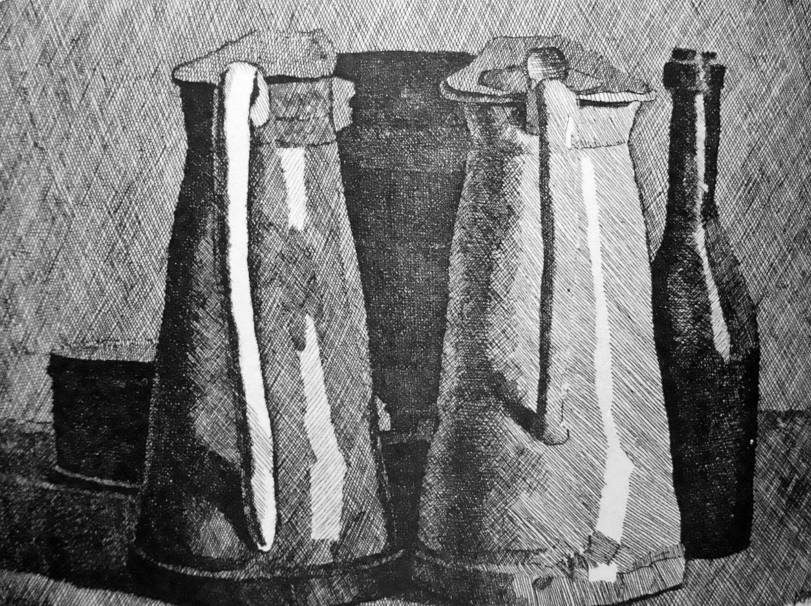
Giorgio Morandi etching. Still Life with Five Objects, 1954.
These etchings were created by using a combination of hatching and crosshatching. I want you to notice the lightest areas in the artworks, as well as the darkest. Notice how the lightest areas have nearly no lines in them, so they look almost entirely (or entirely) white. Now notice how the darkest areas are full of lines to the point at which they look close to (or entirely) black. Try pinpointing the different values in between the lightest and darkest throughout the drawings. How many can you count? How many variations in value do you think you can create using only one pen or pencil? Practice creating value strips showing gradual tonal changes using the downloadable PDF at the end of the post (VALUE_STRIPS.PDF). This will help A LOT! 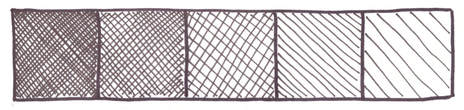
Value strip exercise
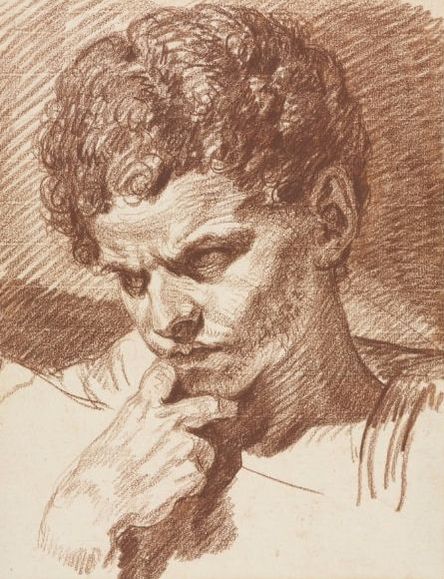 Jean-Baptiste Greuze red chalk sketch. Head of Caracalla, 1768. Jean-Baptiste Greuze red chalk sketch. Head of Caracalla, 1768.
Now take a moment to observe this piece by Jean-Baptiste Greuze created with only red chalk. Notice how this drawing is more complex due to the nature of the subject. Notice the whitest areas and the darkest areas and the values in between. In this drawing, the artist used a mixture of shading techniques. I can find both straight lines, contour lines and even some scribbles which create the texture of curly hair. Understand that different shading techniques can be used together in one same piece. Ok! Moving on! Follow along with the tutorial below to practice hatching, crosshatching, weaving, contour lines, scribbling and stippling:
If you enjoyed this video and found it helpful, make sure to subscribe to my YouTube channel. I share a brand new video every week with art tips, drawing and painting tutorials and mindset/productivity tips for artists. *Subscribe HERE*
Different Shading Techniques Here are seven different shading techniques that you can use in your drawings and sketches. When using all of these techniques, it's important to keep in mind that, even though lines do not have to be super perfect, you do have to take your time and think about what your doing. It's essential to keep a sense of consistency in terms of the marks you create throughout your piece and to stay mindful of how your mark-making is going to affect its outcome. Keep line thickness, direction, and overall size in mind throughout your drawing process! What's even MORE important, is that the lines you create accentuate the form of the object you are drawing. Increase the density of your lines by placing them closer together or creating a second (or even third) layer overlapping the first in areas that you want to appear darker. If you need practice drawing sets of parallel lines, I recommend practicing until your hand becomes steady enough. Practice each of the following techniques using the downloadable PDF at the end of the post titled SHADING_TECHNIQUES. 1. Hatching/Parallel Hatching This can be considered the most basic of all of the shading techniques included here. It involves creating groups or patterns of parallel lines. These lines don't have to be completely vertical or horizontal. They can also be slanted or follow any angle you'd like, as long as this direction is uniform throughout the area you are shading. 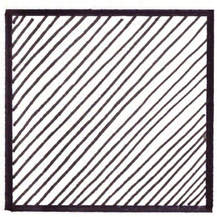
Hatching

2. Cross Hatching Cross Hatching is like taking parallel hatching to the next level. You create a first layer of parallel lines (in any direction) and a second layer of lines is drawn on top in a perpendicular or nearly perpendicular manner. This technique is probably the quickest of all due to the fact that you are able to create darker values faster than with the other techniques. I tend to go for this method most of the time myself. 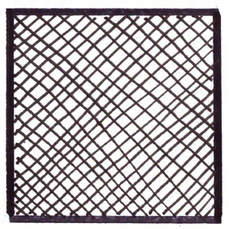
Cross-hatching
3. Contour Hatching This technique involves using lines that follow the curves or lines of the initial contour/outline drawing. When used correctly, contour hatching enhances volume and three-dimensionality in a very striking manner. With this method, it is important to be able to visualize the three-dimensionality and planes of whatever it is your drawing. 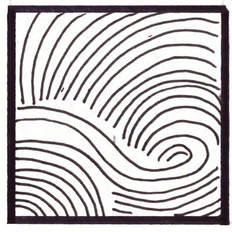
Contour Hatching
4. Stippling When stippling, tone and texture is built up by applying dots in different densities. This technique takes time and you have to make sure that you don't start creating lines instead of dots. 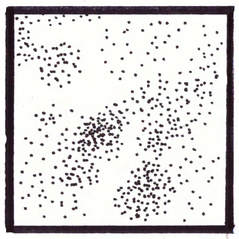
Stippling
5. Tick Hatching This method is similar to stippling but instead of making dots, you make short lines. In darker areas, lines are placed in an overlapped manner. I personally don't use this method very much because I find the texture it creates looks like hair! However, it is very useful when using oil pastels or similar media to create Impressionist-style art. 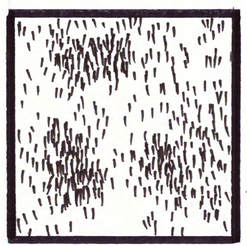
Tick Hatching
6. Woven Hatching Woven Hatching leads to a very interesting outcome when done correctly. This technique involves creating sets of short(er) parallel lines in one direction and then placing another group of parallel lines next to it in perpendicular or near-perpendicular directions. Crosshatching can be later added to add density in areas that require darker values. 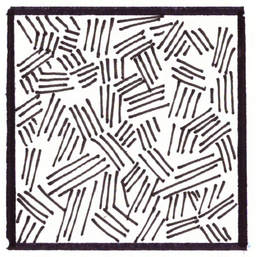
Woven Hatching
7. Scribbling Scribbling is an excellent technique to use when drawing specific subjects like trees or hair because it not only creates values, but also transmits a sense of texture. In the drawing below I used scribbling to create the leaves of the tree and the effect of grass below it. I love scribbling! 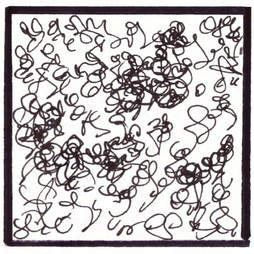
Scribbling
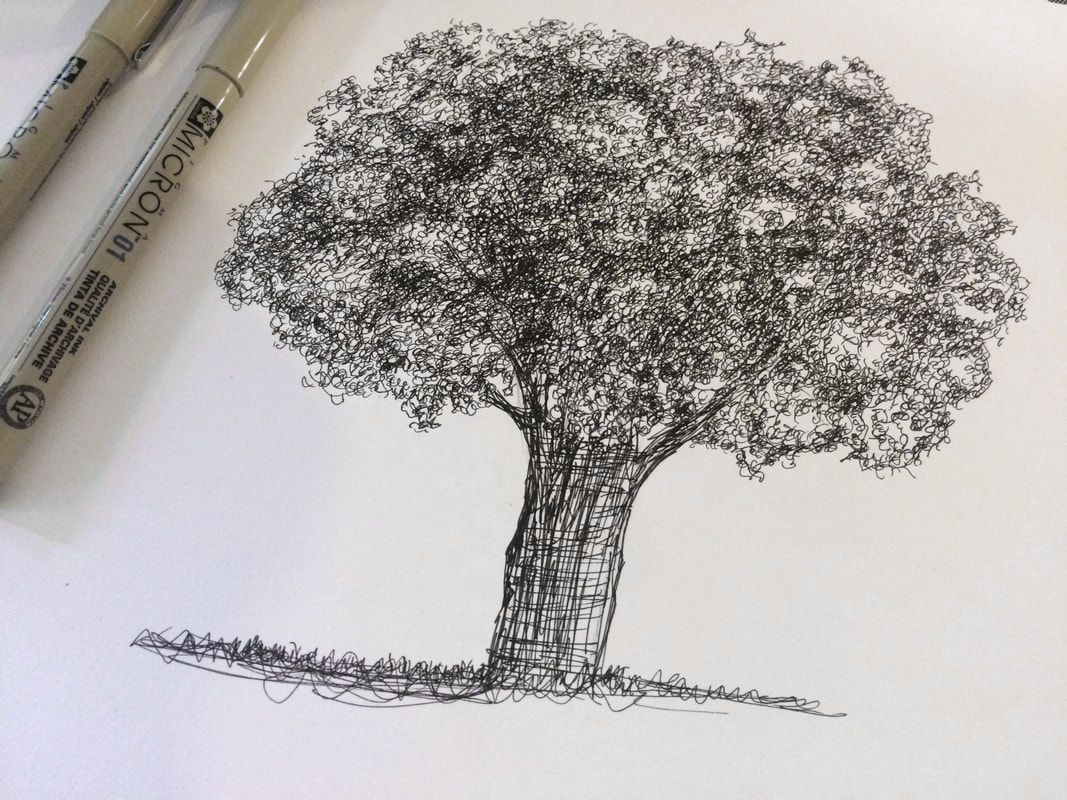
Tree pen sketch by Erika Lancaster. Micron pens on Canson Mixed-Media sketchbook.
For a complete list of my current favorite art supplies, go here.
Practice the different shading techniques described using the PDF titled SHADING_TECHNIQUES attached at the end of the post. Then, before starting with more complex figures, practice shading simple geometric shapes (use PDF titled GEOMETRIC_SHAPES). 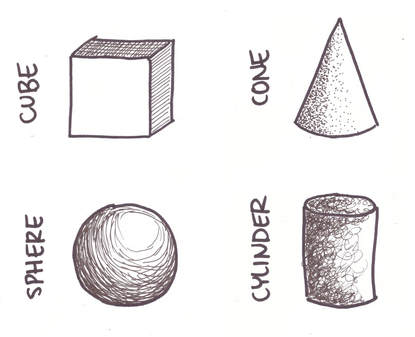
Various shading techniques used to shade simple, geometric shapes.
Essential Steps to Achieving Successful Shading 1. Make sure you select a good photographic reference What makes an effective photograph? Firstly, make sure it is large enough to allow you to view details. Do not select blurry photos. Secondly, make sure the photo is not over or underexposed and has a good balance of light and dark areas. I recommend selecting a photo that has only one visible light source hitting the subject so that you can easily distinguish where the lightest parts and darkest parts will be. Try going for a simple object first. Perhaps a simple still life photograph with only one or two objects in it? Start out with something like this. You can download this image for free use here or find other great pictures to practice from at www.pexels.com. 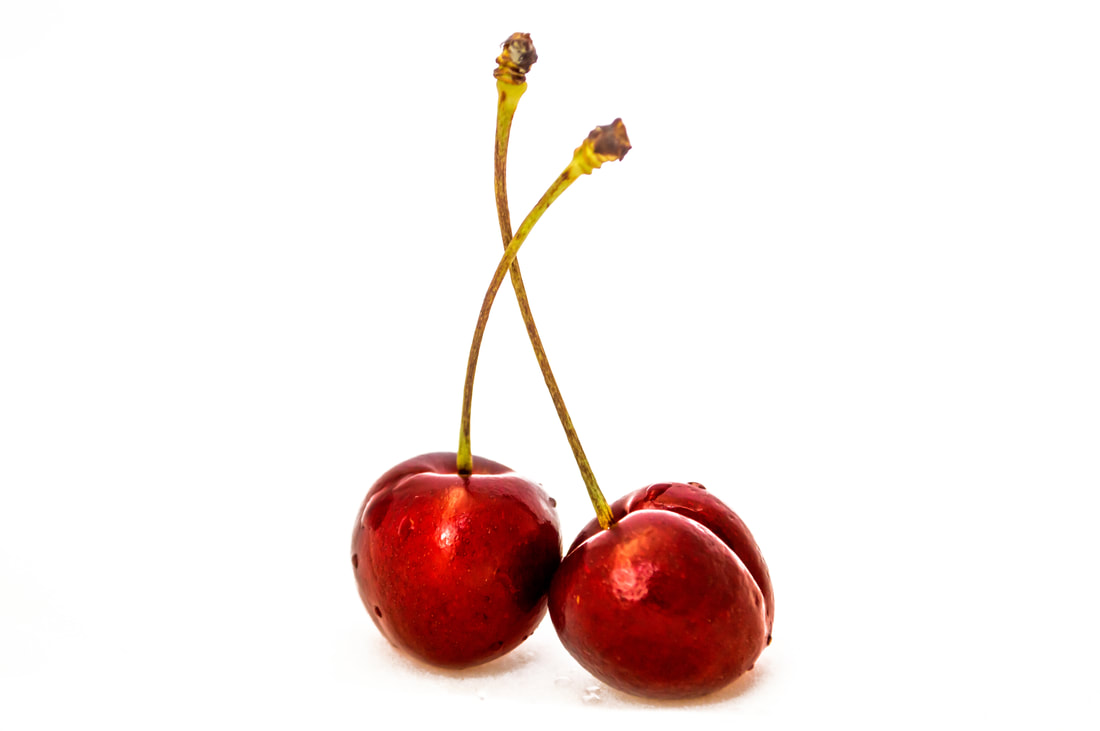
Photograph by Lisa Fotios. Find her photos at www.pexels.com or visit her website here.
2. Create a light pencil sketch including only outlines of shapes Practice your observational/drawing skills to create a simple, outline drawing of your subject. Focus only on the general shapes, proportions and locations of the subject(s) in relation with one another and within the composition. 
Outline drawing of cherries created using the previously mentioned reference picture.
I strongly encourage you to keep practicing your drawing skills and not resort to tracing, but I have included my outline drawing in PDF form for you to download if you wish to only focus on shading techniques today (CHERRY_OUTLINES.PDF).
3. Take a moment to observe the reference picture and answer the following questions: -Where is the light source located in relation to my object(s)? Is the light in front, behind, below, above or to the side of the subject? -Where are lightest/whitest parts of the subject? -Where are the darkest/blackest parts of the subject? -If there are different colors included in the photograph (in this case we have red and green), how do they relate to one another in terms of their value? Is the red included here LIGHTER or DARKER than the green? This is very important! It may be easy to notice different values within one same color, but once more colors are added in, it is important to notice how they compare to one another in terms of lightness or darkness. For example, in this picture, the values of reds in the cherries are darker (for the most part) than the green in the stems. The green in the stems is pretty light when compared to the reds of the cherries and this is something that has to be translated within a one-color drawing. *If you still feel unsure, I recommend you take your time when preparing your initial sketch. Create a map for yourself using LIGHT pencil strokes within your outline drawing. I do something similar when painting with watercolors in order to remind myself what areas will be left completely white and which areas are darkest. 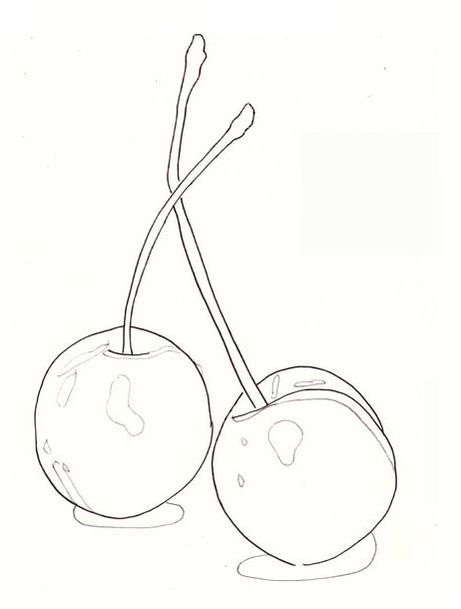
In this "map" I have created shapes that should be left nearly white and also where my cast shadows will be below the cherries.
4. Start developing those values! I recommend starting your drawings with pencil if you haven't practiced these techniques much and move on to pen and ink once you feel more confident. Pen and ink drawings are wonderful and super fun but each and every line you create is permanent and it is easy to get discouraged if your drawing doesn't turn out the way you want it to. Experiment with different techniques and go for the one you feel comes most natural to you. You can move on to exploring combinations of techniques and more complex subjects as time goes by. The way I usually start this type of drawing is by placing my hatching in darkest areas and go back and forth adjusting values as I see fit. 5. Consistency is key It is essential to keep in mind that the lines you are creating are meant to ENHANCE and not DISTRACT the viewer when the piece is finished. So, again, remember that line length, thickness, and direction should show some kind of consistency. Take your time! These kinds of drawings are very much a mental exercise as much as they are a drawing exercise. 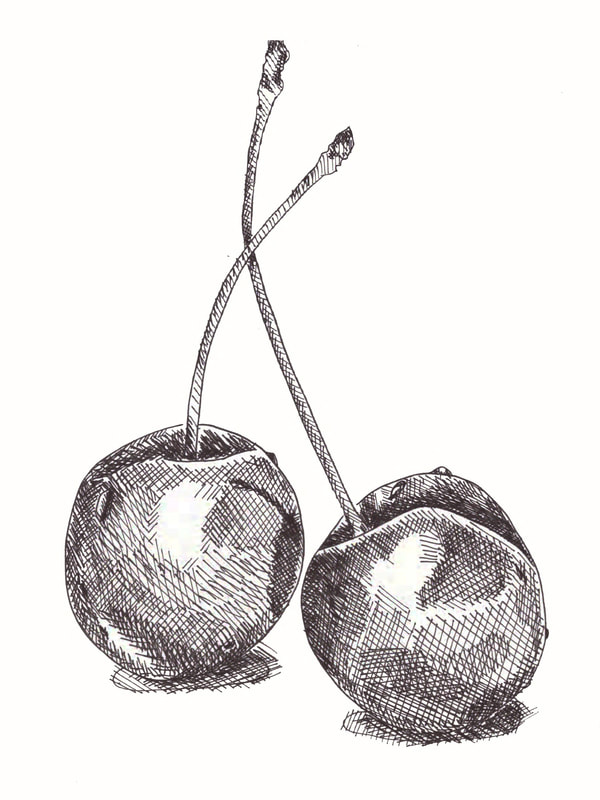
Pen/Ink drawing of two cherries showing the crosshatching shading technique by Erika Lancaster.
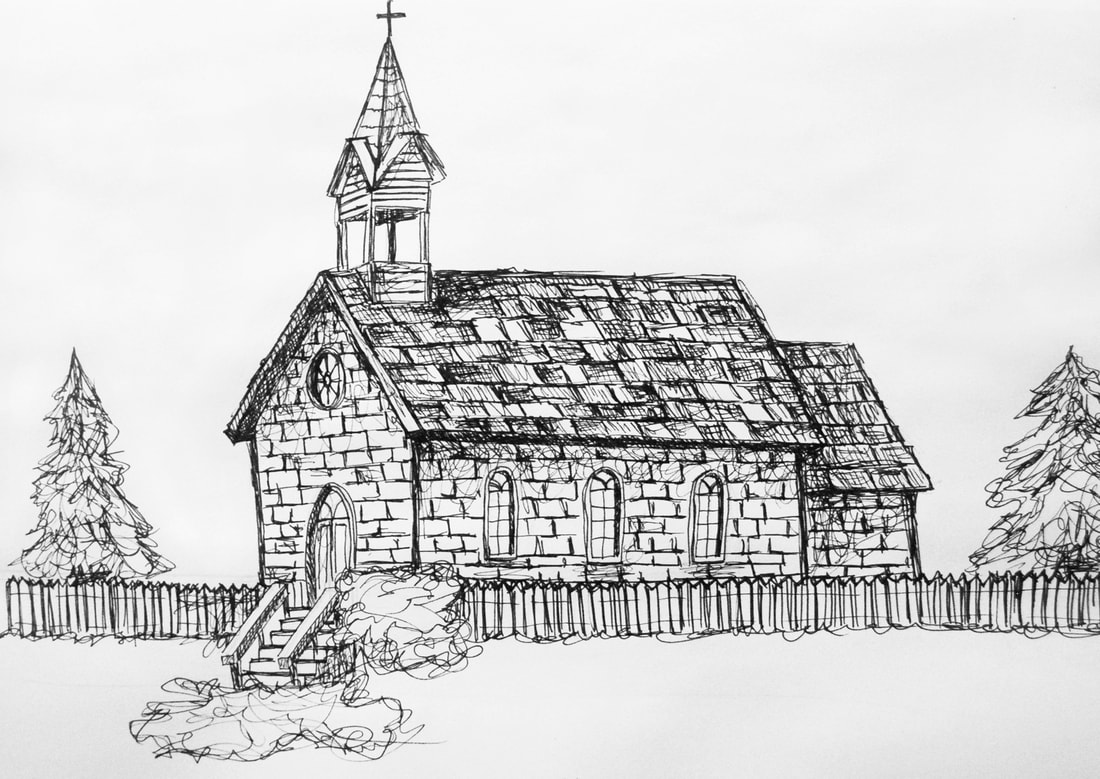
Old country church pen sketch showing a variety of shading techniques by Erika Lancaster.
What kind of shading technique do you like most and why? Do you switch shading techniques depending on the artistic medium you're using? I'd love to hear from you! Comment below.
66 Comments
Chris Lintner
5/1/2018 06:24:53 am
I found this very informative and the best instructional on this topic. It's a n important first step in some cases and it helps to develop a sense of value. My friend who is an art professor stresses value above all when trying to achieve depth in a painting.
Erika Lancaster
5/1/2018 08:43:56 am
Hi Chris!
Gillian
6/17/2018 06:27:01 am
This was great background reading for me as I am covering a primary school class teaching these shading techniques. The downloadable PDFs and the worked example of the cherries will be particularly helpful. The class of 7 - 9 year olds will be experimenting with the techniques tomorrow! Thank you
Erika Lancaster
6/17/2018 10:20:09 am
Hi Gillian,
Patrick
11/4/2018 12:03:37 pm
Hi Erika,
Erika Lancaster
11/5/2018 09:13:31 am
Hi Patrick,
bob bilson
2/28/2022 09:28:39 pm
hello
Dan Scott
5/19/2019 03:19:07 pm
I'm curious as to your recommendation for the actual application of hatch/cross hatch marks. I've been told that it's best to make the marks all in the same direction, from left to right. But I've seen some artists who seem to make the marks going both directions (more of a scribble motion). What do you suggest?
Erika Lancaster
5/23/2019 11:49:19 am
Hi Dan,
Elizabeth
12/14/2019 06:33:51 pm
This was an AWESOME post. I would go so far as to say PERFECT. You are an inspiration not only for art and learning the subject, but how to run a blog. So many blogs are spamming pop ups, auto playing ads and all sorts of other obnoxious money grab tactics. I get it, people need to be compensated for their expenses and time and I am happy to make sure that happens...but the way you do it is how. I trust you with my email, cookies, et al and I will bookmark your affiliate links because you're the real deal. Thank you Ericka. I look forward to exploring the rest of your site in the future. bookmarked por vida, cheers! 12/15/2019 06:36:27 pm
Dear Elizabeth,
pura
1/19/2020 02:35:10 am
Buenos dias
Juliet Philip
1/23/2020 11:14:10 am
Hi Ericka, 1/26/2020 01:57:24 pm
Hi Juliet! :) 3/2/2020 12:58:13 pm
Hola es muy importante lo que he leído sobre tus clases de Dibujo yo también soy Profe. de artes plásticas en una Escuela de Artes Plásticas ubicada en Guanare Venezuela y me ha parecido muy interesante he tomado algunas lecciones para practicarlas personalmente y luego llevárselas a mis estudiantes en la Universidad de las Artes plásticas 3/10/2020 08:06:16 am
Hola Andres,
Manuel Jaén
4/23/2020 10:37:09 pm
Soy un jubilado que después de tener gusto por el dibujo durante la infancia , abandone los estudios por el trabajo y ahora retomo dedicándome a la reproducción de retratos en grafito y he encontrado muy claros todos sus comentarios sobre el sombreado. Espero seguir informándome si Ud. me lo permite utilizando su pagina. 4/27/2020 02:14:08 pm
¡Hola Manuel!
Brian
5/22/2020 03:52:48 pm
Muchas gracias por compartir estos conocimientos básicos, en verdad creo que son de muchísima ayuda! 5/24/2020 04:44:48 pm
¡Hola! 6/25/2020 06:55:13 am
Much thanks for telling us about this 3 fabulous applications. They looks great despite the fact that I haven't utilized any of them. Prone to utilize them to alter a portion of my photographs. 9/16/2020 06:25:29 pm
Hey, there!
Haramain
8/11/2020 07:51:44 am
IT HELPED ME SO MUCH! 9/29/2020 03:20:35 pm
Hi, there!
Hans
9/16/2020 05:04:36 am
Thank You for the simple instructions. Very much agree, CONSISTENCY is really the key with added art skills. Your art teaching is inspiring and probably I will post some of my sketches for elementary appreciation (beginner's thumb-up so to speak if, there's any). 9/16/2020 06:26:34 pm
Hi, Hans! 9/29/2020 03:21:21 pm
Hey, there! 11/16/2020 09:16:23 am
Hi, Shanda! 12/2/2020 04:48:56 pm
I really like how you specifically point out how to do these techniques especially since that I don't know how to properly to do these! 12/7/2020 08:22:34 pm
Hi, Kiran!
Suzanne
12/23/2020 07:56:59 pm
This was so informative! I like using hatching with watercolor and ink work, and I think this will help me have a more refined technique. I fear I’ve been a little haphazard. I’m going to practice more with using it in drawing, and I believe I’ll improve. Thank you. 12/28/2020 10:38:35 am
Hi, Suzanne!
David Darvin Duobah
5/6/2021 11:41:40 am
Thanks so much for the lessons. They helped me a lot. 5/10/2021 11:13:59 am
Hi, David!
Yuri De Coti
5/26/2021 11:58:49 am
Your explanation of this process was so well put together. It is informative, concise, and easy to understand. Your post taught me what my teacher couldn't. I wish I ran into this information years ago. Thank you for the time you put into your blog. 5/30/2021 09:44:06 am
Hi, Yuri!
Sabrina
6/18/2021 01:20:14 am
Hi! Hope you’re doing well 11/23/2021 12:09:53 pm
Hi, Sabrina!
Brian
8/16/2021 06:49:55 pm
Very good, concise and informative presentation of sketching techniques - thank you! 11/23/2021 12:10:26 pm
Hey, Brian!
ROSE
11/22/2021 01:33:09 am
Hi Erica, thank you so much for the information. It has been very helpful in the detailed reading of comics and appreciating the level of engagement the artist has put in the work. 11/23/2021 12:11:10 pm
Hey, Rose!
BookNerd
11/22/2021 05:25:39 pm
Hi Erica, 11/23/2021 12:11:53 pm
Hey, there!
Leitha
1/3/2022 10:52:32 pm
This is indeed a very helpful and well written post. I have been reading/watching mountains of material online and in print about creating value with pen and ink but had become very frustrated about not finding any discussions about what to do with value differences created by colour (rather than just highlights and shadows). This is an area of my own drawing/learning journey I have really been struggling with so I am so glad to have found this post. I would love it if you were to deal with the topic of value and color in more depth in future. 1/4/2022 09:45:14 am
Hey, Leitha! 5/2/2022 04:57:57 am
Thank you for sharing amazing contents. I would like to see your next amazing contents. 5/3/2022 09:55:45 am
Hey, there! 5/3/2022 05:11:05 am
what a beautiful content you share, i hope you have a good day! 5/3/2022 09:56:26 am
Hi, there!
Swapnil
9/18/2022 04:41:47 am
Hi erika, 9/19/2022 07:01:47 pm
Hi, there!
Swapnil
10/10/2022 12:48:06 pm
Thanks ❤🇮🇳 10/15/2022 12:20:12 am
Great pieces. Keep posting such kind of info on your blog. Im really impressed by it. 10/18/2022 07:36:59 am
Hi, Maeia!
ennyabosede
10/18/2022 10:23:12 am
Really appreciate it 💕 10/23/2022 11:22:37 am
Thanks for checking this one out! 12/29/2022 01:59:27 am
I am so glad you shared this information. It is very helpful for me. 1/31/2023 01:03:04 pm
Hey, there!
Jerry Ranch
1/23/2023 04:04:07 pm
Many methods of shading. Is it considered good art or technique to use different approaches in the same drawing (hatching, scribbling and stippling, for example). I see you had an example of hatching and scribbling in the same piece. I expect the shading methods need to be "artistically compatible".... 1/31/2023 01:09:02 pm
Hi, Jerry! 12/5/2023 08:21:39 pm
Hi, Jane! Leave a Reply. |


 www.erikalancaster.com
is a participant in the Amazon Services LLC Associates Program, an affiliate advertising program designed to provide a means for sites to earn advertising fees by advertising and linking to amazon.com. www.erikalancaster.com is a participant in the Shareasale.com Affiliate Program, an affiliate advertising program designed to provide a means for sites to earn advertising fees by advertising and linking to Shareasale.com partner companies. |
||||||||||||


 RSS Feed
