|
Oh my! It's been a while since I created a post about the personal work I've been doing! Some of these are studies I created for myself, others are for goodies I create for my newsletter subscribers (I'll leave a subscription link at the end of this post in case you're interested), and the last picture is of the progress I've made so far in my largest commissioned painting to date! I still have a bit to go! The techniques included in this small collection range from watercolor paintings, to pencil sketches, to oil painting. The subjects are food/drink, portraits, landscapes and botanical. I hope you enjoy having a look into my work. Lately, I've been very much immersed in creating helpful quality content for you both here on my blog and on my YouTube channel. By the way, this Friday's blog post/YouTube video is going to be all about how to draw a face in 3/4's angle, so make sure to stay tuned for that. It's going to be a good one! 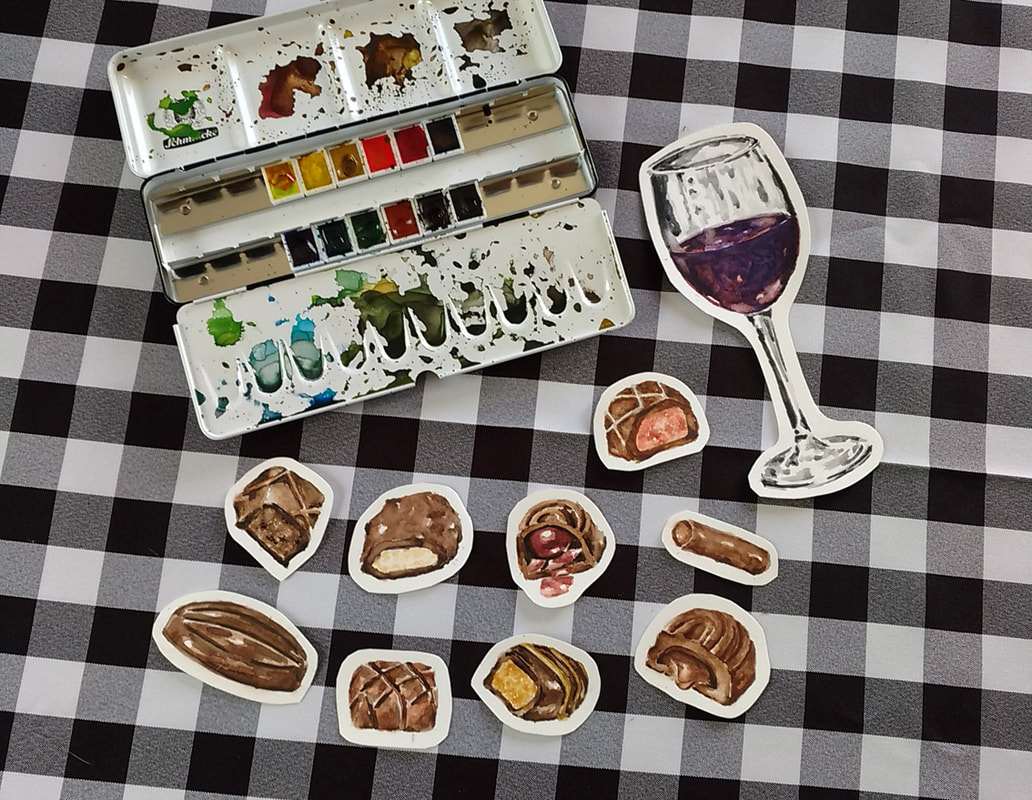
Watercolor Chocolates and Glass of Wine. Schmincke 12 Pan Watercolor Set and Art-n-Fly Cold Press Watercolor Paper.
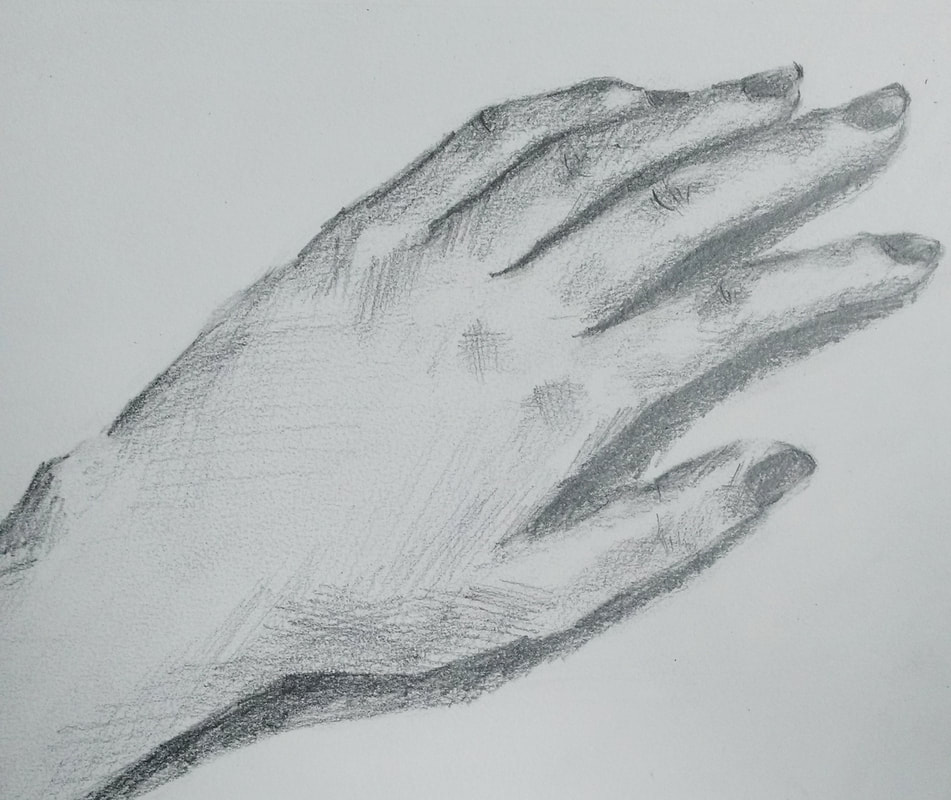
Pencil Hand Sketch. Castle Art Supplies Pencils, Pelican PVC Free Eraser and Canson Mixed-Media Sketchbook.
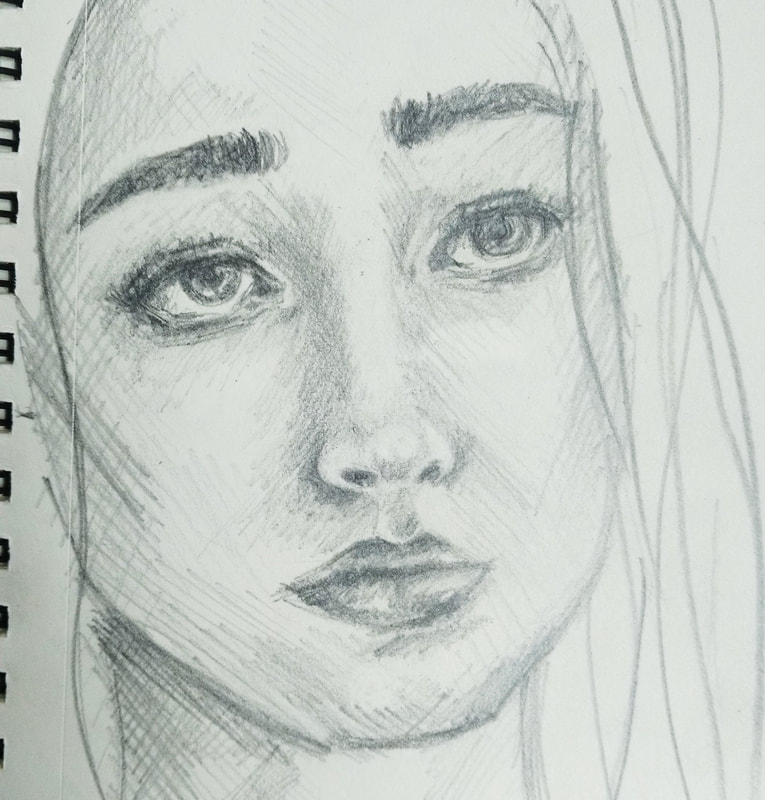
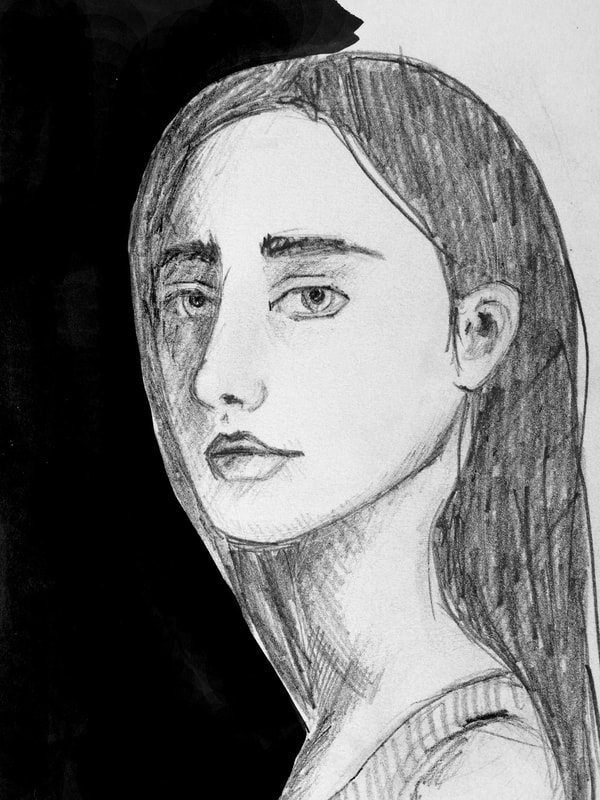
Female Portrait Sketch. Castle Art Supplies Pencils, Pelican PVC Free Eraser and Canson Small Drawing Sketchbook.
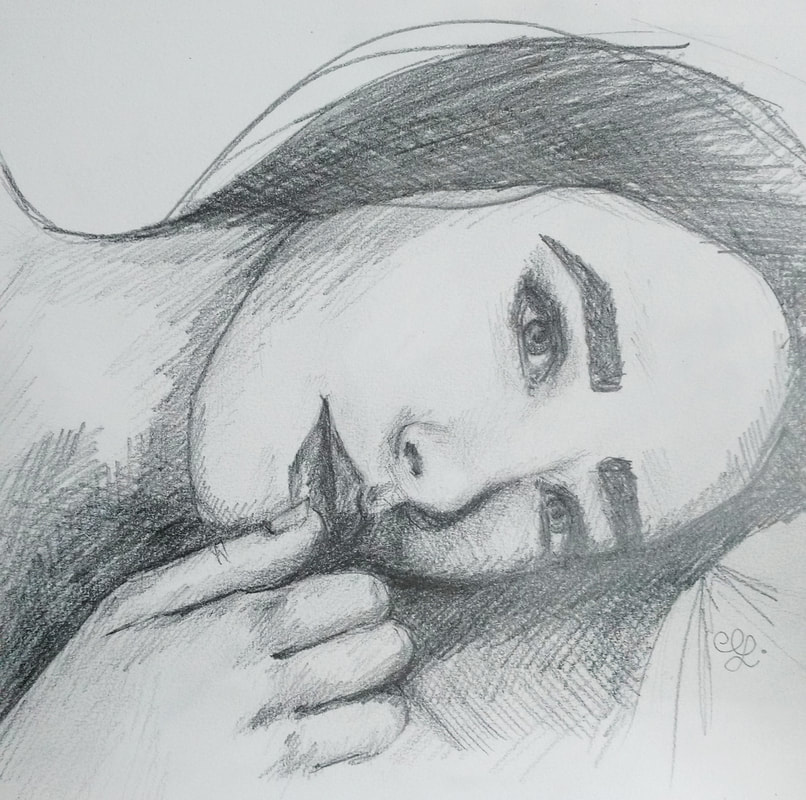
Female Portrait Laying Down. Castle Art Supplies Pencils, Pelican PVC Free Eraser and Canson Mixed-Media Sketchbook.
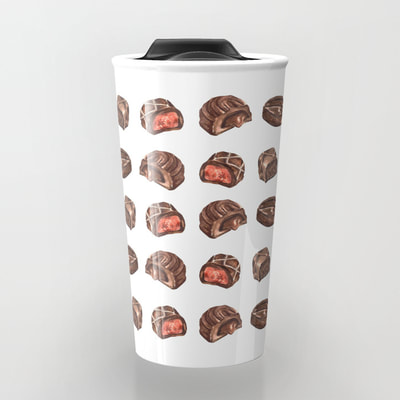
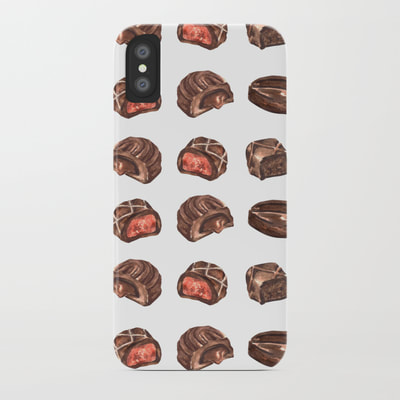
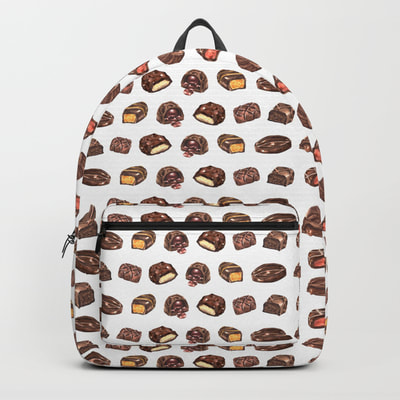
Visit my Society6 shop to find some awesome products designed around my watercolor illustrations!
2 Comments
*This post contains affiliate links. I receive small commissions for purchases made through these links at no extra cost to you. These commissions help me keep this site up and running, in order for me to keep providing helpful and inspiring art content. :)
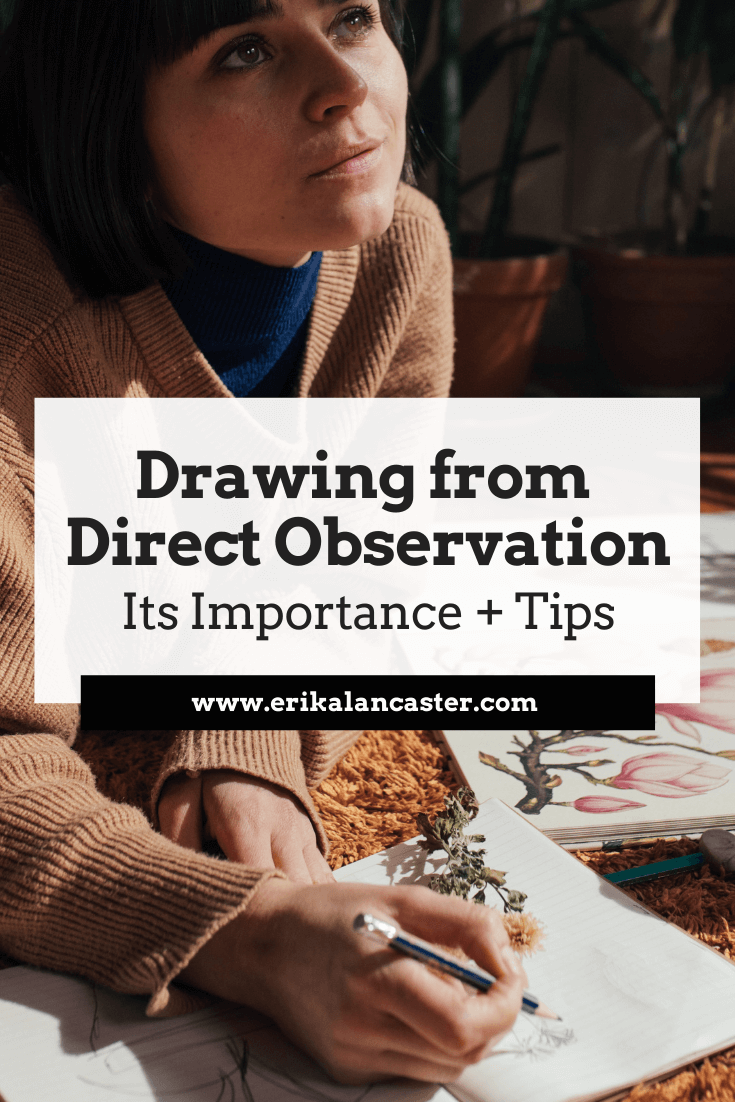
How often do you draw or paint from life? Do you find drawing or painting from direct observation a bit intimidating and/or a hassle to do? Are you aware of the artistic growth that can come when using direct observation compared to using only photographic references when creating art? Drawing from direct observation is also referred to as drawing from life. In this type of practice, the artist uses his/her medium of preference to draw a subject by observing it in real life as opposed to using a photograph as reference. It's important to note that the subject can be anything the artist chooses, whether it's an arrangement of objects, the human figure, a landscape, animals or anything else that can be observed first-handedly. Drawing from life can have many uses depending on your art style. In the traditional sense, artists did their best to recreate their subject matter as realistically as possible. However, a lot of us today use this method to create practice sketches in order to improve our gestural drawing. Others start projects by drawing or painting from direct observation and finish their pieces later in their studios. Though not every artist uses direct observation as means to create perfectly realistic representations of what it is he/she is seeing, this method is able to bring a level of energy and originality to art that simply cannot be achieved when using a photograph as reference. There's no question that this method challenges the artist in a way that using a photograph doesn't and it can greatly improve our skill. This blog post is going to shed some light on why making time to draw/paint from life is so important and how it's different from using a photographic reference to create art. I will also share ten tips that are going to help you create more effective artwork using this method. This blog post is the third in a four-part series about the use of different types of references when creating artwork: 1. Using Other People's Photographs to Create Art (when it's okay to use other people's photos and how to do it in a way that will ensure your artistic progress) 2. Creating Artwork Based on Your Own Photography (click here to learn fast and easy ways to produce your own reference pictures) 3. Why Drawing from Direct Observation is Essential and 10 Tips to Improve (click here to learn why this drawing/painting method is so important in order to progress artistically) 4. Using Collage as an Effective Method to Create Unique and Expressive Art (click here to find out why collage is so powerful and how you can use it to your advantage) 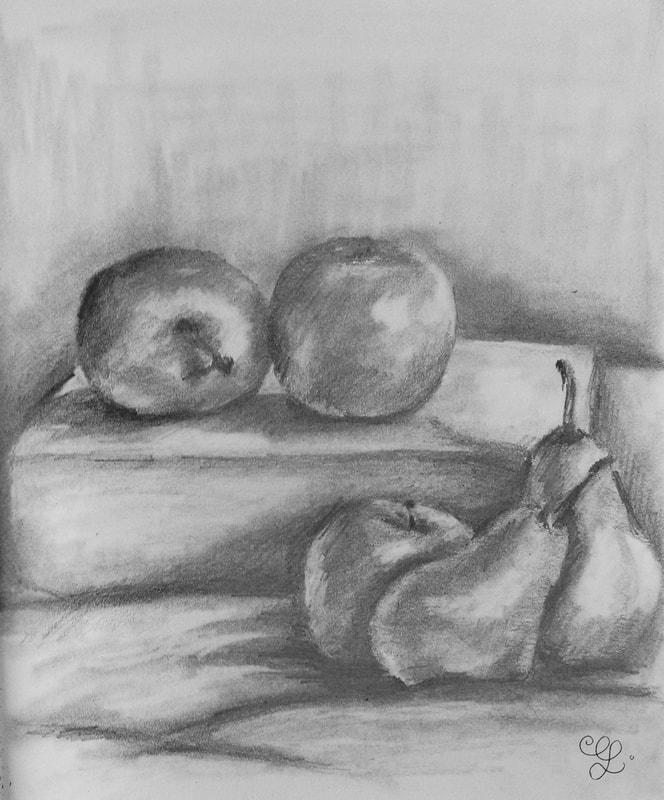
Still life pencil drawing of apples and pears by Erika Lancaster.
Why Making Time to Draw from Life is Important Drawing or painting from life is a completely different experience to drawing or painting using a photographic reference that is printed out or displayed on a computer screen. In my opinion, an artist must continuously seek ways to challenge his/herself, and this is one of the best ways to improve our skills, as well as our knowledge of many important Art Fundamentals such as Perspective and 3D form. When an artist draws or paints from life, he/she is able to actually interact with the subject first-handedly. As opposed to a photograph (which basically provides the artist with only visual information displayed on a flat surface), being able to actually interact with the subject brings us a wealth of information that will enhance our work in a variety of ways. If you are drawing a portrait, you are able to talk with the person and have a feel for his/her personality. If you are drawing an object, you are able to touch, smell and see its colors directly. If you are drawing an animal, you are able to feel what it's like to have it in front of you. If you are painting a landscape or scenery and you are actually IN the place, you're able to feel the energy around you. Your personal feelings and thoughts whilst experiencing the subject will translate into your work to make it richer and more expressive. You are able to have complete creative control when you draw from life, which means that you'll have to apply your thinking skills throughout brainstorming and preparation. You're not only going to exercise your observational and rendering skills throughout the process, but you're going to have to visually interpret what you're seeing and innovate using your personal style. Furthermore, when taking a photo there is always a chance of perspective being slightly distorted and colors being off. In a way, photographs are a processed rendition of what you can actually take in with your eyes. Photographs, at times, present us with views of scenes, objects or even people that are different from what we would normally expect to see. Our brains play a big part in why we see things in life the way we do, and cameras don't have brains (last time I checked). When drawing from life, there is no way to cheat. You can't trace or use grids. The artist is met with the challenge of translating real-life forms and perspectives onto flat substrates in order to create aesthetically pleasing compositions. It quite simply puts the artist's skills to the test in a way that using a photograph doesn't. 
10 Tips to Help you Improve Your Life Drawing Skills 1. Make sure you have a good amount of knowledge of Art Fundamentals If you don't have basic drawing skills down and/or lack understanding of the Elements and Principles of Art, it's going to be incredibly difficult to create an effective piece using direct observation. I recommend studying Art Fundamentals and putting them to use by creating abstract compositions using simple shapes and then moving on to actual objects or subjects. Understanding basic topics such as like proportion, depth, form, value and compositional arrangement are vital. Over at my Patreon site, there's already an entire library of classes on Art Fundamentals (designed to be seen in sequential order) that you can enjoy immediately upon joining! 2. Frame it When we are standing or sitting somewhere our eyes can be drawn to many places at once, which can be very overwhelming when we have to focus on only one area. I like using some kind of frame when coming up with a composition because it helps me decide how my different items will be placed within the space I will be recreating. It also helps me mentally separate what is going to be inside my composition and what is going to be left out. 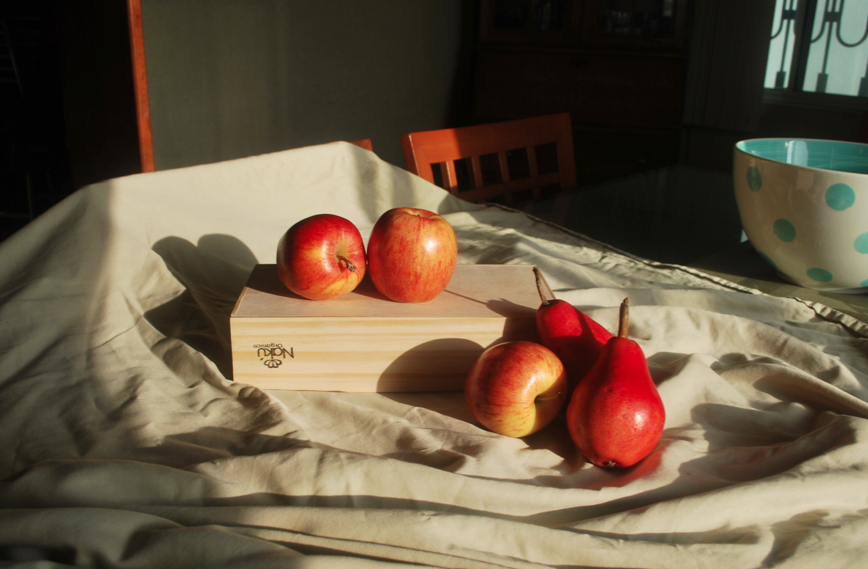
Preparing a still life composition of red apples and pears to work from.
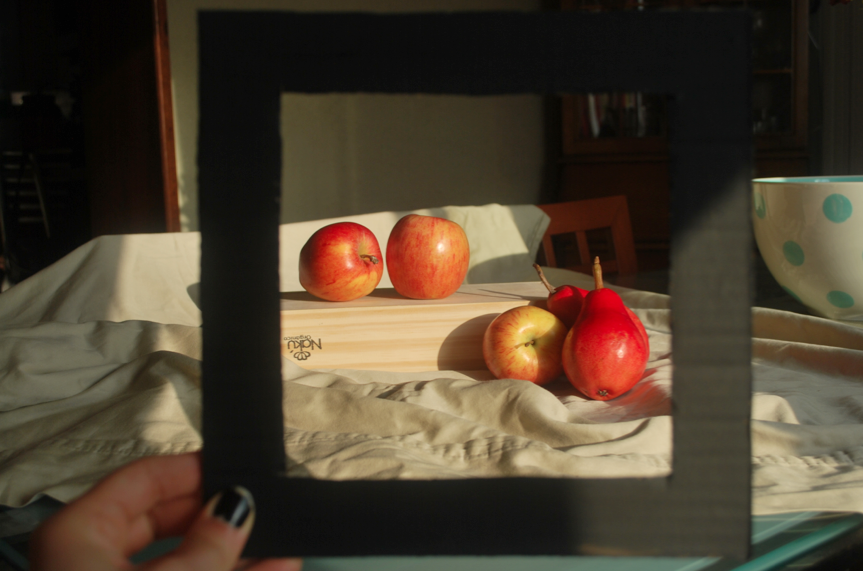
A frame makes it less overwhelming and helps you determine how much of what you're looking at will be included within your drawing/painting.
3. Start with grayscale/pencil My recommendation to beginners is usually to start working in grayscale. Working with pencils/graphite is incredibly useful in this case because they are easy to control and correct. Focus first on learning to discern between highlights, midtones and darks and recreating them in your drawing in their appropriate locations. Color comes later!
4. Once you have set up move as little as possible Slight changes in angle or distance from your subject can change the perspective in your drawing. Make sure before you start that you are in a comfortable position and chair so that you can work for as long as you need to! 5. Get used to looking at your subject constantly A lot of people spend more time looking at their paper than at their subject when drawing. You should be aiming to observe your subject at least 50% of your working time. Forget about drawing things the way you think they look and draw what you're actually seeing. Train yourself to constantly look at your source of information until this becomes natural to you. 6. Always start by creating effective shape, proportion and arrangement in space Focus on drawing only large shapes first (lightly). Concentrate on achieving correct proportions and placement of elements within space. Compare items in your composition to each other in terms of size, location and shape. Study how lines intersect and how angles are created between them. Practice visually measuring things and use your pencil/fingers as measuring devices as you're seeing your subject(s) at a distance. Make sure you give it a final look before moving on to the next step.
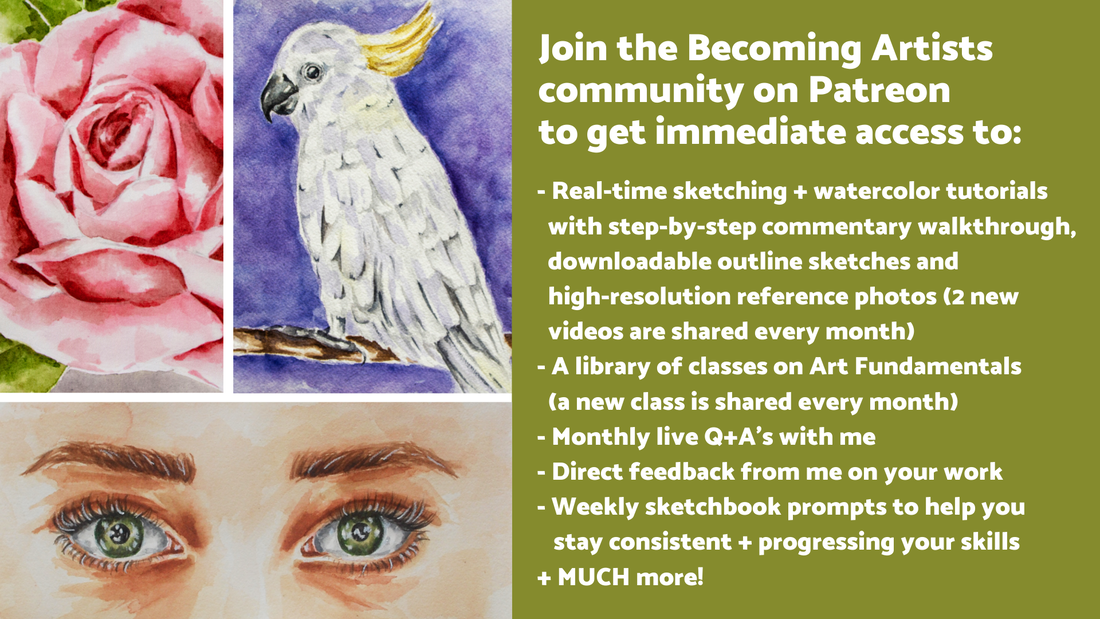
Check out my FREE Patreon-exclusive tutorial and class samples here.
9. Add details and texture Think about what techniques you'll be using to transmit any needed textures (hatching, crosshatching, stippling, etc.) and add details carefully wherever necessary. Try to be subtle about it (remember in realism we rarely see lines). Unless you're going for hyperrealism, you should choose what is going to be included in your piece and what is going to be left out. 10. Apply your artistic license As the artist, it's your decision whether specific things are going to be included or omitted. It is not necessary to add every singe detail of what you're seeing. You can also consider rendering some parts in full and leaving others less detailed in order to pull the attention of the viewer to your focal point. Although artwork created through direct observation is usually expected to be realistic, it doesn't have to be (unless that is what you are going for)! Try to apply your own style and ideas to whatever it is you're doing. Remember slight smudges and imperfections are perfectly fine and sometimes even give a piece character. 7. Keep your preliminary outline sketch light When drawing your initial shapes and all the smaller shapes/lines within them, remind yourself to draw lightly. In real life there are no outlines. Shapes are actually separated from each other by changes in color, texture, value, etc. Artists who are skilled at producing realism are masters at capturing subtle changes. 8. Develop a good tonal/value range throughout your drawing Take your time developing a full range of tone/value throughout your drawing, starting lightly and adding darks as you go along. It's normal to think you have darkened an area enough and then have to go back to darken it as you progress. You should end up with a multitude of mid-tones and gradual changes in value. Make sure that you are really observing your subject and placing values appropriately. Don't guess! Use a blending stump if smooth gradients are your thing, or create different values using mark making techniques like hatching or crosshatching. I usually like using a mix of both. Check out my Guide to Shading Techniques: Hatching, Cross-Hatching, Scribbling and Others to learn and practice different ways of creating values. Free practice PDFs included! 
Drawing of my left hand by Erika Lancaster.
If you enjoyed this video and found it helpful, make sure to subscribe to my YouTube channel. I share a brand new video every week with art tips, drawing and painting tutorials and mindset/productivity tips for artists. *Subscribe HERE*
Advantages and Disadvantages of Using a Photographic Reference Vs. Drawing From Direct Observation 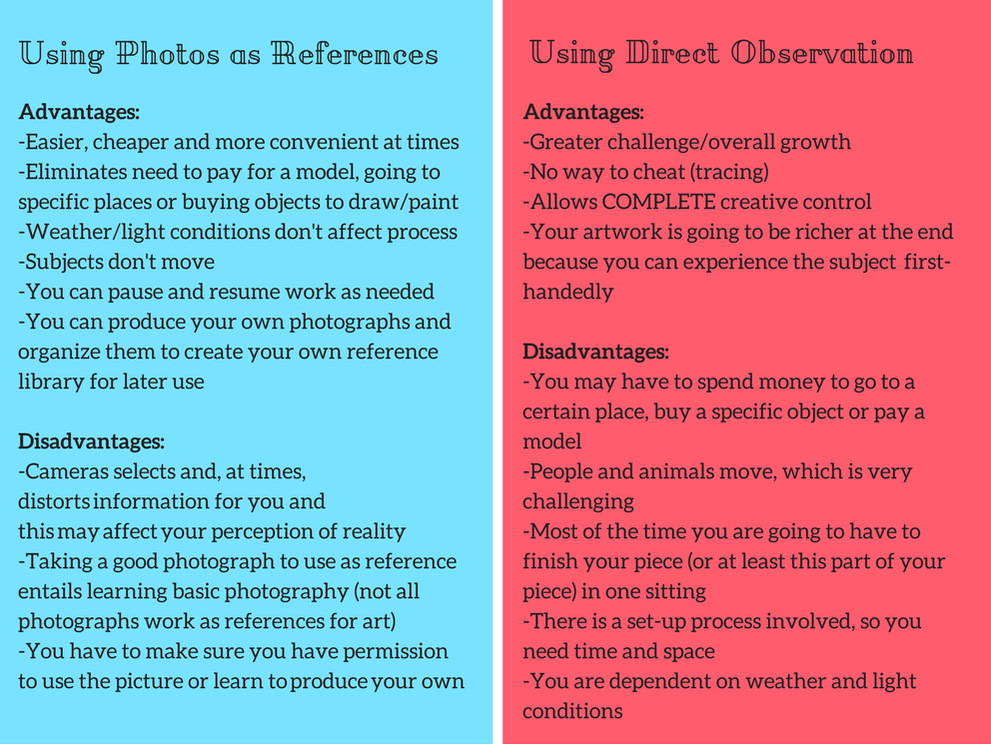
Advantages and disadvantages of using a photographic reference vs. using direct observation when creating artwork.
To finish up, there is a time and a place for drawing/painting from direct observation and for drawing/painting using photographic references. Neither method is wrong or right. What is important is that the artist makes time to explore both on a continuous basis. Do you enjoy drawing or painting from direct observation? Approximately how much of your art is created by using photographic references and how much is created through life drawing/painting? Do you wish you could do it more frequently? I'd LOVE to hear from you! Let's discuss in the comments section below! 
Are you obsessed with those cool sketches made by artists that go outside and are able to capture cityscapes or landscapes so realistically AND so fast? Would you like to try plein air drawing or painting but feel like you'll never be able to capture your surroundings realistically? Does the word perspective scare you away or bore you to the point that you abstain entirely from creating artwork that involves different viewpoints from those you are used to? Perspective is considered to be one of the fundamental components of drawing. A beginner artist may think that it only has to be mastered by landscape or cityscape artists, but this is not the case at all. Understanding perspective and how to create the illusion of depth is essential in order to render believable scenes in all kinds of art, whether it's still-life, interiors, and even animal and portraiture-based artwork. In this post I will explain a few key terms and ideas to grasp before moving on to the One and Two Point Perspective drawing techniques. I will also suggest specific exercises and provide you with downloadable grids that you can use to improve your drawing and visualization skills. With a bit of practice you'll gain the confidence to get out there and start sketching in plein air, which is so important and gratifying as an artist! I remember first learning very basic perspective in Art class at some point in Elementary school. Our teacher taught us about simple One Point Perspective and we were asked to create a landscape drawing including a path going off into the distance. I remember how my mind was blown back then as I started realizing that creating realistic artwork is quite simply knowing how to apply a series of optical illusions in order to make the viewer believe that a picture has real-life qualities (be it texture, volume, depth, etc.). Later on in life, I learned about more complex perspective in one of my first semesters at university, where I took an incredibly difficult course that architecture students took. I was super scared because this class involved numbers, Geometry and being extremely clean/precise. As a child, I had always been terrible at Math and, to the day, I have a tendency to tune out when calculations and numbers come up in conversations! The professor was incredibly strict and took off points for any little extra pencil or eraser mark on our assignments, but I passed the course and I honestly learned a ton. That class fast-forwarded my ability to visualize objects in space and gave me the abilities I needed later in order to begin creating realistic art. I promise it is not too hard! If I can do it, you can do it! Understanding Perspective in Real Life and in Art Perspective is what gives a picture a sense of three-dimensionality and depth. Take a moment to look out your closest window. Observe how the trees/buildings/houses closest to you appear larger, while the trees/buildings/houses farther from you appear much smaller. Even though the tree closest to you may, in reality, be the same size as a tree farther away from you, they appear to be different sizes to you due to the fact that you are standing at the specific point you are in. Artists must master the ability to create this effect on a flat, two-dimensional surface, be it paper, canvas, or whatever substrate is used. The more complex a picture is, the more important it is for the artist to approach the piece in a methodical and careful fashion. Take a minute to analyze the following famous masterpiece by the great artist Raphael. 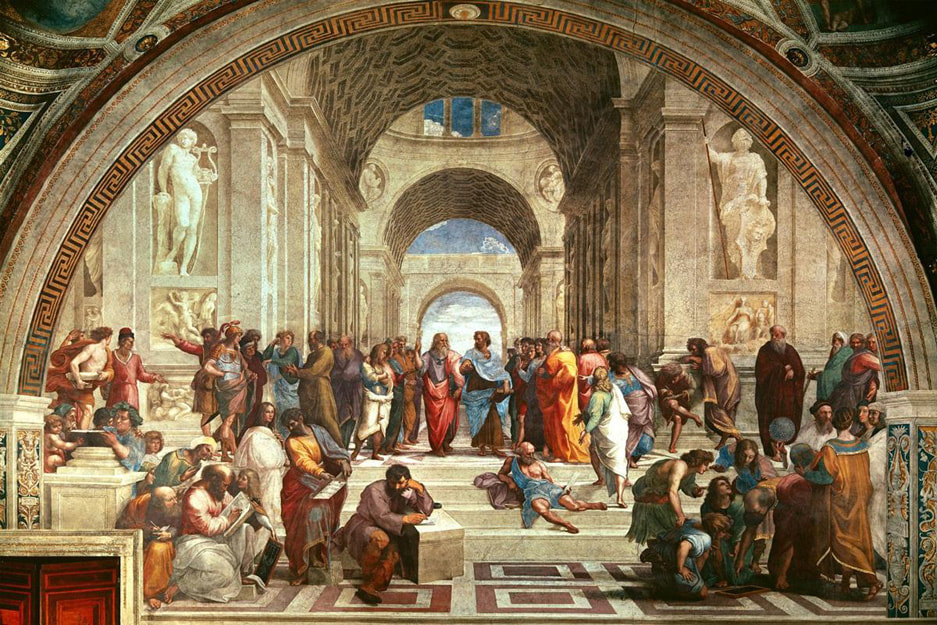
Fresco painting by Raphael created for one of the Vatican walls. The School of Athens (1510 - 1511).
In this fresco we are able to see how the arches in the ceilings get smaller and smaller as they get farther away from us in the distance. Likewise, the human figures that are closest to us in the foreground appear larger that the people located in the middleground (more about these terms later). The combination of all of these things creates a very effective sensation of three-dimensionality, perspective and depth. Isn't it just astounding? This famous masterpiece is an excellent example of One Point Perspective, which we will get into in a bit. If we place the One Point Perspective grid on top of the artwork, we are able to see how the artist was able to visualize where to effectively place the elements within the painting. Starting our work with a grid made up of straight lines, allows us to better visualize the three-dimensional space which we will place our shapes upon. 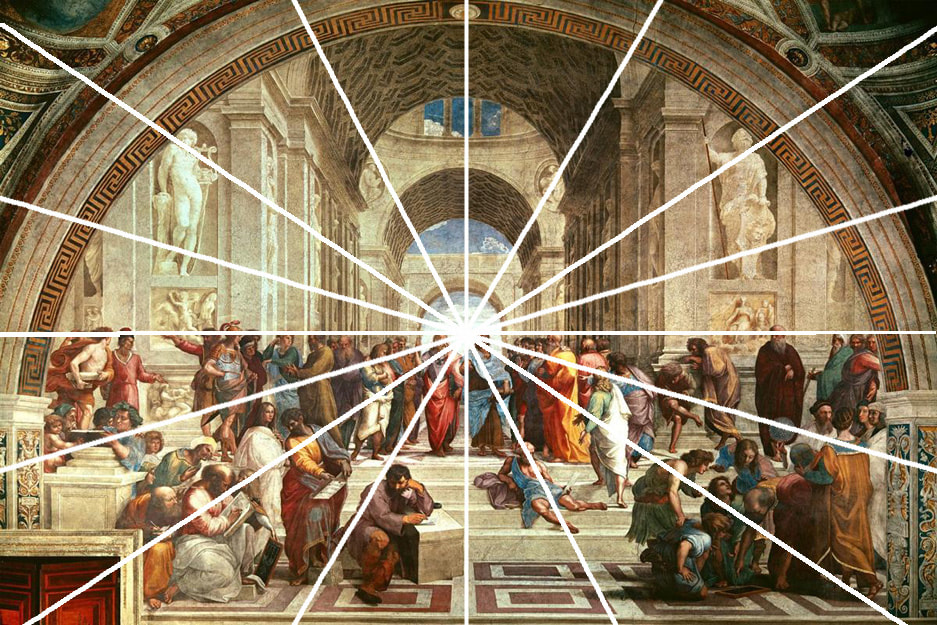
The School of Athens with a One-Point Perspective grid.
Before moving on, here's how the grid applies in a modern picture. Notice how the point at which the lines meet is off center in this image. 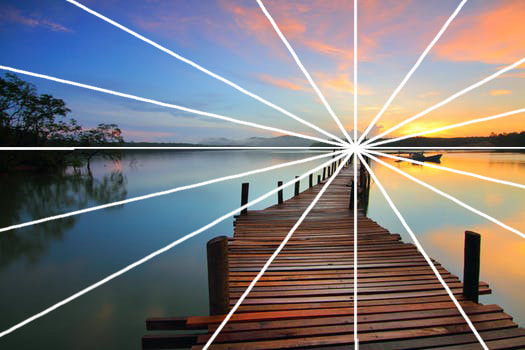
Picture of a dock going off into the distance over a large lake with One Point Perspective grid. Click on the picture to go find the original at the Pexels website!
Important Art Terms Related to Perspective Before explaining how to use the One and Two Point Perspective drawing techniques, I would like to just mention a few key art terms we need to be able to understand. 1. Horizon Line This is the line that separates sky from land (in landscapes) or sky from water (in seascapes). It is also referred to as the "eye-level" of the viewer. The Horizon Line doesn't necessarily have to be right in the middle of your picture. In fact, it is a lot better, compositionally speaking, if it is somewhere below or even above the halfway point of your drawing area. 2. Vanishing Point The Vanishing Point is placed somewhere on the Horizon Line and it represents the farthest point in your picture. There can be a number Vanishing Points (One Point Perspective has one, Two Point Perspective has two and Three Point Perspective has three). When creating a grid, this point is were the Orthogonal Lines all meet. 3. Orthogonal Lines Orthogonal Lines (also known as Convergence or Vanishing Lines) are key when drawing perspective. They are diagonal and recede back into the vanishing point(s). A perspective grid can have many Orthogonal Lines or very few of them, depending on the complexity of the picture. The more elements in the picture, the more lines you will probably have to include in your grid. 4. Transversal Lines These are completely horizontal or vertical lines that are either parallel or perpendicular to the horizon line. They form rectangles or right angles along the grid and are especially useful when drawing interiors (I will provide you with an example in a bit). 5. Vantage Point The Vantage Point refers to the specific place from which a scene is viewed. This point can actually be very high (referred to as bird's-eye) or very low (referred to as worm's-eye). It is crucial to decide where the Vantage Point is going to be in the very beginning because this will affect the placement and size of all elements within the composition. 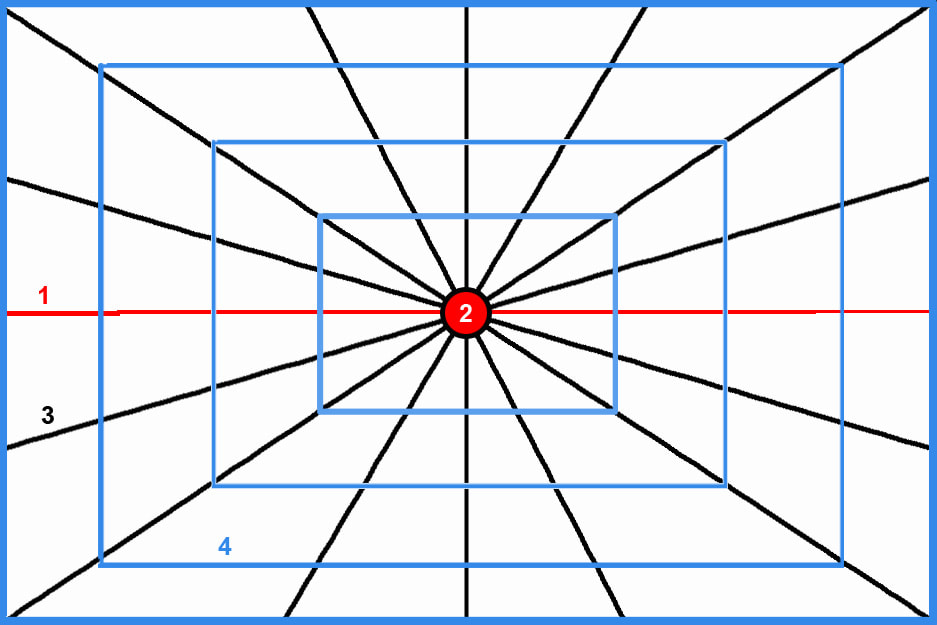
Foreground, Middleground and Background are also helpful terms to understand because including a variety of layers within a drawing or painting really helps transmit a sensation of depth. The layer closest to the viewer is referred to as the Foreground, behind it is the Middleground and the layer furthest from the viewer (which in many cases is simply the sky) is the Background. It varies from image to image, but the important thing is that you are able to discern which layers are closest to the viewer and which layers are farther away. This will affect the color placement within the artwork, as well as the sharpness of the elements included in each layer. The image below is an excellent example that illustrates how the elements in the foreground are much more sharp and saturated than the layers behind it. As you can see, elements in the middle ground and background, also get cooler and cooler in temperature as they recede. This is related to another perspective technique called Aerial Perspective which artists can employ along with linear perspective (or by itself) in order to create a sensation of depth and space. 
Click on the picture to go find the original at the Pexels website!
Finally, foreshortening is a drawing technique that helps us create the illusion of an object/person/animal receding into the distance. The object, person or animal is drawn shorter, in a way that makes it seem as if one part of it is closest to the viewer and the other end is far from the viewer. It is a great way to transmit a sense of depth, even when the only subject included in an artwork is an object or a person. When used in extremes, it creates very interesting artwork. Andrea Mantegna's famous Lamentation of Christ (1480) is an excellent example of foreshortening. 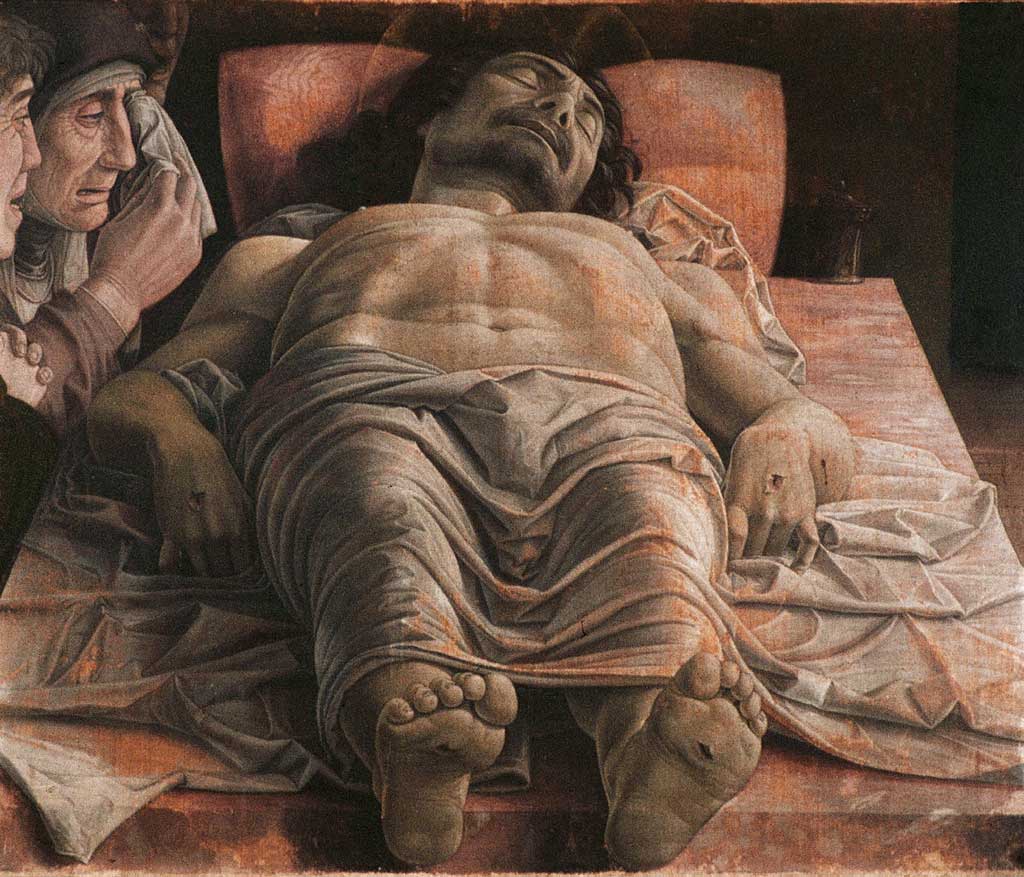
Tempera painting on canvas by Andrea Mantegna. Lamentation of Christ (1480).
The picture below also shows foreshortening. If you notice, the man's forearm appears wider than the width of his open hand. This is because his forearm is so much closer to us than his hand! 
Click on the picture to download the original for free at the Pexels website!
Drawing 3-Dimensional Geometric Shapes Knowing how to draw three-dimensional geometric shapes is absolutely necessary before moving on to using the One or Two Point Perspective drawing techniques. Why? Because, here in reality, everything around us has volume (length, width and height). First, practice drawing simple three- dimensional shapes (use the PDFs at the end of the post titled Geometric_Shapes1 and Geometric_Shapes2 for step-by-step instructions). Once you feel more confident, try placing them within the One and Two Point Perspective grids (I have also included both grids at the end for you to use). If you are already great at this, ignore this step. When attempting to draw any geometric shape, straight lines are important. This is even more important when creating three-dimensional shapes because they involve parallel lines and angles. Due to this, I recommend using a ruler in the beginning. If you want to get even more technical, bring out your protractor! Keep in mind that, once you have enough practice, you will be able to create 3D shapes without using any straight-edged tools. Unless you are going for a super clean and precise drawing, slight imperfections will not affect the picture if the perspective is successful overall. 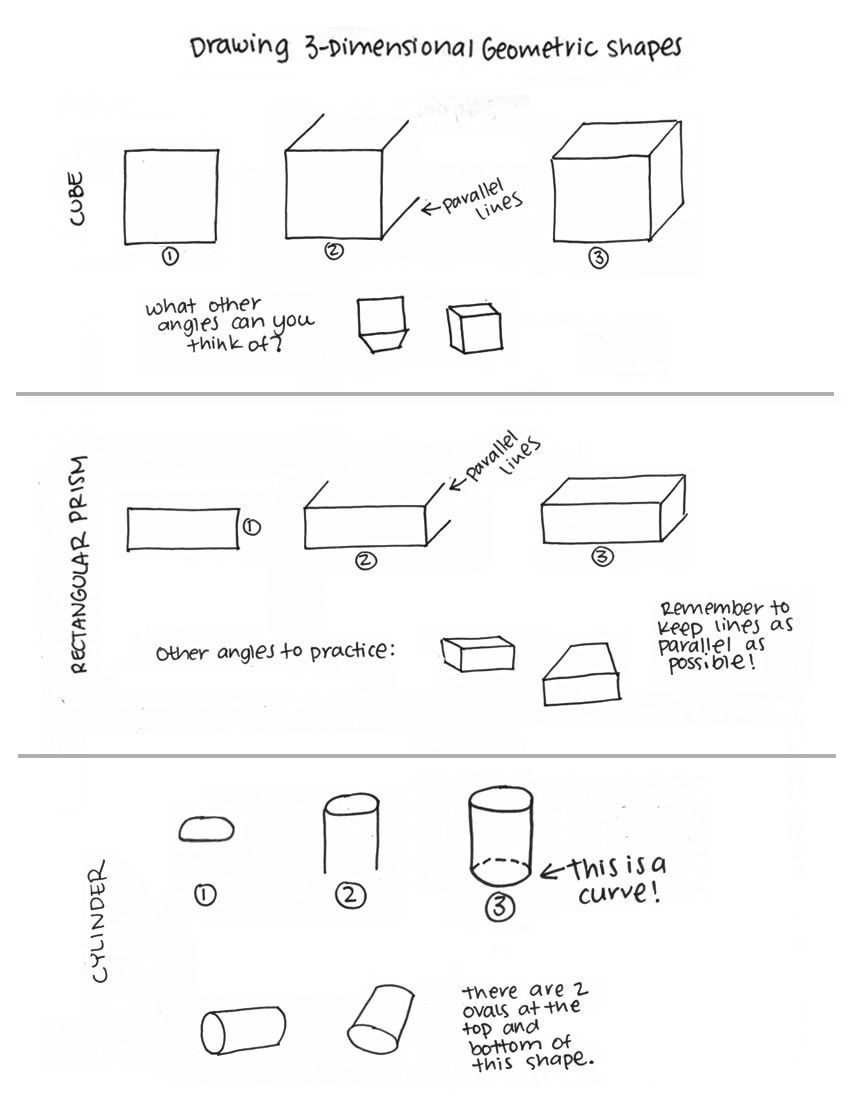
How to draw 3D Geometric shapes. Download this worksheet at the end of the post.
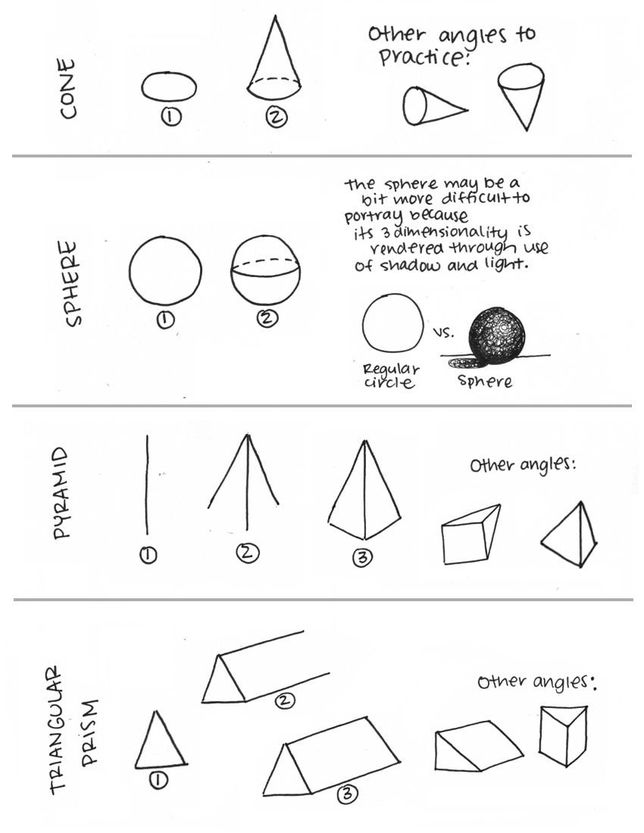
How to draw 3D Geometric shapes. Download this worksheet at the end of the post.
How to Apply the One and Two Point Perspective Techniques One, Two and Three Point Perspectives are referred to as ¨Linear Perspectives¨, which means that they rely on the use of straight lines to depict a three-dimensional space and the forms within it. In other words, to apply these techniques we will need to prepare for our drawings by creating grids using a ruler. It is important to note that this grid should be created lightly. Though it will be heavily used throughout the drawing phase, they will be erased later on.
One-Point Perspective
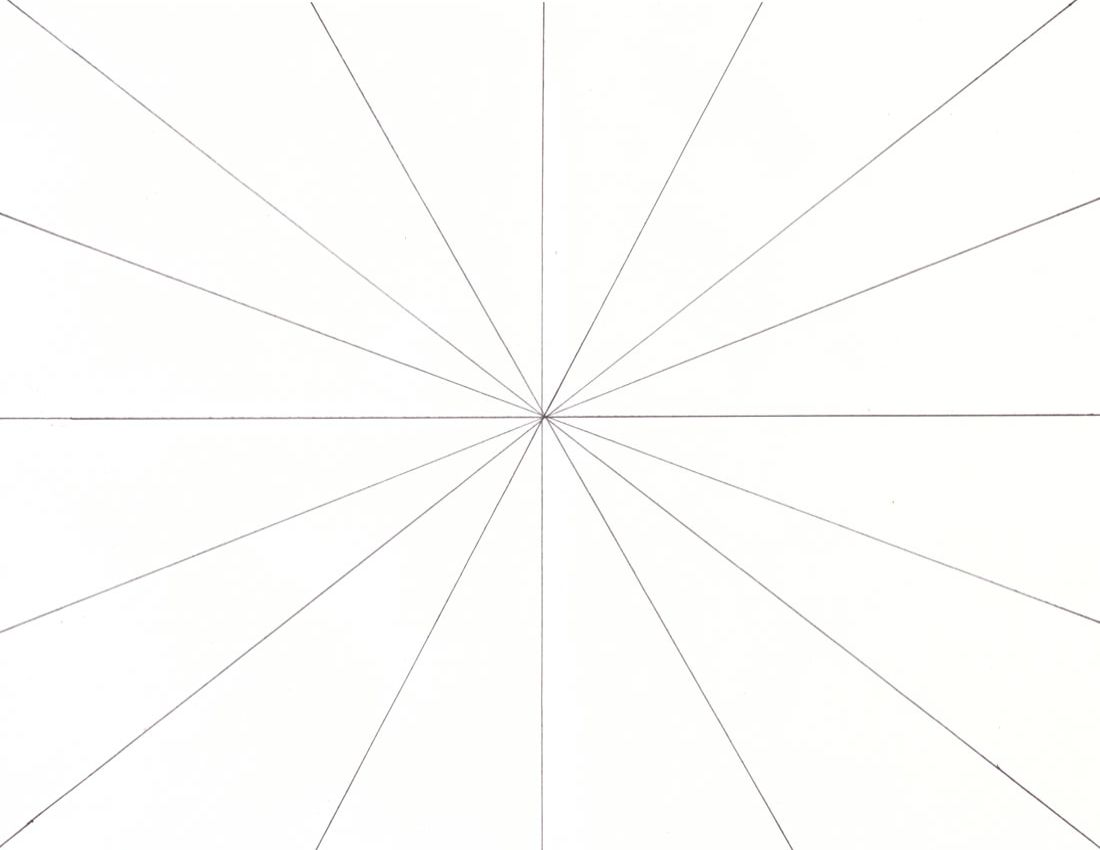
One-Point Perspective Grid
The One-Point Perspective grid is made up of straight lines that converge at the Vanishing Point. Firstly, decide where your Horizon Line will be placed within your drawing area. Secondly, place your Vanishing Point somewhere on your Horizon Line (remember it does not have to be placed right in the center). Then, carefully draw straight lines from one edge of your paper to the other using a ruler, making sure that they all cross at your Vanishing Point. This kind of perspective is excellent to draw simple cityscapes, landscapes and interiors. My suggestion would be to begin using this technique to draw simple landscapes and focus on adding in different organic elements with believable proportions. Then, master placing three-dimensional geometric shapes within the One-Point Perspective grid to effectively transmit a sensation of depth (see picture below). Afterwards, one can move on to buildings and interiors. 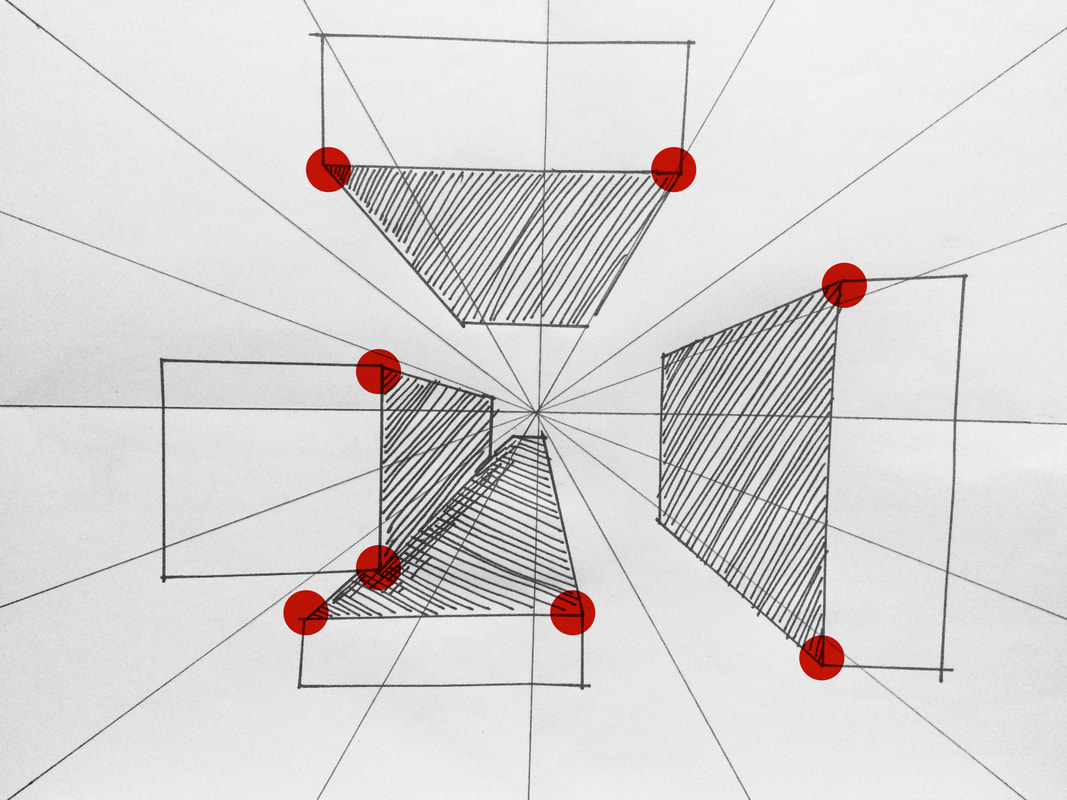
3D Geometric Shapes in One-Point Perspective Grid.
How to do this exercise: 1. Prepare your One-Point Perspective grid (you can download the PDF at the end or draw it for yourself). 2. Draw a few flat (two dimensional) rectangles or squares anywhere on your grid. 3. Pinpoint the corners/angles of your shapes that are closest to the Vanishing Point (see red highlights in the image). 4. Using your ruler, draw straight lines from the corners of your shapes down to the Vanishing Point. Take into account here that there may be two to three lines, depending on where you placed your shape. 5. Finally, close your shapes with vertical or horizontal lines. Remember to make these lines parallel to the lines you used in your initial two dimensional shape. You're done! 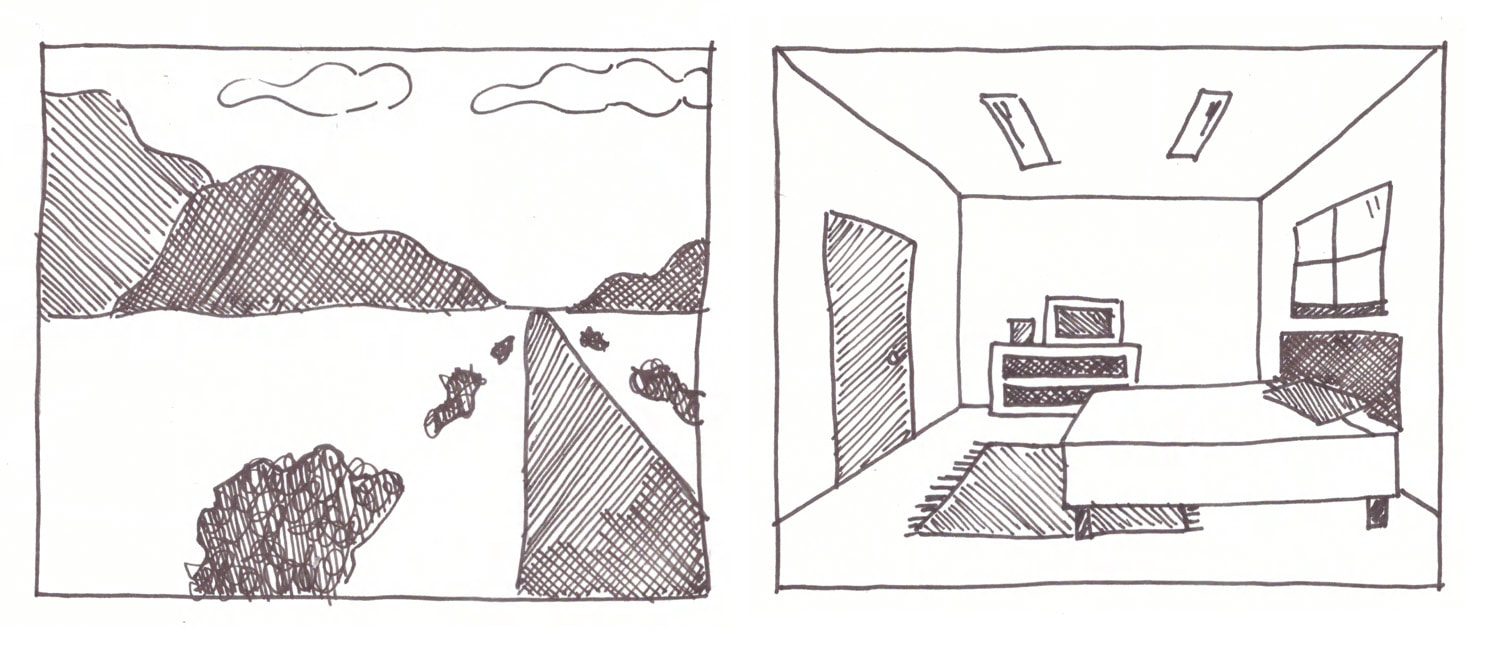
Thumbnails showing use of 1 Point Perspective in a simple landscape and in the interior of a room.

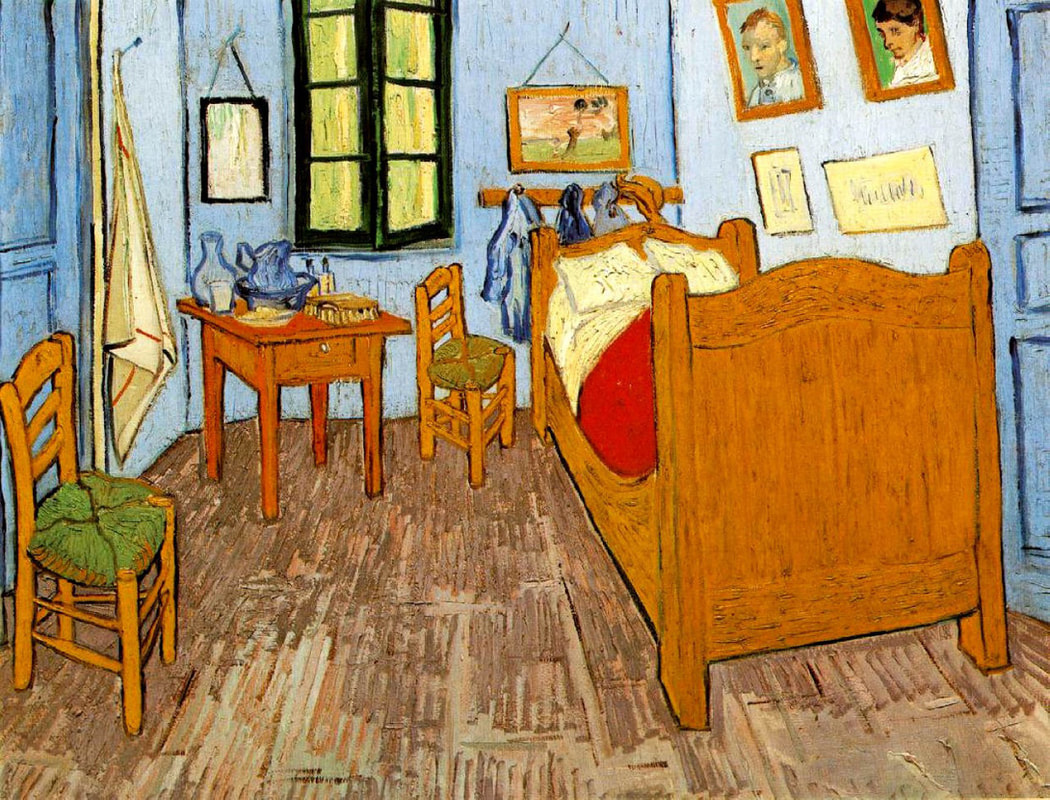
Oil painting on canvas by Vincent Van Gogh. The Bedroom (1888).
Take a moment to analyze this important artwork by Van Gogh. Judging by the lines you can see in the image, where would you say the Vanishing Point is located? Two-Point Perspective
Two-Point Perspective Grid
The Two-Point Perspective grid is also made up of straight lines that converge at the Vanishing Point, only this time there are two! This grid is going to help us create the effect of viewing objects (think boxes or buildings) as if we are standing on a corner. It is slightly more complex and is often used when drawing buildings in a cityscape or objects at more extreme angles. Let's start practicing! You can decide if you'd like to use the Two-Point Perspective grid I have included at the end of the post, or if you'd like to create it for yourself. Here are the steps you need to follow to make it yourself! To prepare a Two-Point Perspective grid, I usually start by folding my paper in half both lengthwise and widthwise. The horizontal fold will be my Horizon Line in this case. 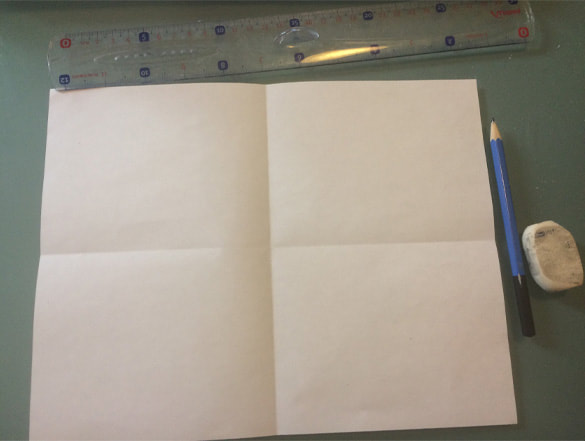
How to draw a 2-Point Perspective grid
Then, decide where your two Vanishing Points will be on this Horizon Line (I recommend placing them at a good distance from each other). You can see in the image below how I placed my two Vanishing Points close to the edges of my paper. I often like to place them at equal distances from the edges and use a ruler to help me do this. The vertical lines you can see here will be erased and are not really a necessary part of the grid. You can also see that I have folded my paper two more times. Sometimes I like to do this because the folds help me visualize straight lines as I am creating my grids, but they are not necessary either. 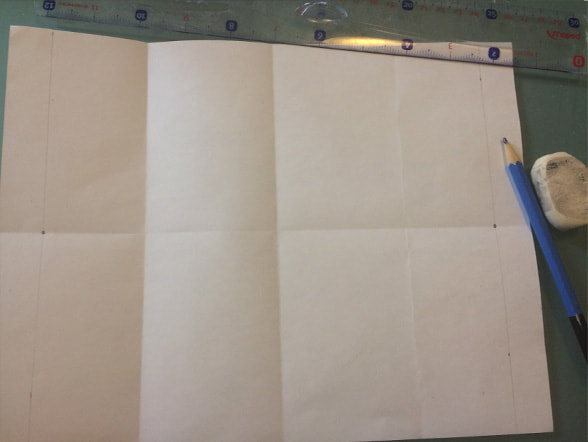
How to draw a 2-Point Perspective grid
Next, create small marks using a ruler right on the central vertical fold on your paper. You can decide how close or far apart you want these marks to be (I recommend somewhere between 1.5 to 2 centimeters to start out). 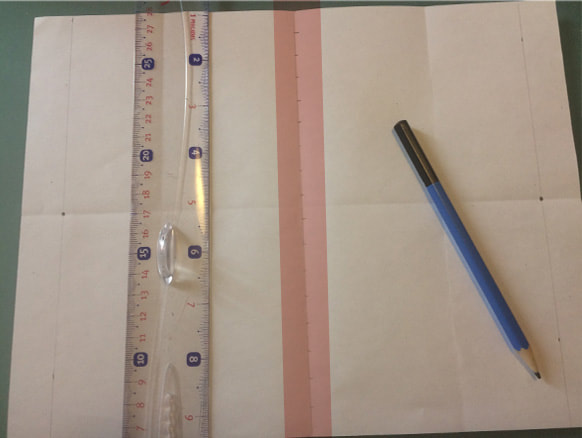
How to draw a 2-Point Perspective grid
To finish the grid, carefully draw lines starting at your Vanishing Points and ending at the marks you previously created on the central vertical line. The lines you draw coming from your left and right Vanishing Points should meet, creating a symmetrical/mirrored effect. 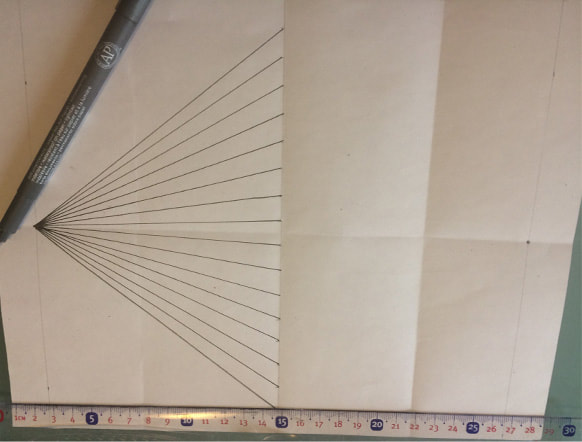
How to draw a 2-Point Perspective grid
By this point your Two-Point Perspective grid should be finished. If you have never used this technique before, I recommend starting out by drawing simple three-dimensional geometric shapes on it. This will help you understand how it works and will set you up for success in your later drawings. 
3D Geometric forms drawn in the 2-Point Perspective Grid.
Next, use the grid to create a cityscape! Remember, these buildings are nothing more than rectangular prisms with a few details added in. Nothing to be scared about! 
Cityscape created with a 2-Point Perspective grid.
After enough practice, you will be able to easily conclude what kind of drawing technique you need to apply in each project. The sketch below is something I created a while back. Where would you say that the Vanishing Point is located in this case? Remember that even though certain elements are not always visible within a final piece, the artist must always have them in mind when working so that the sense of perspective is achieved at the end. 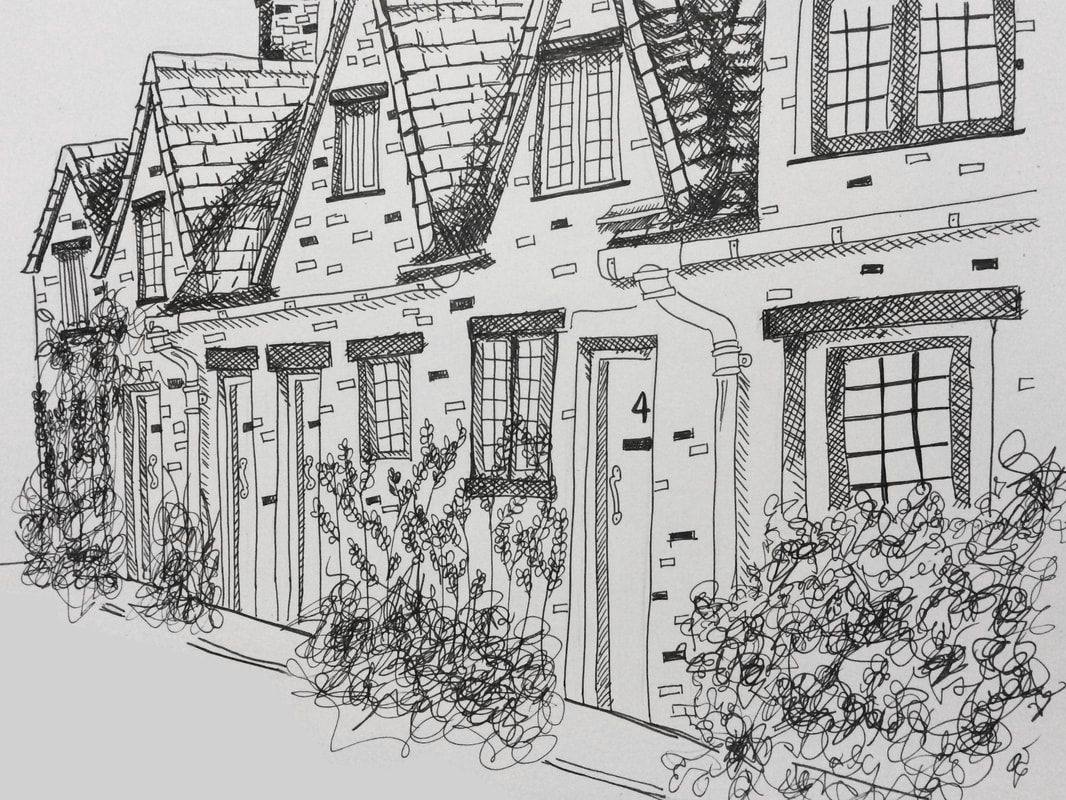
European house ink sketch by Erika Lancaster
If you still feel a bit unsure about taking it outside, I recommend searching for pictures of buildings or houses online and apply what you have learned. Draw one single house or building three-dimensionally and move on to groups of houses, then street views, etc. I assure you, you WILL get more and more comfortable. To conclude this post, I leave you with this great da Vinci quote about Perspective: Perspective is to painting what the bridle is to the horse, the rudder to a ship… There are three aspects to perspective. The first has to do with how the size of objects seems to diminish according to distance: the second, the manner in which colors change the farther away they are from the eye; the third defines how objects ought to be finished less carefully the farther away they are.
-Leonardo da Vinci
Do you find it difficult to create depth and perspective in your artwork? If so what is it specifically that frustrates you? Let me know in the comments below!
This week I started my days with face sketches. I am pushing myself to draw faces in a variety of angles, which is something I think I need practice in. I was also able to complete my second collage painting based around a picture of my hands. I am really enjoying painting these experimental pieces and am going to continue doing more, which I am selling later. These pieces mean a lot to me because they are the first to actually have a more personal meaning behind them. I hope you are having a wonderful weekend! Cheers! 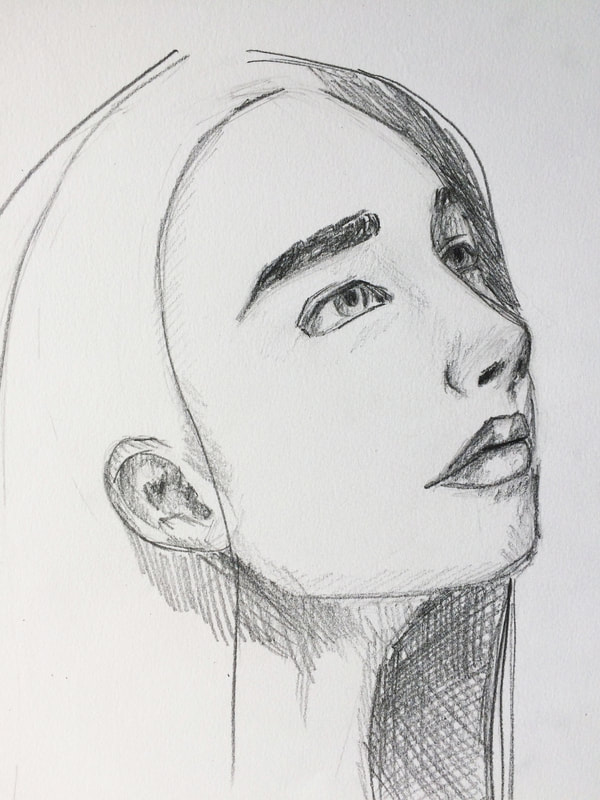
Daily face pencil sketches. Canson Mixed-Media sketchbook. Woman looking up.

Daily face pencil sketches. Canson Mixed-Media sketchbook. Woman face 3/4 angle.
Daily face pencil sketches. Canson Mixed-Media sketchbook. Woman face 3/4 angle. Pencil and India ink.
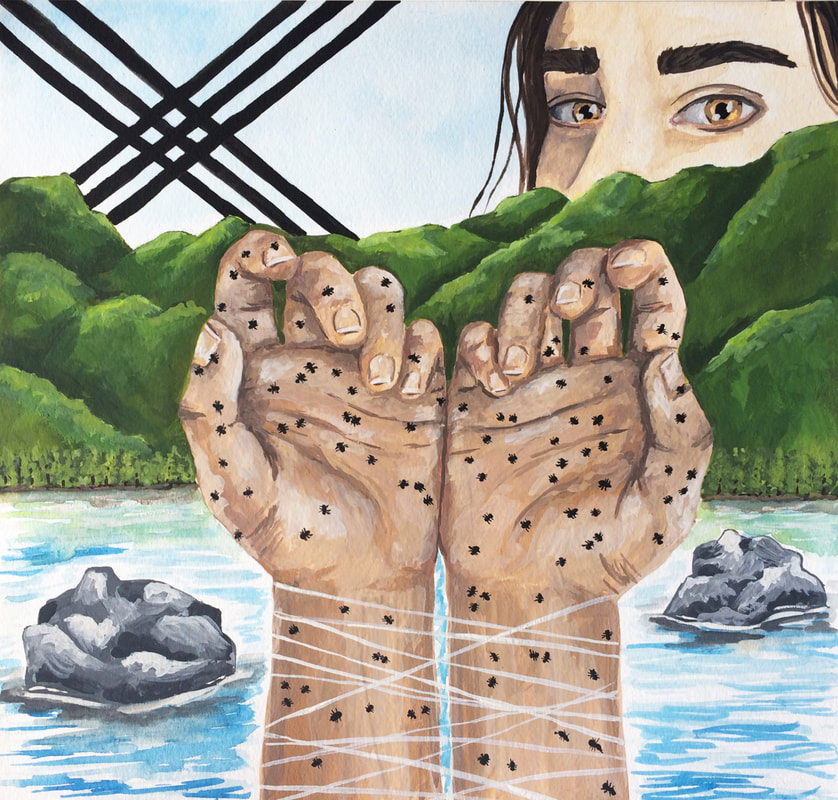
Collage mixed-media painting. Marie's Gouache Color + Winsor & Newton Watercolor on Canson Watercolor Paper. "It's About Time".
This was my last week drawing hands at the beginning of my work days. I can't believe it's been a month of morning hand sketches! I can definitely see a lot of improvement compared to the first week (see sketches in this post). I am still thinking about what my next subject for morning sketches will be. This week was kind of nuts for me. Between business appointments, family commitments to attend, work to finish for family, other work popping out from out of nowhere with very tight deadlines, and a lot of house cleaning, I didn't have the time I would have liked to paint. I did, however, explore a new method in the only painting I was able to finish. I've always loved creating collages and wanted to try to paint a composition made of various pictures meshed into one. I'll be experimenting more with collage painting for sure! Thanks for coming by today and I hope to see you around soon. :) 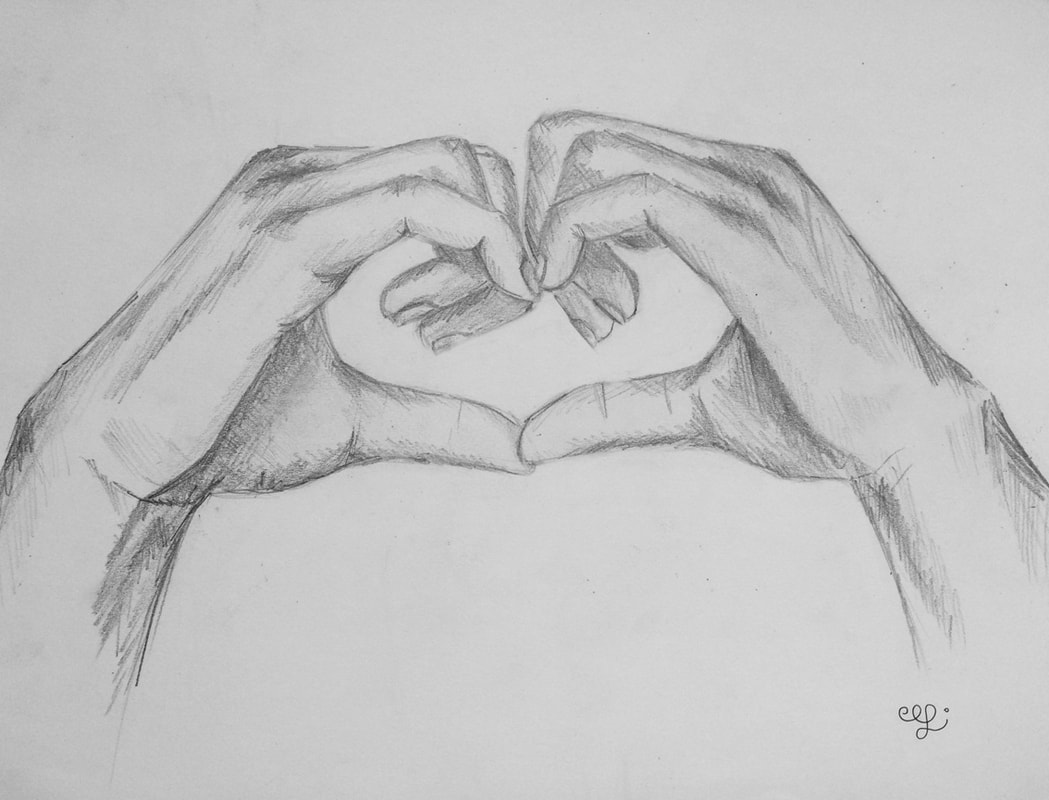
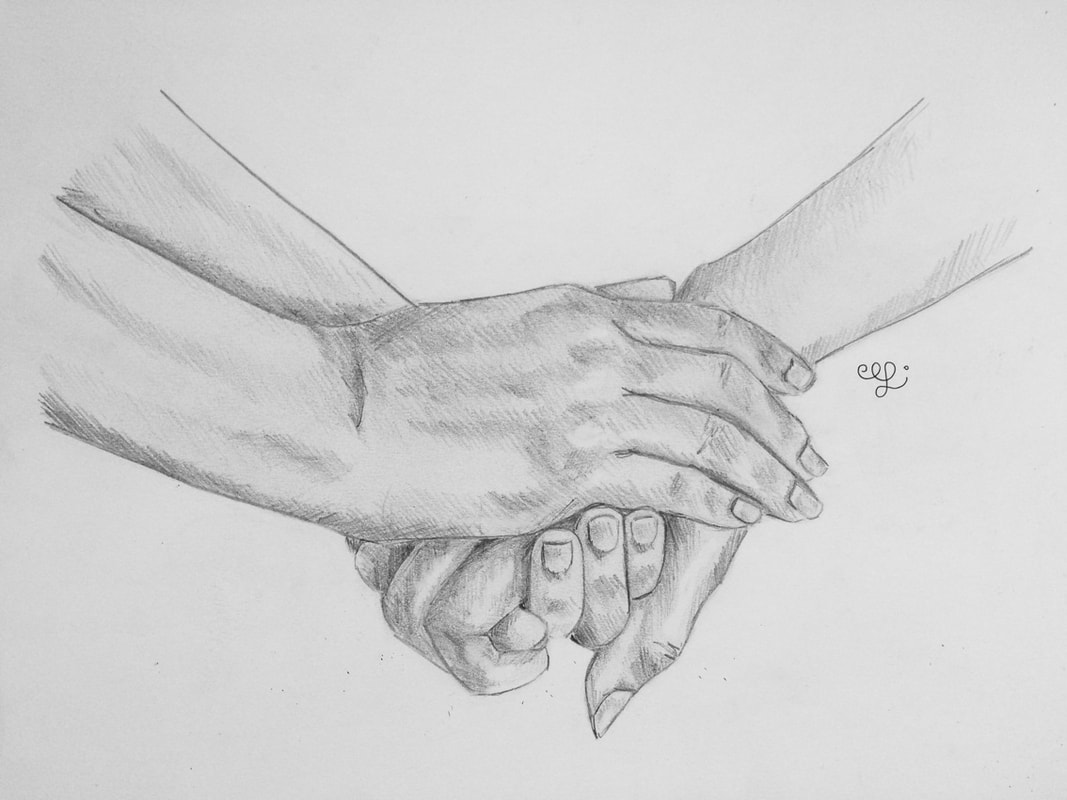
Daily hand pencil sketches. Canson Mixed-Media sketchbook. Heart.
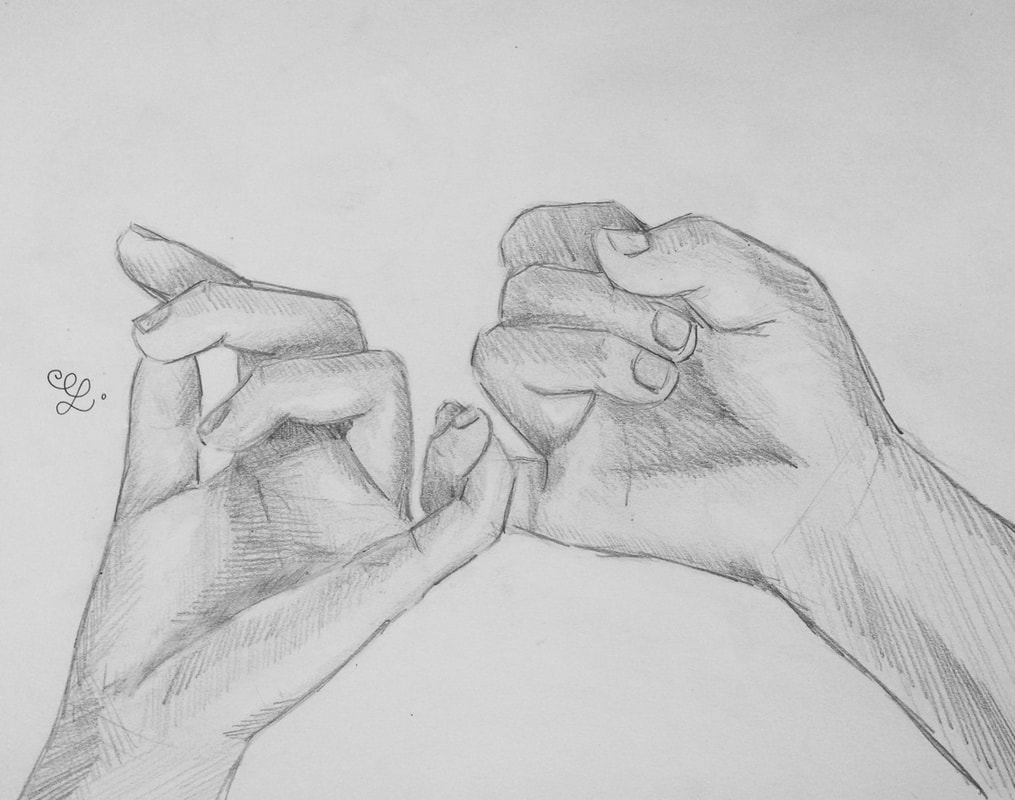
Daily hand pencil sketches. Canson Mixed-Media sketchbook.
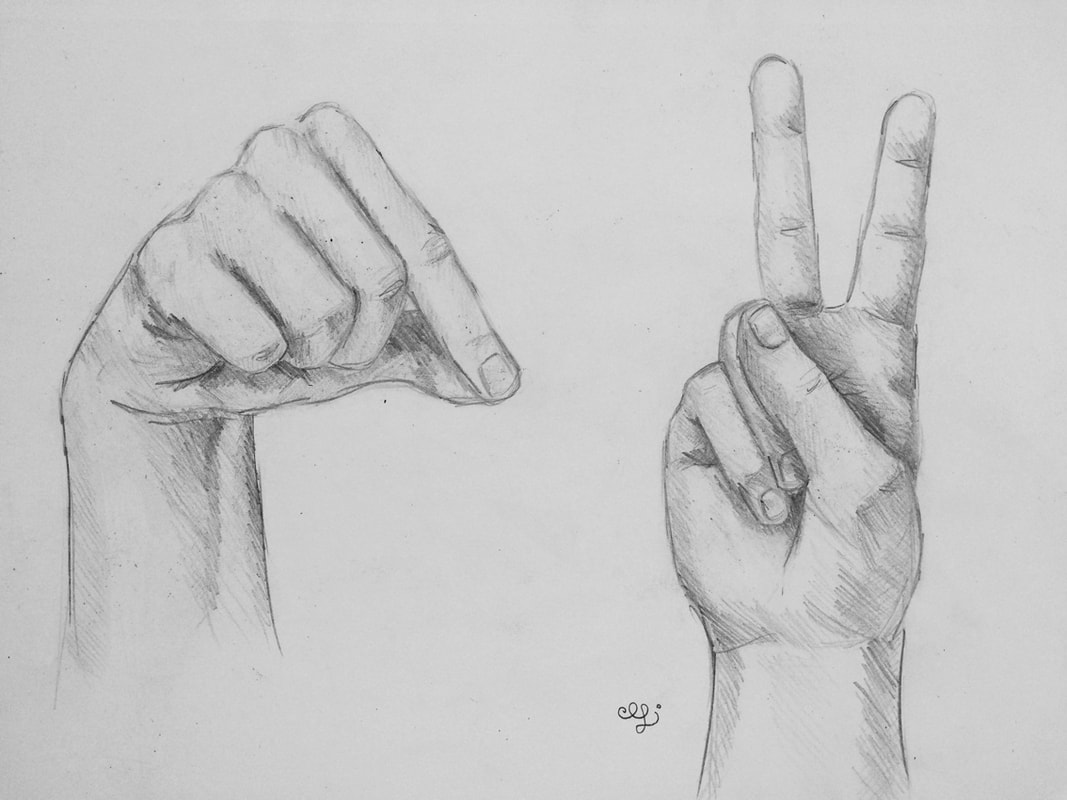
Daily hand pencil sketches. Canson Mixed-Media sketchbook.
Daily hand pencil sketches. Canson Mixed-Media sketchbook.

Daily hand pencil sketches. Canson Mixed-Media sketchbook.
|


 www.erikalancaster.com
is a participant in the Amazon Services LLC Associates Program, an affiliate advertising program designed to provide a means for sites to earn advertising fees by advertising and linking to amazon.com. www.erikalancaster.com is a participant in the Shareasale.com Affiliate Program, an affiliate advertising program designed to provide a means for sites to earn advertising fees by advertising and linking to Shareasale.com partner companies. |
|||||||||||||||||


 RSS Feed
