|
*This post contains affiliate links. I receive small commissions for purchases made through these links at no extra cost to you. These commissions help me keep this site up and running, in order for me to keep providing helpful and inspiring art content. :)
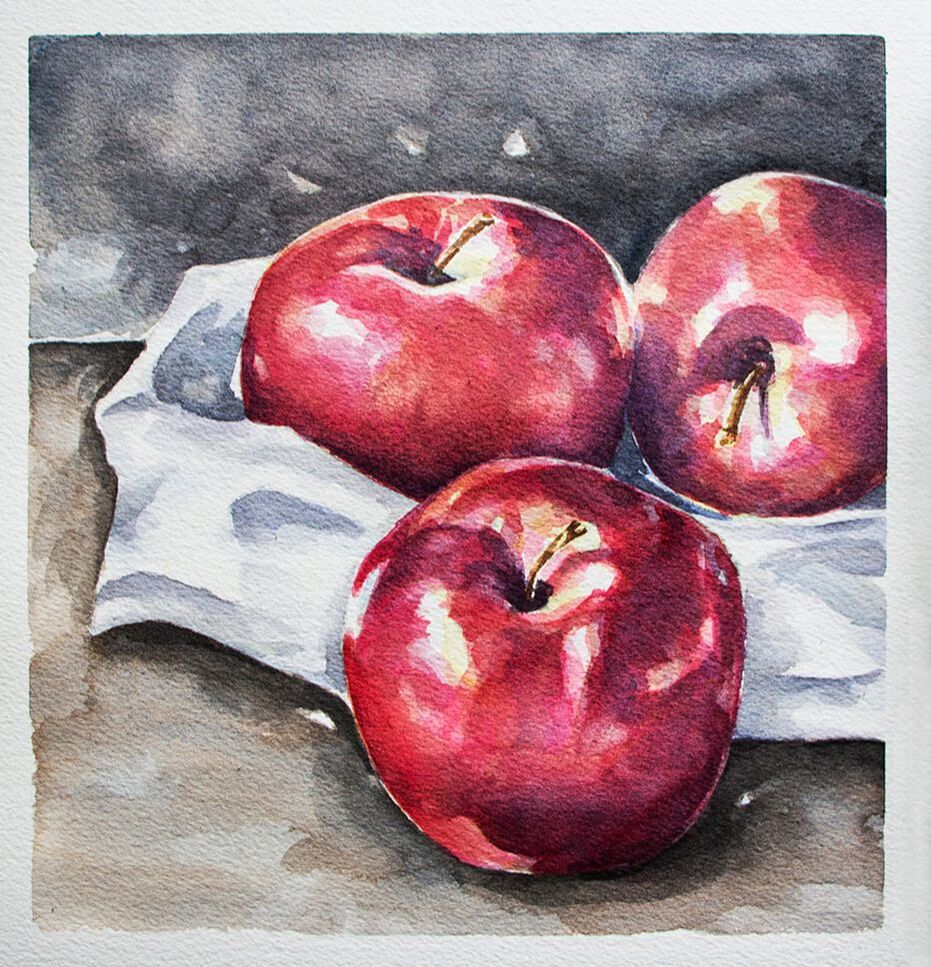
What, exactly does the term muddy color refer to when painting with watercolor? What are the common culprits for muddy colors and which actions should we take in order to avoid them? Watercolor! So vibrant, so fresh, so... tricky! Muddy colors are one of the most common struggles for people starting out with this painting medium and in today's blog post (and YouTube video!), I'm covering what they are exactly, so that you know what to keep an eye out for. I'll also be providing my best tips that'll help you keep your colors fresh and vibrant. There's no doubt that watercolor is an amazing painting medium that can be a lot more practical to use when compared to mediums like acrylics or oils, which require a larger space to set up, a well-ventilated area, much more clean up and, most often than not, a larger investment in supplies. This said, it doesn't take much time using watercolors to realize that they are truly a challenge. Not only are there so many variables involved when it comes to painting with watercolor that affect both the painting experience, as well as the final outcome (such as the humidity and temperature of the room we're in, the quality of our paint, each specific pigment's characteristics, the type of paper that we're using, etc.), but there's also no way to simply cover up our mistakes or swipe them off like we can when we're painting with opaque mediums. Learn more about different types of paint, paintbrushes and watercolor paper and what you truly need as a beginner just getting started in my blog post titled Watercolor Supplies for Beginners and Things You Must Know. Not to mention, we're working on a substrate that's inherently fragile. Even when we're working with paper that's intended for water-soluble mediums, it can only take so much scrubbing, lifting and layering. It's paper! It's essential to stay patient, work mindfully, practice our water control and allow the paper to dry/regain its strength whenever needed throughout the process. As loose, expressive and even quick, more experienced artists make painting with watercolor seem, as I'll be talking about in the video, creating a successful piece requires not only mastering water control, but also knowledge of color, and going in with some sort of strategy. We need to visualize the overall effects we're going for so that we know what techniques (wet-on-wet, wet-on-dry, etc.) to use where and also, when. It's also essential to have some sort of general plan when it comes to the colors we'll be using. Then we can allow ourselves to let go and embrace the beautiful, organic effects that only watercolors allow. So... what are muddy colors, exactly? The term 'muddy color' refers to a color mixture or a section of our painting has turned dull, flat, matte and, overall, lifeless. Muddy colors lack the vibrancy (and most of the time also the translucency) that watercolor allows and don't look like they belong within the context of the piece, when one takes into consideration the rest of the colors used around that area. Watercolor allows for a light, interesting, vibrant use of color that's unique to this medium and flat, lifeless colors are often proof that something has gone wrong. This said, it's important to note that a muddy color is very different from a desaturated or muted-out color. Desaturated colors are grays, browns or neutralized colors and these are often used intentionally by artists who are looking to tone down highly-saturated colors straight out of the pan or tube to make them look more realistic/natural or simply to make use of a color scheme that suits their style best. You'll notice that lots of colors (except for browns and neutrals) are very saturated and vibrant right out of the pan or tube, and these kinds of colors don't happen very much in real life when you look at the settings or living things around you. Other watercolor artists simply like the look of more muted out colors and create they own color mixtures, adding a second or even third color to desaturate them or create the color they need. This doesn't make these colors mud, as long as the artist knows what he/she is mixing together, has at least somewhat of a plan, is staying in control, is playing to the medium's translucent nature and interesting use of color, and the colors fit within the context of the piece. Take this still life watercolor of mine below as an example. I've created my own gray and brown color mixtures using Ultramarine Blue and Raw Umber and there's still a vibrancy/life to them. There's a variety in values, translucencies and even color temperature throughout these areas, and these more desaturated color mixtures harmonize and look like they've been planned. They allow the bright, vivid colors in the apples to shine. *Learn more about Art Fundamentals and what it takes to plan for successful, harmonious and balanced compositions with my classes over on Patreon. Desaturated, muted out colors and even grays and browns can, indeed, have a life and vibrancy to them, as long as we plan for them intentionally and make sure not to overwork our paintings. What's essential, in my opinion, is making use of this medium's translucency and dynamic nature to create light looking paintings with a vibrant use of color so that, whether the colors we're using are pure/highly-saturated or toned-down, our paintings still seem to glow from within. Matte and opaque are opposite to translucent and vibrant. And flatness/heaviness is basically where the problem is. Not darkness, not level of saturation. When we're just getting started with this medium and are still lacking water control, it's incredibly easy to overwork our paintings. Add to this the fact that most beginnersdon't invest enough time to learn about the Color Wheel/Color Theory and this is a recipe for lots of frustration and disappointment.
If you enjoyed this video and found it helpful, make sure to subscribe to my YouTube channel. I share a brand new video every week with art tips, drawing and painting tutorials and mindset/productivity tips for artists. *Subscribe HERE*
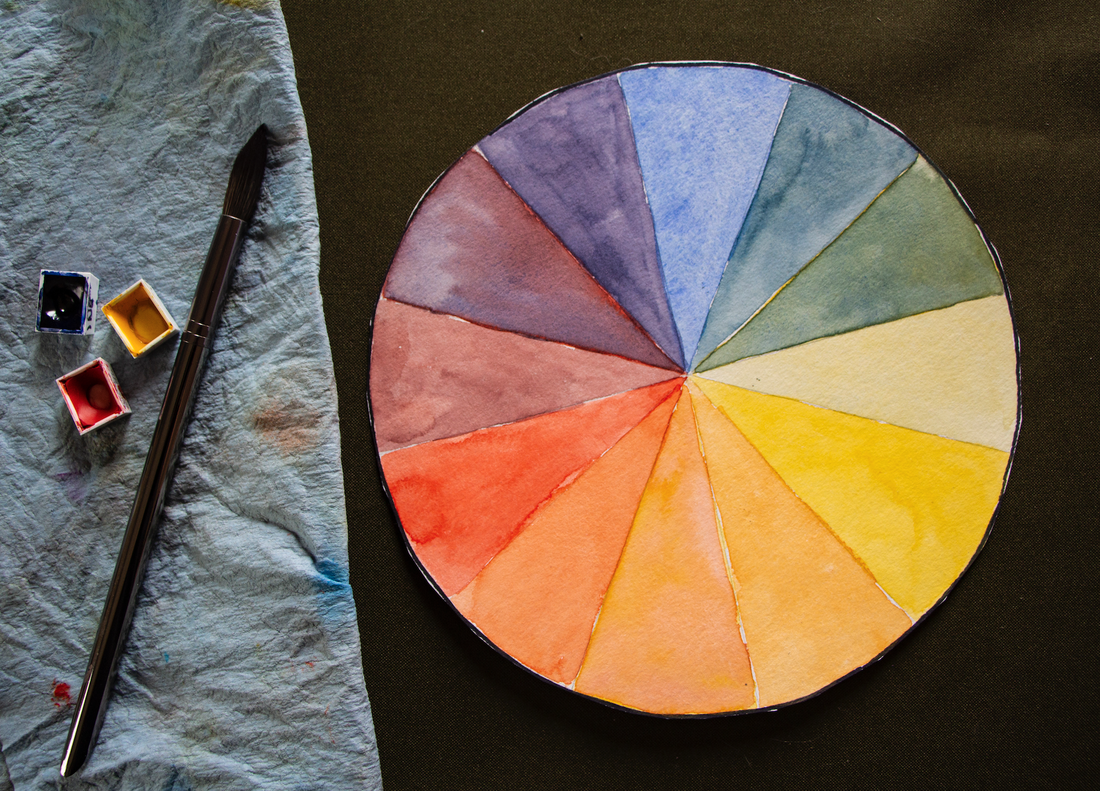
Why do muddy colors happen?Usually, they happen because of one (or a combination) of the following: a) Because we lose control of our different colors on our paint mixing palette or on our paper (colors can intermix in both areas). b) We don't know much about the Color Wheel/Color Theory and don't pre-select our colors before starting a new piece (testing out color mixtures is very important). c) We don't clean out our paintbrush bristles well in-between colors and/or we're not changing our water throughout the painting process. d) We're not staying patient and are getting anxious to finish, going over the same spot again and again, while our paper is still wet, in attempts to fix mistakes but damaging our paper in the process. Find a list of my favorite watercolor supplies here. 10 Tips to Avoid Muddy Colors When Painting with Watercolor 1. Learn about the Color Wheel and color temperature The Color Wheel is an invaluable tool that helps us understand color relationships. Not only does it allow us to create color mixtures effectively while working, but it also enables us to plan color schemes prior to starting with the painting process that work beautifully and help us communicate the message we're looking to communicate. Experiment with creating your own color mixtures. See what happens first-hand when you combine cool colors, warm colors and a warm plus a cool. Learn about color and work on color mixing exercises outside of a painting process via color studies and explorations. 2. Pre-select the colors you'll be using for the painting on hand before getting started Randomly picking colors throughout the painting process is a surefire way of arriving at muddy colors. Keeping things limited to only a certain amount of necessary colors, especially in the beginning, is a great idea. This not only allows the beginner to keep colors more organized throughout the process, but will mostly likely lead to an outcome that is much more harmonious and cohesive. In this video, I share my entire process for painting a still life with watercolor using only 4 colors and why I love working with a limited color palette. Before getting started with a new piece, give thought to how you're going to be creating the different colors you'll be needing, how you're going to be creating shadows and darker values of different colors, etc. Most often than not, working with a limited amount of colors is going to help you get comfortable with color mixing a lot faster! 3. Change your water throughout the painting process (or use 2 or 3 containers) As soon as you notice your water becoming murky, change it! You can also consider using 2 or even 3 containers as you're painting. This way, you're able to use one of them to rinse out your bristles and another to take clean water from as needed throughout the process whenever you need to pre-wet areas of your paper, add more water to paint mixtures, soften out edges, etc. 4. Make sure you're cleaning out your paintbrush bristles thoroughly in-between colors If you just finished using one color and you're planning on going into a color that's very different from it, make extra sure that your bristles are well rinsed, especially if you're not looking to desaturate your colors. As a rule of thumb, if I'm not going into an Analogous color (a color that is next to to the one I was just using the Color Wheel), or just finished using a brown/neutral color, or even a color that might be more opaque than the one I want to use next (watercolors can be opaque, semi-opaque, translucent and semi-translucent), I make extra sure that all of the previous color has been washed out. Unless I actually want to desaturate or mute-out a color. If you're using grays, browns or neutrals, or Complementary Colors (opposites in the Color Wheel) in your painting, make sure to stay mindful throughout the process, as it's very easy for colors to mix together on your paper (especially if you're using lots of wet-on-wet), in your paint-mixing palette, and even in the bristles of your paintbrush! 5. Be careful when using Complementary Colors Complementary Colors are opposites in the Color Wheel and, when mixed together, they neutralize or mute each other out. You can use this to your advantage if this is what you want to do, but if your aim is to keep your colors super saturated, then you need to approach these color combos with some sort of strategy. Ask yourself: Depending on the effects that I'm going for, what area should I paint first, next and last? What techniques should I be using (wet-on-wet, wet-on-dry, etc.)? What areas should I stay extra mindful to allow to dry before adding more color on top or around it? Should I be placing these two colors next to each other at this point in the process? Remember that watercolor is always going to expand and bleed into paper that is wet. So if you don't want colors to intermix, you must allow them to dry completely. If it makes sense for the subject on hand and the style you're going for, consider darkening colors with an Analogous Color, if you want colors to remain very vivid. Remember, Analogous Colors are next to each other in the Color Wheel.
6. Avoid using ready-made blacks Though color ingredients vary from brand to brand, most ready-made blacks such as Lamp Black, Ivory Black, Mars Black, etc., tend to be very flat and usually dull-out colors. This is one of the reasons why so many traditionally trained watercolor artists don't use them and, instead, create their own dark color mixtures that have liveliness and a color temperature to them. It's also important to have in mind that blacks can really lead to stark, heavy looking marks or shapes that can be very distracting, and that there's actually very little pure black in nature. Even shadows have color and a temperature to them. There are tons of ways to create your own darks when using watercolor. I share many different dark color mixtures in this video over at my YouTube channel. If you do use a ready-made black, consider adding another color into it. You can also use Neutral Tint, Payne's Gray or Analogous Cours to darken a certain color. 7. Hold yourself back from overworking your paintings This is a tough one and something I'm working on as I continue on my journey with watercolor. Especially because I started painting with oils and acrylics, which usually require layering and going over the same area many times. When it comes to working with watercolor, I've realized that the less moving around of paint we do after its been placed and even the less amount of layers we have to develop, the better and the fresher the outcome tends to be. I've realized that visualizing the outcome we're after and approaching a new watercolor painting process with at least some sort of general plan is essential. This helps us lay down our washes and brush strokes more confidently and leave things be. Because, if we don't know what we're after or what we're doing, we're going to be hesitating and making lots of mistakes that we'll want to go in and fix. Mistakes and accidents always happen, but they're usually a lot smaller and can be made less noticeable more easily if we go in with a strategy and are staying mindful/patient. If you feel you need to practice a specific technique or do isolated studies of something before getting started with a more complete piece, do it! It'll help you attack a new painting a lot more confidently and with much more success. If you make a mistake, don't fret. Simply absorb excess water and paint with your absorbent towel or semi-dry paintbrush bristles and allow it to dry. Come back after the paper has regained its strength to see how you can make it less noticeable. *A small amount of moving around of our paint is okay, but avoid going over the same spot again, and again, and again!* 8. Allow your layers of paint to dry completely before applying another wash on top Like I said before, watercolor is always going to expand into paper that is wet. If the paper is very wet, the paint you place on top is going to expand more rapidly. If the paper is starting to dry, it'll expand more slowly. But it'll always feather out at least a bit depending on the level of moisture. There are varying degrees of wetness a paper can have when we're working with watercolor and, as we continue practicing, it'll become easier to tell when we should be dropping in our paint in order to achieve a certain level of gradating or blurring out. If we want our marks or the edges of our shapes to be clean and sharp, or if we don't want the previous colors we've placed to intermix with the ones we want to place on top, it's important to be patient and allow our painting (or at least that specific area) to dry completely. Always remember that, wet paper is fragile paper and we must allow it to regain its strength before attempting to add further detail or darken certain areas. 9. Avoid using opaque colors Watercolor paint can be opaque, semi-opaque, transparent and semi-transparent. Each individual color's characteristics vary, even within the same paint set, and this is one of the reasons why swatching out a new paint set is important. It's important to know that opaque colors tend to create color mixtures that get thicker and thicker, and murkier and murkier, which can lead to mud much more easily than using transparent colors. This doesn't mean that we can't use them (I use them all the time!), but it does mean that we have to use them carefully or, in many cases, on their own. Colors such as Cadmium Yellow, Cadmium Red, Cerulean Blue, Raw Umber and Yellow Ochre tend to have opaque qualities to them. You can never go wrong with testing out the different color mixtures you're planning on using on a scrap piece of watercolor paper before actually using them in your painting. 10. Make sure that you're cleaning out your paint mixing palette thoroughly and keep colors organized throughout the process This one's related to keeping your water and paintbrushes clean, and I just thought I'd add it in because it can be especially helpful for beginners. When we're watching videos in which expert watercolor artists are using a huge watercolor palette with a bunch of different colors that seem to be intermixing and they are freely taking their colors as they're painting, it's important to realize that they: a) Know the Color Wheel like the back of their hand b) Have mastered water control and know what to do to fix mistakes and c) Most likely than not, they've pre-selected and organized the specific colors they know and love using to create their very own color palette When we're just getting started it can seem like we should be approaching our painting process in that same way, with a large amount of colors and with a palette that *seems to be* out of control. It can be very frustrating when a beginner sees that, tries to replicate that, continues ending up with paintings that don't seem right, and has no idea what he/she is doing wrong. My advice? Learn about Color Theory, keep things practical and limited, and stay as organized as possible in the beginning so that you can continue practicing mindfully and, I promise, you'll get to that point a lot sooner! *Bonus Tip: Higher quality watercolor paint is going to lead to better results (better color payoff/more vibrancy/easier mixing of colors/etc.) and generally offers more information about each color such as its level of translucency, granulation, etc. Cheaper watercolors tend to be chalky and opaque, which lead to muddy colors. Find a list of my favorite watercolor supplies here.
4 Comments
7/19/2021 11:23:26 am
After being very stressed out this past year, my sister wants to work on a new hobby. Since she's always wanted to try watercolor painting, she wants to take an online course so she can improve her skills and have a hobby that relaxes her. Your tip for her to do isolated studies to practice your skills before working on a complete piece. I'll let her know so she can find a teacher that will help with this kind of practice will be helpful to her.
Reply
7/26/2021 10:32:56 am
Hi, Erika!
Reply
7/6/2022 04:05:04 pm
Happy to help, Suzie!
Reply
Leave a Reply. |

www.erikalancaster.com
is a participant in the Amazon Services LLC Associates Program, an affiliate advertising program designed to provide a means for sites to earn advertising fees by advertising and linking to amazon.com. www.erikalancaster.com is a participant in the Shareasale.com Affiliate Program, an affiliate advertising program designed to provide a means for sites to earn advertising fees by advertising and linking to Shareasale.com partner companies. |






 RSS Feed

