|
*This post contains affiliate links. I receive small commissions for purchases made through these links at no extra cost to you. These commissions help me keep this site up and running, in order for me to keep providing helpful and inspiring art content. :)
Eager to learn watercolor painting but confused as to where to start? Have you started on your journey with watercolor, but always experience frustration during your painting processes and/or end up disappointed with your results? Water and brush control are two basic skills that anyone looking to learn watercolor should focus on in the beginning. Why? Because without these two skills, it's going to be very difficult to succeed with pretty much any kind of painting you set out to work on, whether it's a completely abstract piece or something more realistic. My advice for beginners getting started with any new drawing or painting medium is to devote time to explore it without pressuring themselves to complete a full piece or to achieve perfection in any way. Get to know your medium. Do some research to understand what sets it apart from other drawing or painting mediums, and what the main things are that one should know about in order to create a piece that allows it to perform/"shine" to its full capabilities. In this video, I share the top things I wish I knew about watercolor when I was getting started, in which I share these main characteristics. Compare and contrast watercolor paintings with pieces created with opaque painting mediums such as acrylics or oils. Take notes. For example, when it comes to watercolor, we're meant to use the medium's translucency, in combination with the whiteness of the paper under the paint, to create depth and volume. *We don't even need white paint! Another thing that distinguishes watercolor from other painting mediums is the fact that we're working on paper as opposed to canvas, wood or other tougher substrates. And, while we're using paper that's intended for water-soluble mediums, it's still paper. Paper is much more fragile (especially in its wet state) and, thus, it's much more easily overworked/damaged. As opposed to the heaviness that opaque painting mediums can have, when we're working with watercolor, we're trying to achieve a lighter-looking outcome...a piece that seems to glow from within. When the medium's characteristics are taken into account as we're painting, and the basic "rules" are understood (which we can decide to break later), it's much more likely that we'll arrive at the results we're looking for. Aside from doing research and continuing to learn about these things, basic drills and exercises on brush strokes, as well as washes are essential in the beginning. This hands-on practice will help us tackle complete paintings with greater confidence and ease. This said, the following drills and exercises are very helpful, even for artists who're more advanced, as we have to get to know our brushes every time we invest in a new one. In the following watercolor tutorial video, I walk you step-by-step through the main brush strokes to practice as a beginner, as well as the three must-know washes. I'd recommend practicing these in a sketchbook that's intended for watercolor, or on accessibly priced (but quality) watercolor paper. Find a list of my favorite watercolor supplies here.
If you enjoyed this video and found it helpful, make sure to subscribe to my YouTube channel. I share a brand new video every week with art tips, drawing and painting tutorials and mindset/productivity tips for artists. *Subscribe HERE*
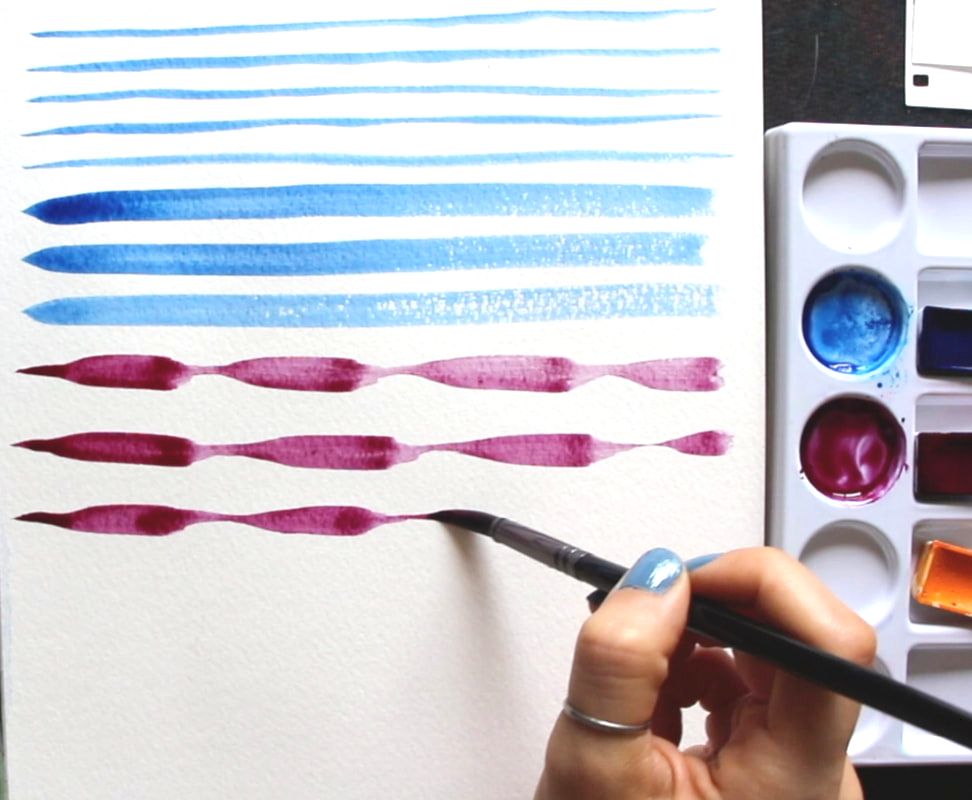
Basic Watercolor Brush Strokes*For these brush stroke exercises, I'd recommend using a medium-sized brush, whether it's a flat or a round (or both!). Something around a size 8-14 would do perfectly. Another suggestion that'll increase your practice is creating your strokes in different directions (horizontally, vertically, diagonally, etc.). 1. Thin Lines To create thin lines, touch just the tip of your paintbrush to your paper and drag from one edge of your paper to the other with one consistent, flowing brush stroke. Do your best to keep the thickness of your line as consistent as possible from start to finish. This means that only the tip of your paintbrush should be coming into contact with your paper from beginning to end. 2. Thick Lines To create thick lines, you'll have to press down the belly of your paintbrush to your paper. Just like with the thin lines, try to keep that pressure and the thickness of your lines consistent from start to finish. You'll likely notice dry brushing effects near the ends of your lines, as paint and water start running out from your bristles. Dry brushing is shown near the end (right) of my thick lines in the image below. You can see specks of white paper showing through, where my paint/water started running out and the color wasn't covering the paper as smoothly. 3. Thin-to-Thick Lines For thin-to-thick lines, the pressure you're exerting on your paintbrush changes as you move from one edge to the other. In other words, your arm is moving laterally, but you're simultaneously lifting and pressing, over and over. This creates variations in thickness throughout that line. The challenge is to always have at least a bit of contact with the paper from start to finish.
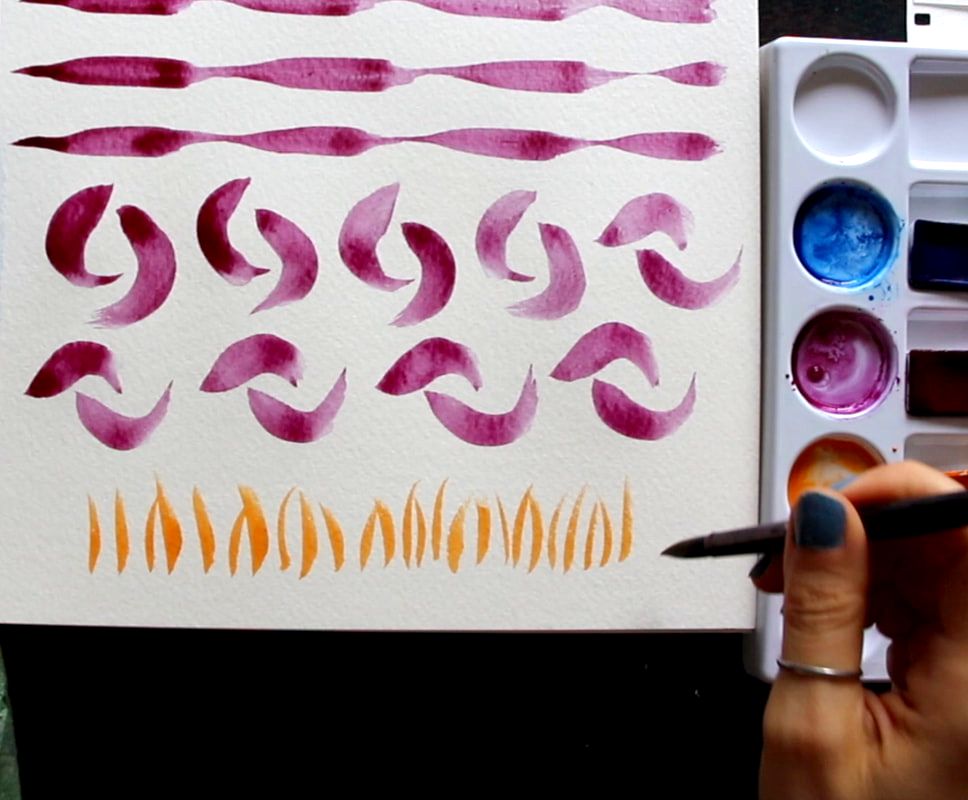
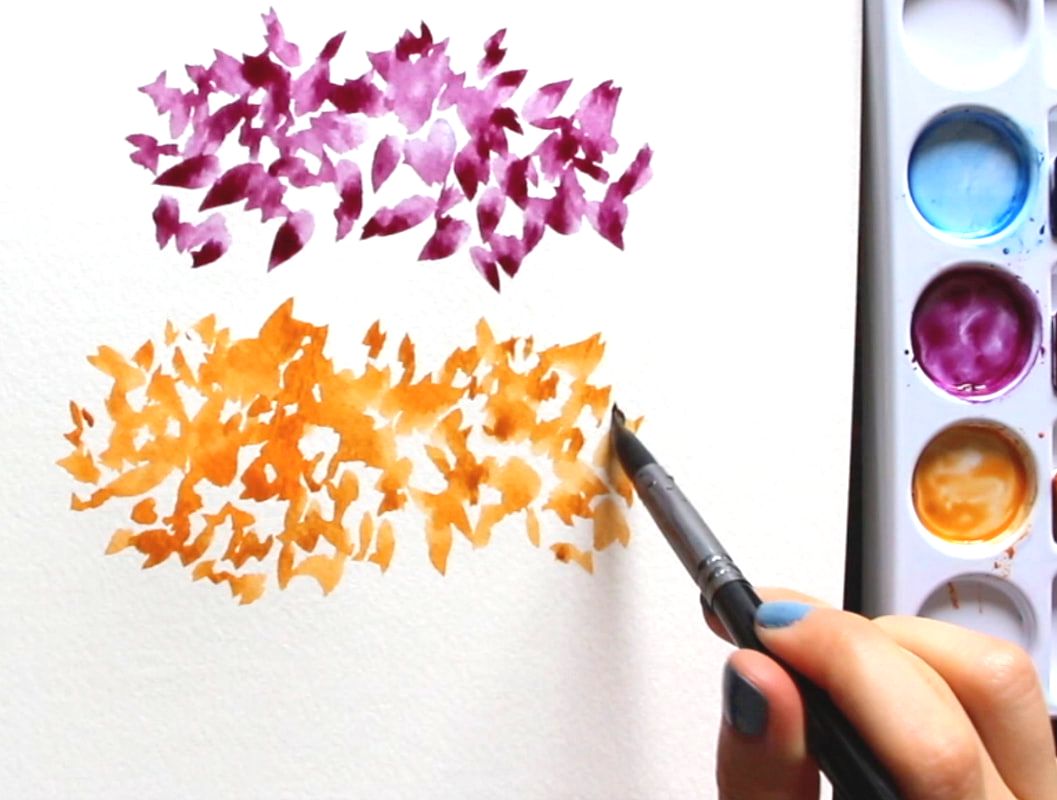
4. C-Strokes These are short, curved strokes that start out wider and taper at their tail ends. Essentially, you press down the belly of your brush at the top, and release that pressure as you move towards the end of that stroke, all the while drawing a curve or "c" shape. 5. Flicking For this one, you flick your wrist upwards (or in whichever direction you'd like) in one quick, short stroke. There's no need to press down your paintbrush bristles onto your paper very much at all, but at the end of the flicking motion, you do want to lift your bristles from your paper in order to have that tapered look at the end. You want the "base" or "root" of your stroke to have a slightly thicker look than the end. This brush stroke is very handy when adding grass to landscapes. 6. Bouncing I think of bouncing as a form of stamping. All you have to do after you've loaded up your paintbrush, is press down its bristles so that their entirety comes into contact with your paper, and lift. On and on. There is no dragging or lateral movement of any kind. Just press and lift, and press and lift. You can imagine how much of a difference it would make if I had used a flat brush instead of a round, as the "stamped" shapes would not look like water drops or leaves, but would be more boxy/angular. This one is great to create the illusion of leaves when painting nearby trees and plants. 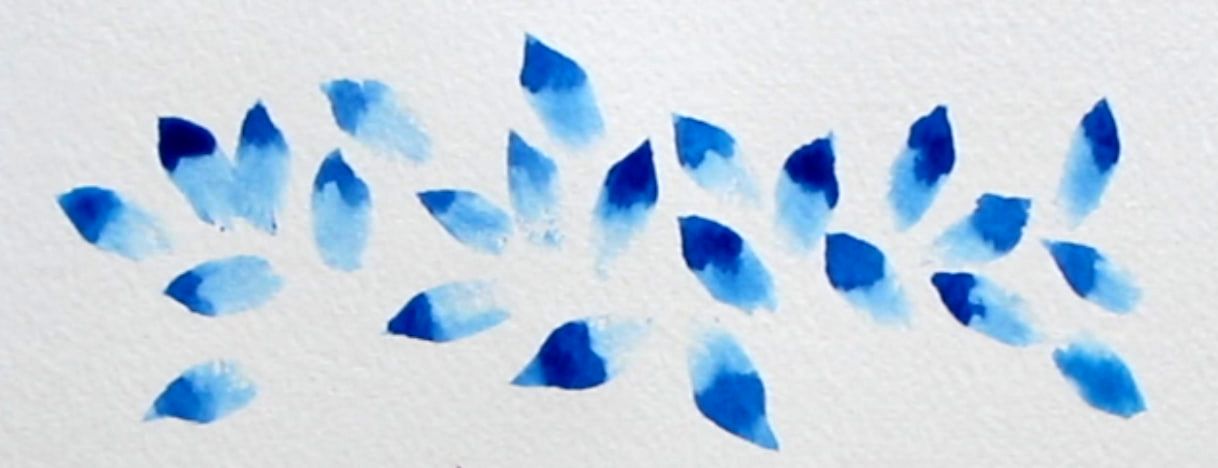
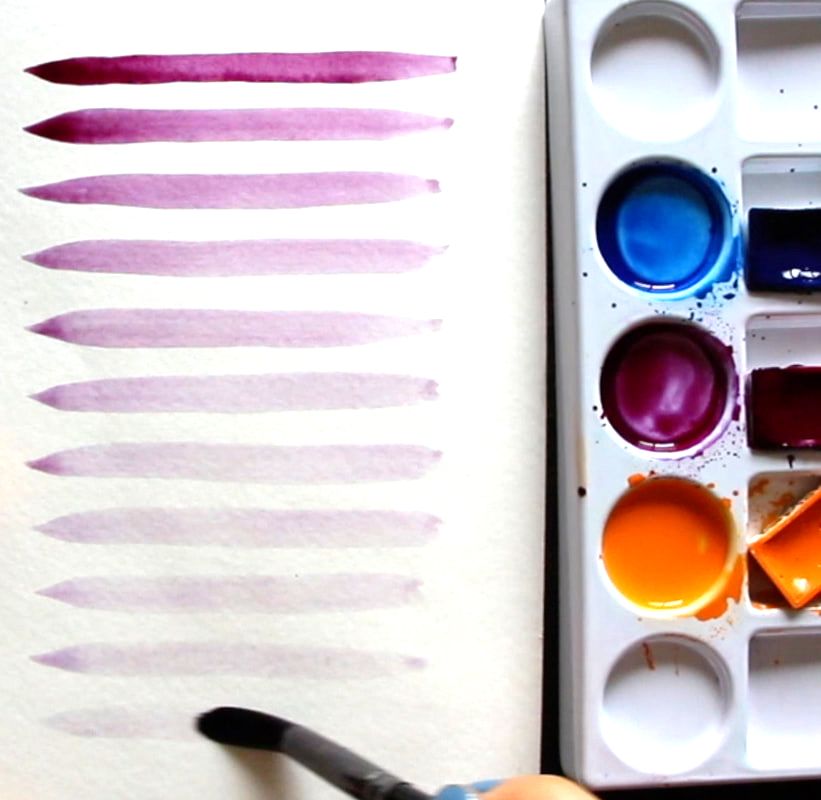
7. Scribbling To do scribbling (shown in orange in the image below), loosen up your wrist and really practice using your paintbrush in a variety of different ways. You're looking for irregularity all throughout (no organized patterns or perfect shapes) and this is created via shifting and changing the pressure you're exerting on your paintbrush, but also the angle you're using your paintbrush at (90°/45°/30° from your paper, etc.), and the direction you're painting towards. You're moving your paintbrush up and down, but also laterally in different ways. Curves and loops are also great. Just let your wrist go and embrace irregularity! 8. Scribbling + Bouncing This is a combination of both techniques which can be seen in the image below at the top (the magenta/purplish color). You'll notice some visible "stamped" leaf/drop shapes, while other shapes are more irregular in terms of their shape and size. This technique is also great for leaves of plants and trees. 9. Dark-to-Light Lines With one same load of your paintbrush, you start at the top by painting a line using the color at its most saturated (darkest) state. In between each line, you dip your paintbrush in your container of water 1-2 times, remove the excess water, and paint the next line. Then you dip your paintbrush in your container of water again, remove the excess water, paint the next line, and so on and so forth until you reach the bottom. This is a great exercise for water control and understanding translucency, as well as the wide range of values you can create with only one color. 3 Must-Know Watercolor Washes
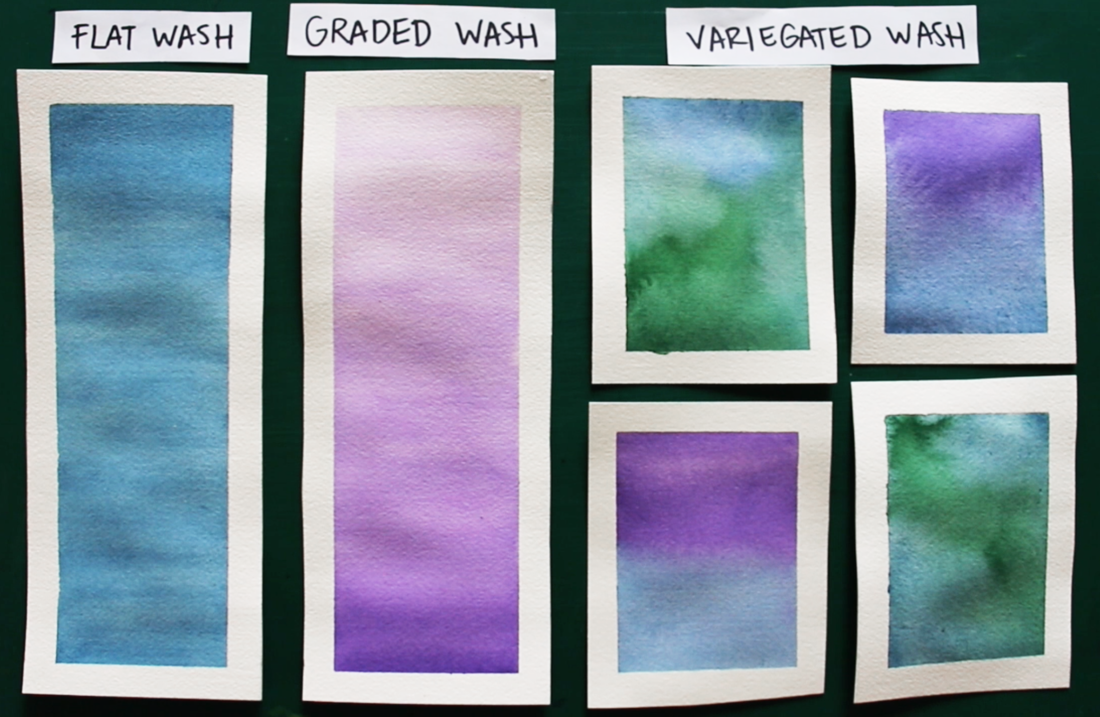
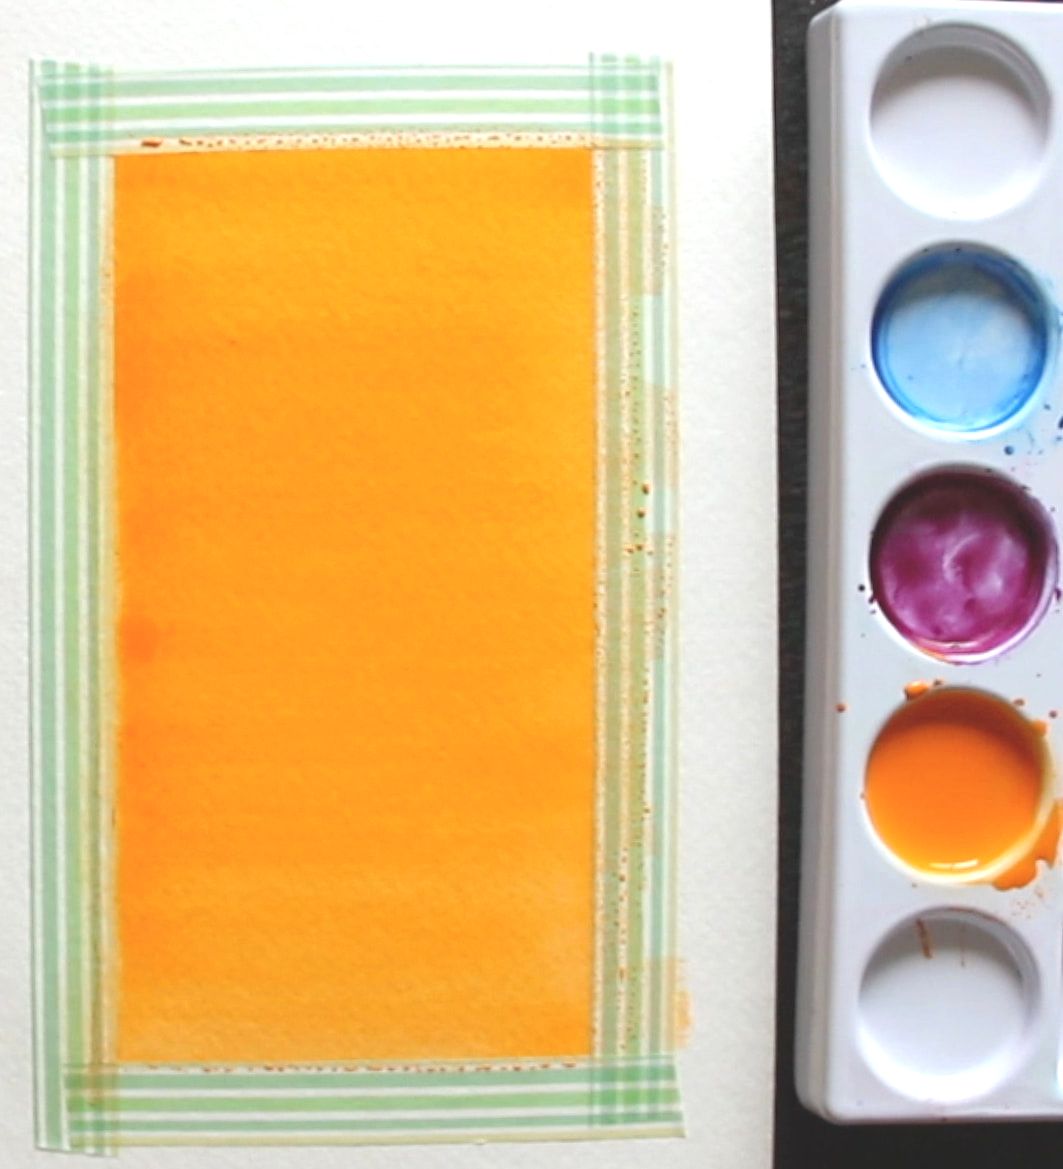
*For these watercolor wash exercises, I'd recommend larger sized brushes, whether a large round/mop or a flat brush. The larger the painting area, the larger the brush you'll want to use. These strips I prepared for myself were around 3 inches in width and 6 inches in height. I used a 3/4" flat brush. It's important to create enough juicy/saturated color mixtures for yourself on your color mixing palette and to work quickly as you're laying down that color. The less moving around of paint that you do after it's been placed on paper, the better. 1. Flat Wash The objective with the flat wash is to paint consistent/uniform color all throughout the shape. What's important to take into account with this one is that, as you're making your way down (or upwards or sideways), your color will start running out from your paintbrush bristles and it'll become lighter and lighter. How quickly this happens depends on the size of the space you're painting in, as well as the size of the paintbrush you're using. If the shape you're filling up with color is relatively small, and you're using a large brush, perhaps you'll make it through with just one load. On the other hand, if you're trying to fill a larger space, and are using a smaller brush, you're going to have to reload way more often. Keep your eye on the paper as you're filling that shape in and notice if/when the color is becoming weaker and, when it does, quickly load up your paintbrush with more paint and pick up where you left off before the paint that's on your paper starts to dry. 2. Graded Wash 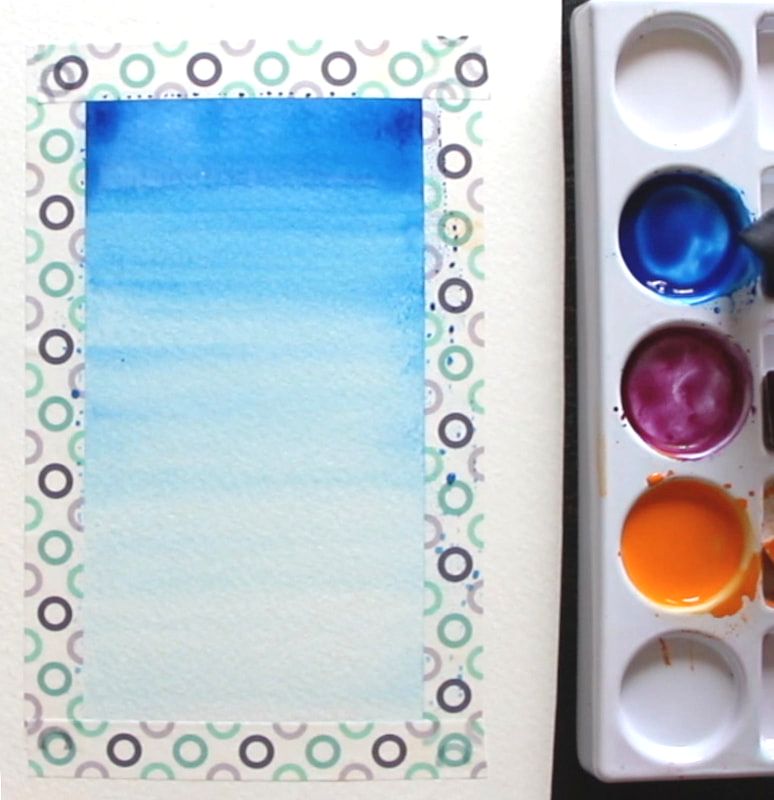
For the graded wash, you're looking for your color to become lighter (or darker) as you move up/down. You're looking for a gradual change in value/translucency of the color you're laying down. As opposed to the flat wash, you want your color to start running out from your paintbrush bristles so that it becomes weaker and weaker as you go. Keep your eye on your paper and, as your making your way down filling in that shape, make sure your color is becoming more translucent. If it's not, quickly dip your paintbrush in your container of water a couple of times, remove the excess water, and come back to pick up the edge of your shape where you left off. I usually have to dip my paintbrush in my container of water to weaken that color at least a couple of times throughout the process to ensure that, when I reach the end of that wash, my color will be at its most translucent. 3. Variegated Wash In a variegated wash, one color gradually turns into another color, which means we'll need at least a couple of different colors. I'd recommend getting started with colors that are Analogous (right next to each other) in the color wheel. By choosing Analogous colors, you'll ensure vibrant transition colors throughout the gradient you create. 
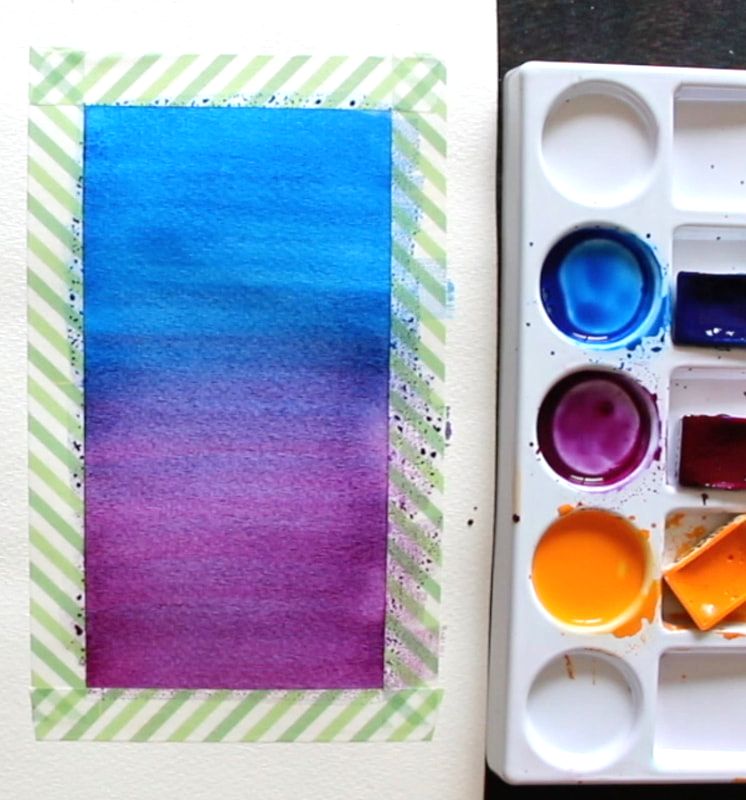
Complementary colors (opposites in the color wheel) mute each other out, and you can accidentally create muddiness or grays/browns in between, where your two colors merge together. To create a variegated wash, paint in a section of your shape with one of your colors and then remove all of that color from your paintbrush bristles, remove the excess water, load up your paintbrush with the next color and paint in the rest of the shape. In the video, I painted in the blue until I got around halfway down, I removed the blue from my paintbrush bristles, loaded up my paintbrush with purple and worked on the transitional gradient by overlapping this purple on top of the blue in the middle section. I then removed the blue-purple from my paintbrush bristles, reloaded with just purple, and finished that last third so that I would only have purple as I made my way towards the bottom. I hope this post was helpful and wish you lots of progress and enjoyment as you move forward in your journey with watercolor.
8 Comments
Paul Carroll
8/21/2021 03:07:30 pm
This is exactly what I needed write now. Thanks. A brilliant plain English summary of the basic techniques.
Reply
8/23/2021 10:23:28 am
Hey, Paul!
Reply
9/17/2021 09:08:58 am
Wow That’s a lot of tips. Thanks for wrangling them all!
Reply
10/18/2021 05:55:15 pm
Hey, there!
Reply
9/20/2021 03:27:47 am
Very Awesome tip & points and Help full blog. Its really helps me.
Reply
10/18/2021 05:55:48 pm
Hey, Darcy!
Reply
10/18/2021 05:56:41 pm
Hey, Lhynzie!
Reply
Leave a Reply. |
www.erikalancaster.com
is a participant in the Amazon Services LLC Associates Program, an affiliate advertising program designed to provide a means for sites to earn advertising fees by advertising and linking to amazon.com. www.erikalancaster.com is a participant in the Shareasale.com Affiliate Program, an affiliate advertising program designed to provide a means for sites to earn advertising fees by advertising and linking to Shareasale.com partner companies. |






 RSS Feed

