*This post contains affiliate links. I receive small commissions for purchases made through these links at no extra cost to you. These commissions help me keep this site up and running, in order for me to keep providing helpful and inspiring art content. :)
What are the main things I need to know in order to achieve realistic results when drawing hair? How can I break drawing hair down into simple steps to follow? There's no denying it. Achieving realistic results when drawing (or painting) takes great skill and patience. And for those of us who love drawing portraits and animals, knowing how to add hair texture in a believable way is important! I'm very excited to share a super helpful, step-by-step tutorial with you that the extremely talented Austrian artist/illustrator Sabrina Hassler prepared for us. Today, she'll be spilling the beans on her method for adding beautiful (and very realistic) hair to her graphite portraits! It takes only a quick look into Sabrina's website and social media to know that she's the real-deal when it comes to realistic drawing. She loves drawing portraits, animals and botanicals and, just like me, she has a passion for sharing her knowledge with other creatives who are looking to progress their skills. Without any further ado, let's get into her tutorial!
|
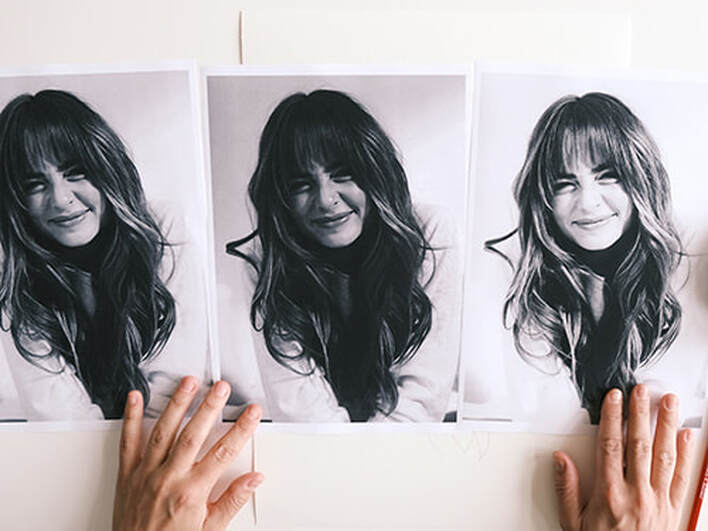
Print out your reference photo several times.
Print out the original photo on regular printing paper once (preferably in grayscale/black and white if you draw with pencils).
Other copies should ideally be a little lighter and a little darker than the original. You can make small brightness adjustments using any photo editing software.
Why do you need lighter and darker copies?
In the lighter copy you'll be able to see dark areas in more detail and in the darker copy the highlights will stand out even more. This will help you to create a high level of contrast between lights and darks later on, which is important for realism.
You’ll also need an extra copy to draw in some helpful guidelines.
Link to my reference photo.
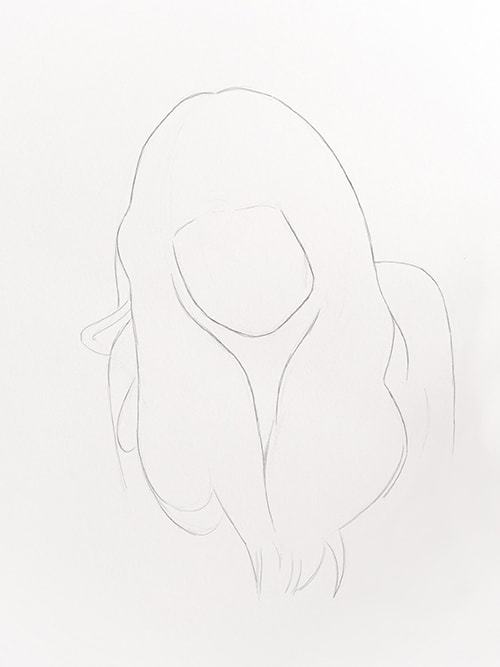
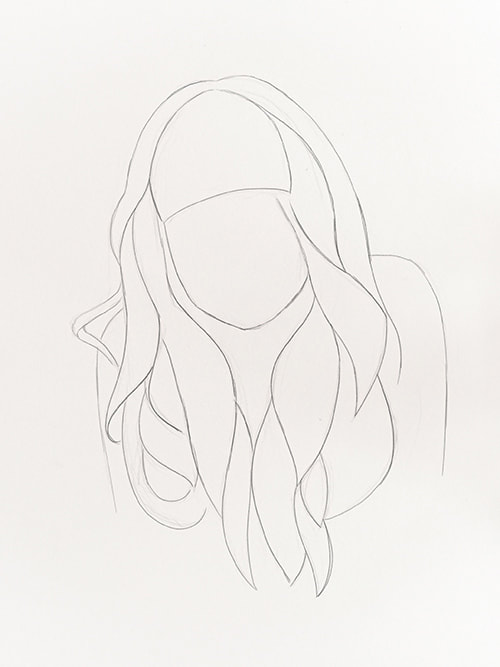
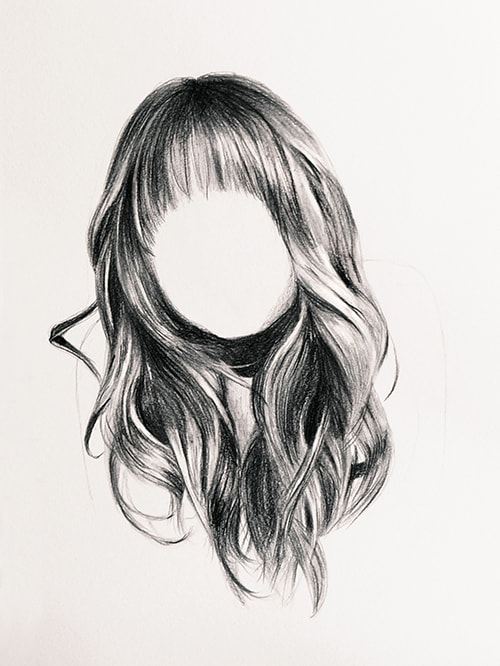
1. Draw basic outlines
To begin, carefully draw the outlines of the head, neck and hair on your drawing paper. Use a harder pencil grade (for example H or HB) and make sure not to press down too hard on your paper as you're creating your sketch.
In the beginning it’s completely normal to make mistakes and you’ll often have to fix something. That’s why your strokes shouldn’t be too dark, so they're easily erasable.
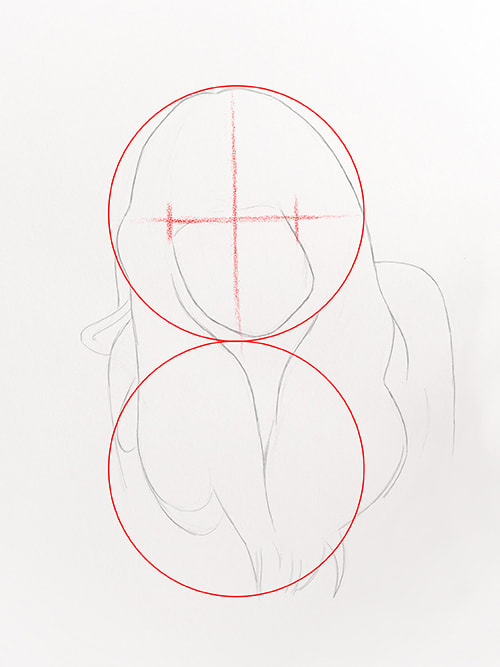
If you have trouble getting the proportions right, try breaking down your subject/reference into simple shapes (such as circles and rectangles). It also helps me to draw guidelines, for example along the central axis of the face (from forehead to nose to chin).
In this example you can draw a circle for the head (chin to top of the head) and then draw an identical circle beneath it, to get an idea where the hair
ends.
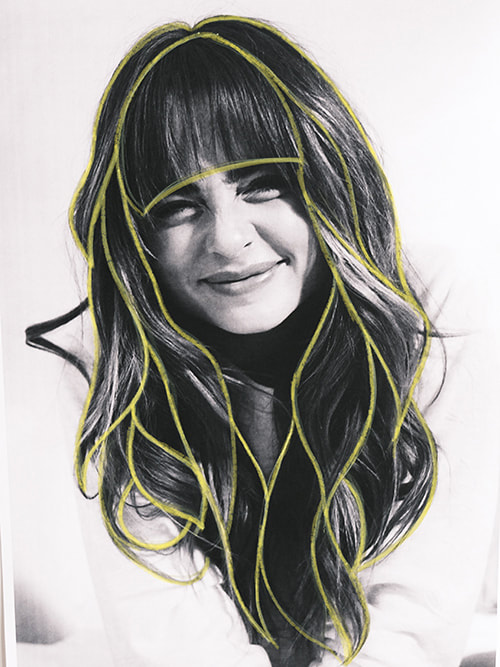
2. Analyze shapes
It's time to analyze the separate strands of hair. To do this, take your extra copies of the reference photo and try to recognize abstract shapes throughout the hair.
Draw these abstract shapes with a pen or drawing tool that you'll be able to see clearly on your photo. I used a yellow acrylic pen in the example below.
Once you have divided the hair into shapes, transfer these shapes onto your sketch, once again, without pressing too hard.
Reference photo with shapes:
Outline sketch:
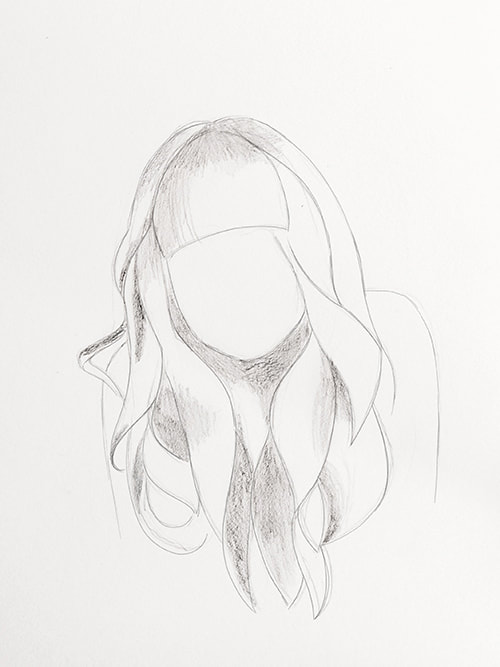
3. Start shading
The next step is very basic shading.
I'd recommend using a softer pencil grade such as B or 2B, and shade the darkest areas on your sketch where least amount of light reaches the hair.
Mostly the areas around the neck and on the parting are very dark. Start there.
Take a look at your lighter copy of the reference photo and detect the areas where the image is darkest.
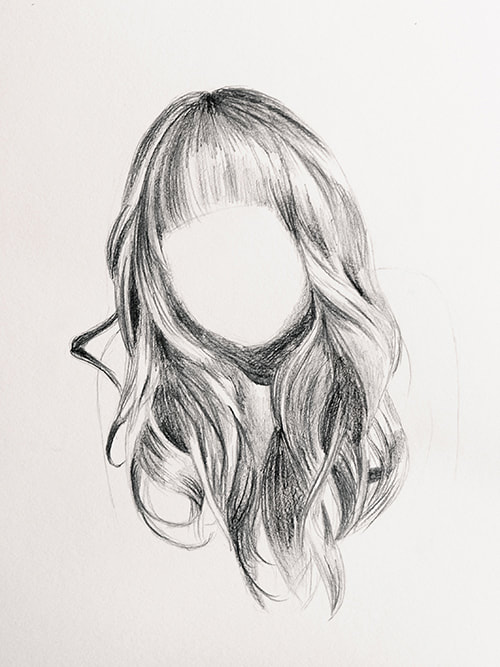
4. Sculpting
Next, give your hair more volume and three-dimensional form by adding individual hair strands inside of those basic shapes you created.
By dividing the strands into shapes (step 2), this process is much easier for you and you can work your way over the head one strand at a time.
Make sure that your strokes flow in the same direction as the hair naturally grows. Constantly observe your reference photo for clues.
Try to leave the bright spots (highlights) free of graphite and concentrate on the dark tones and midtones.
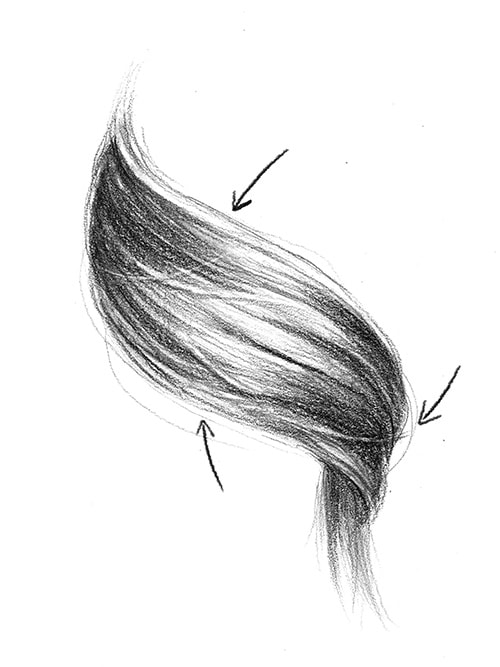
*Tips and techniques to give hair a 3D look
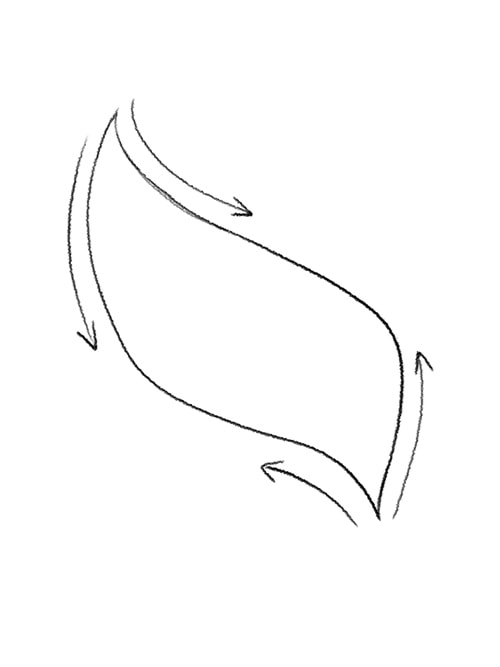
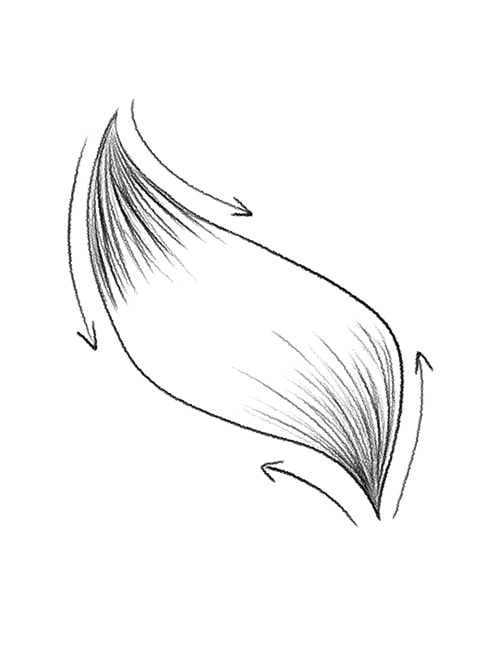
In the sketch below, you can see how you can shade in a single lock of hair.
Always draw your lines from the ends of that strand, going in (see arrow direction) so that your strokes end gradually in the widest area in the center. In other words, those pencil strokes are going towards the direction of the highlight in that strand of hair.
The hair usually shines most in the middle of the strand because this part protrudes outwards most and thus captures the most light.
Therefore, it's helpful to work from the ends towards the middle section, and not fill in the area in the middle with as much graphite, as this will be the lightest part.
Your focus should be more on the overall shape of the strand, and not on the individual hairs.
The more lines you draw, the darker everything will look. This creates more contrast with the lighter (empty) areas in the middle and this will make your stand look three-dimensional and shiny.
One lock of hair:
5. Smooth things out
The next step is a suggestion and not a requirement. It mostly depends on the overall look or result you'd like to achieve.
I think it makes a big difference to smooth out the transitions between values (lights, midtones and darks), and to soften out individual lines. I like using a paper bending stump for this part of the process, but you can also use a cotton swab.
Carefully (and gently) trace over your previous pencil strokes and let the flow of the hair guide you.
Try your best to not go over areas of lighter values/highlights. It often happens that I accidentally smear something or bring graphite into areas that I wanted to leave very light.
But don't worry, if this happens! We will correct this in the next step.
6. Pull out highlights
Next, take your pen-style/barrel eraser (or a pointed-shaped kneaded eraser) and erase the highlights (i.e. the shiny spots that reflect the light the most).
Most of the time I accidentally smudge these shiny spots with my blending stump in the previous step, so I have to pull them back out by erasing the graphite.
Observe your darker copy. There, you'll be able to notice lighter areas even more distinctly.
A pen-style eraser is perfect for this because it provides a lot of precision and you can even erase individual hairs.
7. Add contrast
By this point, your drawing will probably already look pretty good, but you shouldn’t stop there!
Using a black colored pencil, darken the darkest areas of your drawing again, using the same strokes/direction/overall motion that you were previously using with your pencil.
Colored pencils provide a more opaque/less shiny finish than regular pencils and will help add more depth and contrast, making your drawing look even more realistic.
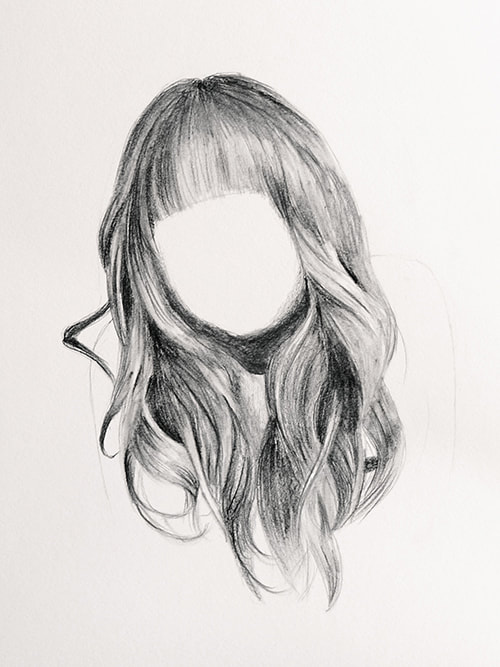
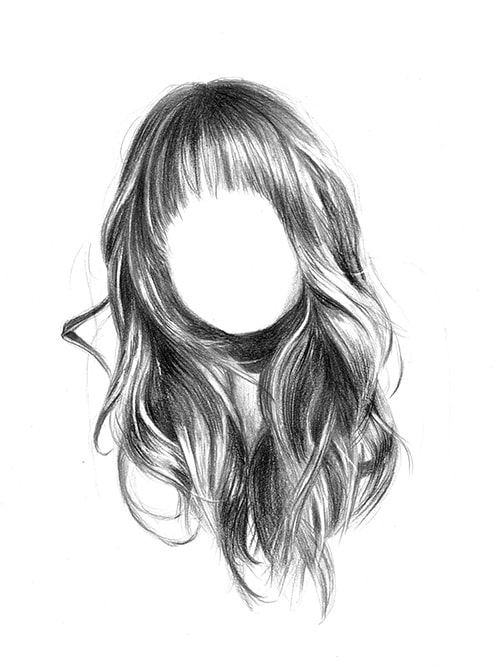
8. Final details
The last step will really make your drawing stand out. If you want your drawing to look natural, you should also invest some time adding the final details.
By that I mean details such as smaller hairs that don’t follow the general flow of the hair, such as flyaways, stray hairs, and all the small imperfections that make hair look "real". These can be added around the head or even over the face.
You can draw a few flyaways on the outside of the head with a hard pencil grade. Flyaways are usually very thin and hardly recognizable from a distance. The pen-style eraser is suitable for drawing individual hairs over the main hair areas. Use it to erase small lines over larger, dark areas to add in a flyaway hair.
Take a close look at your reference photo and decide for yourself which details you would like to draw in and which make the hairstyle unique.
You can also add some details from your imagination, if you want to achieve a messy look for instance.
Finished drawing:
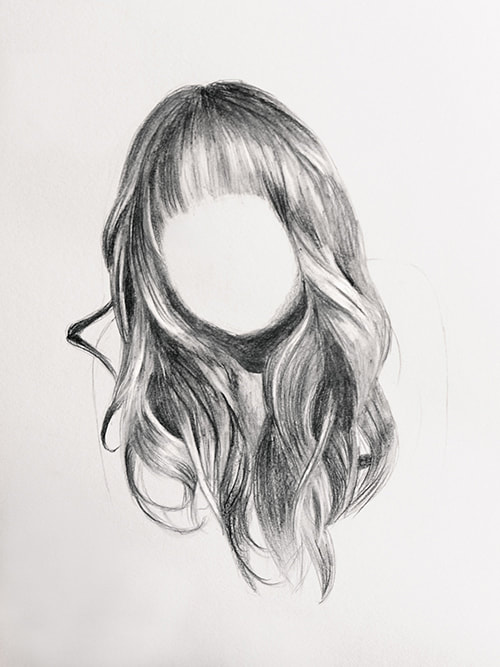
*Final tip: Adding details
In the image above, you can see examples of “imperfections” such as flyaways and stray hairs in greater detail. Some single hairs also cast their own shadow on the hair underneath.
Avoid dark ends in hairs by releasing the pressure on the pencil at the end of your stroke. Try to get your hairs darker at the roots and remember to create a line weight variation within your lines (from thick to thin/dark to light), instead of having one continuous line weight from one end to the other.
Never forget to draw your lines in a dynamic motion so they don’t end up being wobbly. If you move your hand in a fast and confident way, you will achieve a great look!
I hope that these tips will help you to draw complex and believable hairstyles and that from now on drawing hair will be much more enjoyable for you.
Drawing hair is a great way to practice our shading skills and advance out ability to draw different textures. Not to mention, we're also able to progress out observational skills via analyzing complex references.
Once you understand the basic principle, you can let your imagination go wild and draw interesting hairstyles or fur.
I would be happy to hear from your experiences - you can contact me here.

|
Sabrina Hassler is an Austrian artist and illustrator specializing in portraits, animals and botanicals. Follow her on social media: And visit her website here. |

Was this an amazing tutorial or what?
I certainly learned a lot of things that I'll be putting into practice when drawing hair realistically, and I hope you did too.
For more helpful tips and tutorials from Sabrina, check out her blog.
Sending out a huge thank you to Sabrina for this incredibly helpful tutorial!
Cheers!

Thank you so Erika, you make it look so easy. Can't wait to give this a go :)
All the best and stay safe.
Hi, Sue! Thanks so much for checking this one out!
This tutorial was actually created by guest artist, Sabrina Hassler. Isn't the tutorial amazing? :)
You can check out more of her helpful content at her website: https://blog.sabrillu.com/en/tutorials-page/
Glad you liked it! Have a lovely week ahead.
im bad at drawing lol
We all start somewhere. :)
I wasn't good at all in the beginning either, but it's all a matter of consistent practice!
Don't give up! Thanks for reading.
Your welcome!😁😄😀
I appreciate your skills and style in elaborating on the topic. It bound the reader for long. I have liked everything that I have read in the article so far. Nice content.
Hi, there!
Thanks for checking this one out.
Glad you're liking the content I share.
Have a great day!
Thank you for this! It really helped me as a beginner.
Hi, Mia!
Glad it was helpful. :)
Thanks for reading and have a lovely day!
I appreciate your skills and style in developing the theme. Tied to the reader for a long time. I have liked everything I have read in the article so far. Good content
Thanks for checking this one out, Laura!
Glad you enjoyed it. :)
Have a great day!
Hola muchas gracias por compartir
¡Hola Angel!
Gracias por checar el artículo y dejar tu comentario.
Te deseo muy buen día. :)
I loved this. I own i museum in minneapolis. you should check it out sometime.
Hi, Eliana!
Thanks so much for checking this one out. Glad you enjoyed it and hope that I'm able to visit Minneapolis at some point in the future.
Take good care!
When I tried to draw the lines using a black color pencil, the lines stood out a bit.I tried to fix it but it still stands out
Hi, Nala!
I'm so happy to hear that you gave this hair drawing tutorial a go. :)
Make sure that you're making your way incrementally/gradually towards darkest dark areas, don't press down your pencils on your paper too hard and that you have midtones around your darkest areas so that those lines don't pop out too much. If you have a lot of lights around a very dark line, it's going to look very stark because of the contrast created.
Hope this helps! Have a good one.
This was such a great tutorial. I actually tried it and it turned out better than I thought it would be.
Thanks a lot 🤗🤗🤗
Hey, there!
Glad you enjoyed this one and that it was helpful.
Wish you tons of progress and enjoyment in your art journey.
Thanks for reading and leaving a comment! :)
I'm 12 years old and my friend draw like a pro,I would always try to make good drawings but fail,but then I stumbled on this tutorial and it helped me draw like a pro help me draw like a pro.Thank you so much Erika!
Hey, there!
Thanks so much for checking this one out and taking time to leave a comment. :)
Glad to hear it was helpful.
Wish you a lovely day.
こんにちはエリカ、このチュートリアルに感謝します。これは、私が以前に描くのが苦手だったすべてのチュートリアルを見た後、私が良くなるのを助けました!そして今、クラスで最高の引き出しを! :))
Hi Erica, thanks for this tutorial. This helped me get better after seeing all the tutorials I wasn't good at drawing before! And now Im the best drawer in my class! :))
Hey, there!
Thanks so much for reading and leaving a comment. :)
Glad to hear this tutorial was helpful!
Wish you a lovely week and take good care.
Hey, there!
Glad to hear the post was helpful. :)
Don't give up! I've been on my art journey for many years and have been able to develop my drawing and painting skills quite a bit, and even at this point, sometimes I have to work on a piece two or three times before I actually like the results.
It's a never-ending learning journey. If you don't give up, you'll see improvement!
Hey, there!
Thanks so much for checking out this post. I'm glad it was helpful!
Wish you tons of progress and enjoyment in your art journey.
Have a lovely day. :)
Hey, there!
Thanks so much for reading. Glad it was helpful!
Have a lovely day.
Hi, Ajay!
Thanks for reading.
Glad it was helpful.
Have a great day!
Great tutorial! These 8 steps make drawing realistic hair seem much more approachable. I appreciate the detailed explanations and helpful tips. Looking forward to trying this out in my own artwork. Thanks for sharing!
Best regards,
Tristian
Hey, there!
Thanks so much for reading.
Glad this one was helpful.
Enjoy your art practice!
Erika
I really liked this content, you helped me a lot. thank you.
I really like this content and you are very helpful and valuable to me
Thanks so much for reading.
I'm glad this one was helpful.
Enjoy your art practice!
Leave a Reply.


is a participant in the Amazon Services LLC Associates Program, an affiliate advertising program designed to provide a means for sites
to earn advertising fees by advertising and linking to amazon.com.
www.erikalancaster.com
is a participant in the Shareasale.com Affiliate Program, an affiliate advertising program designed to provide a means for sites to earn advertising fees by advertising and linking to Shareasale.com partner companies.
 RSS Feed
